String concatenation technique is used quite frequently when we are dealing with legacy systems. Sometimes, we need to add a specific delimiter after every column / expression while concatenating multiple columns / expressions. Earlier, we used multiple functions to achieve it and I have written a detailed article about it earlier.
In SQL Server 2017, a new function shipped namely CONCAT_WS() and you can easily achieve the above mentioned scenario by using CONCAT_WS() function. The database compatibility level MUST be 140 or higher to use this function.
Let me create a sample to demonstrate the functionality of CONCAT_WS() function.
Sample:
USE TEST_DB
GO

CREATE TABLE Employees(
EmployeeID INT IDENTITY(1,1),
EmployeeName VARCHAR(100),
PrimaryEmail VARCHAR(100),
SecondaryEmail VARCHAR(100),
AlternateEmail VARCHAR(100)
);
GO

INSERT INTO Employees
(EmployeeName, PrimaryEmail, SecondaryEmail, AlternateEmail)
VALUES
 ('Davolio Nancy', 'Davolio2@gmail.com', 'Davolio_Nancy@gmail.com', 'Nancy99@hotmail.com')
,('Fuller Andrew', 'Fuller_12@gmail.com', 'Andrew_f99@gmail.com', 'Andrew_f9@hotmail.com')
,('Leverling Janet', 'Leverling_42@gmail.com', 'j.Leverling_2@gmail.com', 'Janet_Leverling@hotmail.com')
,('Peacock Margaret', 'Peacock@gmail.com', 'Peacock_12@gmail.com', 'Margaret_Peacock@hotmail.com')
GO

SELECT * FROM Employees;
GO
--OUTPUT
Example 1: Concatenate multiple columns & applied semi-colon (;) as a delimiterin between:
Old approach using add (+) operator:
In the old approach, when we need to concatenate two or more than two columns using Add (+) operator, we need to manually take care of the concatenation and add delimiter (separator) between columns as shown in the example. This approach was used earlier than SQL Server 2017.
USE TEST_DB
GO

SELECT [EmployeeName]
    , ([PrimaryEmail]+';'+[SecondaryEmail]+';'+[AlternateEmail]) AS [AllEmails]
FROM [Employees];
GO
--OUTPUT
New approach using CONCAT_WS() function:
In the new approach, we just need to use CONCAT_WS() function and it will take care of everything as shown below. It also reduces the complexity of the query since we need to apply delimiter once and the function repeats it automatically, as shown below.
Example 2: Concatenate multiple columns & applied space as a delimiterin between:
Old approach using add (+) operator:
In this example, we need to use add (+) operator and apply space as a delimiter multiple times in between the columns as shown below.
New Approachusing CONCAT_WS() funcation :
In this example, we just need to use CONCAT_WS() function with space delimiter at once and it will be applied automatically after each column by the function itself.
I found CONCAT_WS() function very much useful when concatenating multiple columns / expressions with delimiter. Let me know if you use this function and how did you find it.
Sometimes, we need to concatenate multiple fields to make a consolidated field. These fields may have same data type or multiple data types as well. In the past, we used multiple functions like ISNULL, CONVERT, CAST and used an Add (+) operator to concatenate it.
Now, we have a smart function called CONCAT() to achieve above mentioned scenario easily. This function is intelligent enough that to combine data of single / multiple data types. It converts all the data types to string before joining them together.
Let me show you some examples using old / new approaches.
Example 1: Concatenate multiple columns having NULL values
Old Approach Using Add (+) Operator
In old approach, we simply apply add(+) operator to combine multiple fields as shown below.
USE Northwind
GO

SELECT [CompanyName]
     , [Address]
	 , [City]
	 , [Region]
	 , [Address] + ' ' + [City] + ' ' + [Region] AS [FullAddress]
FROM [dbo].[Suppliers];
GO
--OUTPUT
As you can see above, if one of the columns is having NULL value, which you are trying to concatenate, then result will be NULL regardless of which field has value or not.
To resolve NULL issue, we need to use ISNULL function to replace NULL values with empty space and ISNULL should be applied to all columns which we are trying to concatenate, since most of the time, we may not know which column may have NULL values, as shown below.
USE Northwind
GO

SELECT [CompanyName]
     , [Address]
	 , [City]
	 , [Region]
	 , ISNULL([Address],'') + ' ' + ISNULL([City],'') + ' ' + ISNULL([Region],'') AS [FullAddress]
FROM [dbo].[Suppliers];
GO
--OUTPUT
New Approach Using CONCAT() Function :
Now, we have seen in earlier approach that how much effort required to concatenate fields. In the new approach, we just need to use a single function which is called CONCAT()function. This function allows us to concatenate multiple columns (varchar, int, datetime etc.) easily as shown in the example below.
USE Northwind
GO

SELECT [CompanyName]
     , [Address]
	 , [City]
	 , [Region]
	 , CONCAT([Address],' ',[City],' ',[Region]) AS [FullAddress]
FROM [dbo].[Suppliers];
GO
--OUTPUT
Example 2: Concatenate multiple columns having different data types
Old Approach Using Add (+) Operator
Let’s concatenate multiple data types column using Add (+) operator as shown below but it generates the error since you cannot combine different data types of columns with Add (+) operator, how we were handling such cases earlier.
USE Northwind
GO

SELECT [SupplierID]
     , [ContactName]
	 , [SupplierID] + ' ' + [ContactName] AS [SupplierID&Name]
FROM  [dbo].[Suppliers];
GO
--OUTPUT
In order to resolve this error, we need to use the CONVERT() function which will convert the int value to nvarchar datatype to make it same data type (string) for both columns and then concatenate it as shown below:
USE Northwind
GO

SELECT [SupplierID]
     , [ContactName]
	 , CONVERT(NVARCHAR(50)
	 , [SupplierID]) + ' ' + [ContactName] AS [SupplierID&Name]
FROM   [dbo].[Suppliers];
GO
--OUTPUT
New Approach Using CONCAT() function:
As we can see many hurdles and complexity in the old approach, in new approcah we need to simply apply CONCAT() function where it itself converts all columns data type to string and then concatenate it and retrun string as an output, as described in below example.
USE Northwind
GO

SELECT [SupplierID]
     , [ContactName]
	 , CONCAT([SupplierID],' ',[ContactName]) AS [SupplierId&Name]
FROM   [dbo].[Suppliers];
GO
--OUTPUT
Conclusion:
I used CONCAT() function multiple times and found out extremly useful since it automatically handles NULL cases, different data type cases etc. If you use this function, do let me know your experience.
Splitting string in SQL Server was always challenging, we need to create a complex user defined function, using multiple SQL Server built in functions in order to achieve it. I have written an article back in 2012 regarding this. In SQL Server 2016, splitting string became so easy, SQL Server introduced a function to split string namely STRING_SPLIT(), it requires the compatibility level to be at least 130.
Let me create a sample to demonstrate STRING_SPLIT() functionality. In given below sample, I have multiple email addresses separated by a semicolon delimiter against each employee as shown below.
Sample :
USE tempdb
GO

CREATE TABLE #Employee
(
 EmployeeID     INT IDENTITY(1,1),
 EmployeeName   VARCHAR(100),
 EmailAddresses VARCHAR(500)
);
GO

INSERT INTO #Employee(EmployeeName, EmailAddresses)
VALUES
('John', 'John_1@gmail.com;John_2@gmail.com;John_3@hotmail.com'),
('Sarah', 'Sarah_1@gmail.com;Sarah_2@hotmail.com;Sarah_1@gmail.com'),
('Aaron', 'aaron_1@gmail@com;aaron_2@hotmail.com'),
('Ackerman', 'ackerman_1@gmail.com;ackerman_2@hotmail.com');
GO

SELECT * FROM #Employee
GO
--OUTPUT
Now sample is ready, let’s apply STRING_SPLIT() function to see how it works and how easy it is to implement it.
Example 1:
Given below is an example where I used sample created above and split email addresses based on delimiter using STRING_SPLIT() function.
USE tempdb
GO

SELECT EmployeeID
     , EmployeeName
     , value AS EmailAddress
FROM  #Employee
CROSS APPLY
STRING_SPLIT(EmailAddresses,';')
GO
--OUTPUT
In above records, we have successfully split email addresses and now we have one email address per row. In the above records, though we have successfully split email addresses, still we have duplicate email (Sarah_1@gmail.com) in email address column.
Let’s fix duplicate issue in below example.
Example 2: Removal of duplicate data
In order to remove duplicate email address, we need to use GROUP BY function along with STRING_SPLIT() function in the given below example.
USE tempdb
GO

SELECT EmployeeID
     , EmployeeName
     , value AS EmailAddress
FROM  #Employee
CROSS APPLY STRING_SPLIT(EmailAddresses,';')
GROUP BY EmployeeID
       , EmployeeName
       , value;
GO
--OUTPUT
As you can see above, duplication in email address column has been removed.
Conclusion:
I found STRING_SPLIT() function very useful and we can easily split string without even writing a lot of scripts. You can also implement it wherever it is required without any complexity. Do let me know if you face any issues.
To test any functionality in SQL Server, we need sample databases to test different scenarios. Few of the sample databases are already available as shown below and you can download and use for FREE.
Sometimes, we need a customized sample table to test one of the SQL Server features. In such cases, above mentioned sample databases are not enough. So we need to create our own test table with some data too. Since there was no proper function available to generate a sample table in earlier version of SQL Server (before 2022), we used CAST(), RAND() and many other functions to achieve it somehow.
In SQL Server 2022, a new function came called GENERATE_SERIES(), which was a long awaited function. One of the usages of this function is that it can easily generate sample table having as much data as we want.
Compatibility Level:
Your database compatibility level MUST be 160 or higher to use this function. Given below is the query to change your database compatibility level.
ALTER DATABASE tempdb SET COMPATIBILITY_LEVEL = 160
Let me show you in the below example, how can we use GENERATE_SERIES() function to generate sample table in SQL Server 2022.
Example :
USE tempdb
GO

CREATE TABLE [Customers]
(
 [CustomerID]         INT,
 [CustomerName]       VARCHAR(250),
 [RegistrationDate]   DATE,
 [EmailAddress]       VARCHAR(100),
 [Address]            VARCHAR(500),
 [PhoneNumber]        VARCHAR(100),
 [DiscountPercentage] NUMERIC(18,6)
);
GO

DECLARE @Start INT = 1;    --Starting point of the record
DECLARE @Stop  INT = 1000; --Ending point of the record

INSERT INTO [Customers]
(
 [CustomerID],
 [CustomerName],
 [RegistrationDate],
 [EmailAddress],
 [Address],
 [PhoneNumber],
 [DiscountPercentage]
)

SELECT
  value                                           AS [CustomerID]
, CONCAT('John',' - ',value)                      AS [CustomerName]
, DATEADD(day,value,'1753-01-01')                 AS [RegistrationDate]
, CONCAT('John',value,'@raresql.com')             AS [EmailAddress]
, CONCAT(value,' N. 10th Street')                 AS [Address]
, '1 (11) '+ RIGHT(CONCAT('0000000000',value),11) AS [PhoneNumber]
, CONVERT(NUMERIC(18,6),value)/@Stop              AS [DiscountPercentage]

FROM GENERATE_SERIES(@Start,@Stop);
GO

SELECT * FROM [Customers];
GO
--OUTPUT
Clean Up:
In order to clean up the table, we need to drop it as shown below.
USE DATABASE tempdb
GO

DROP Table [Customers];
GO
Conclusion:
I used GENERATE_SERIES() function to generate the sample table and I noticed that it has reduced a lot of complexity in creating sample table, compared to earlier approach. Do let me know if you have generated sample table and what was the approach.
Deploying SQL scripts from staging server to production server was always a nightmare, if not handled properly. I remember, we used to keep scripts in a respective folder and number them in order not to miss any scripts for the deployment, as you know that if a single script is missed from deployment, it is a BOOM.
SQL Server Schema compare extension is one of the best extensions in Azure Data Studio when it comes to comparing & deploying SQL script changes from staging to production database. In other words, you can compare and deploy scripts between any two databases. This extension reduced SQL script migration effort from days to just few minutes only.
Let me create development & production databases’ scripts to demonstrate the functionality of SQL Server Schema compare extension in detail.
Sample Databases: (Development & Production)
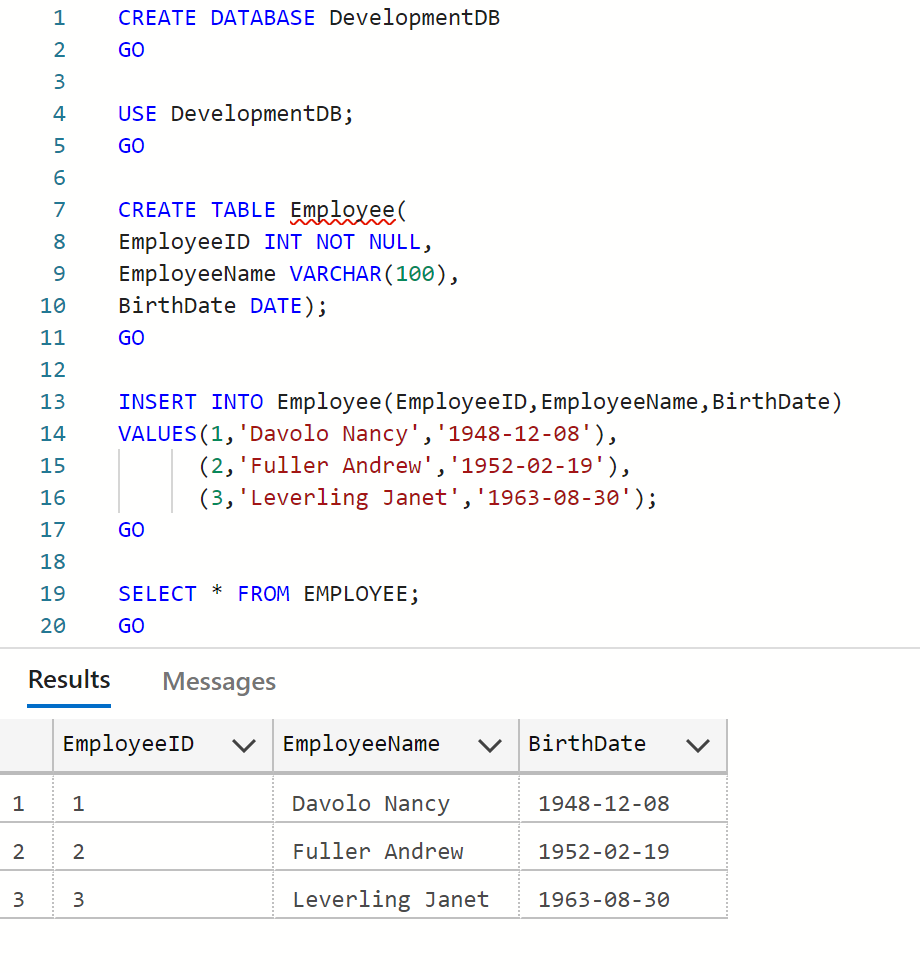
--Creating development database
CREATE DATABASE DevelopmentDB
GO

USE DevelopmentDB
GO
--Creating employee table
CREATE TABLE Employee(
EmployeeID INT NOT NULL,
EmployeeName VARCHAR(100),
BirthDate DATE);
GO
--Inserting data in employee table
INSERT INTO Employee(EmployeeID,EmployeeName,BirthDate)
VALUES(1,'Davolo Nancy','1948-12-08'),
      (2,'Fuller Andrew','1952-02-19'),
      (3,'Leverling Janet','1963-08-30');
GO

SELECT * FROM EMPLOYEE;
GO
--OUTPUT
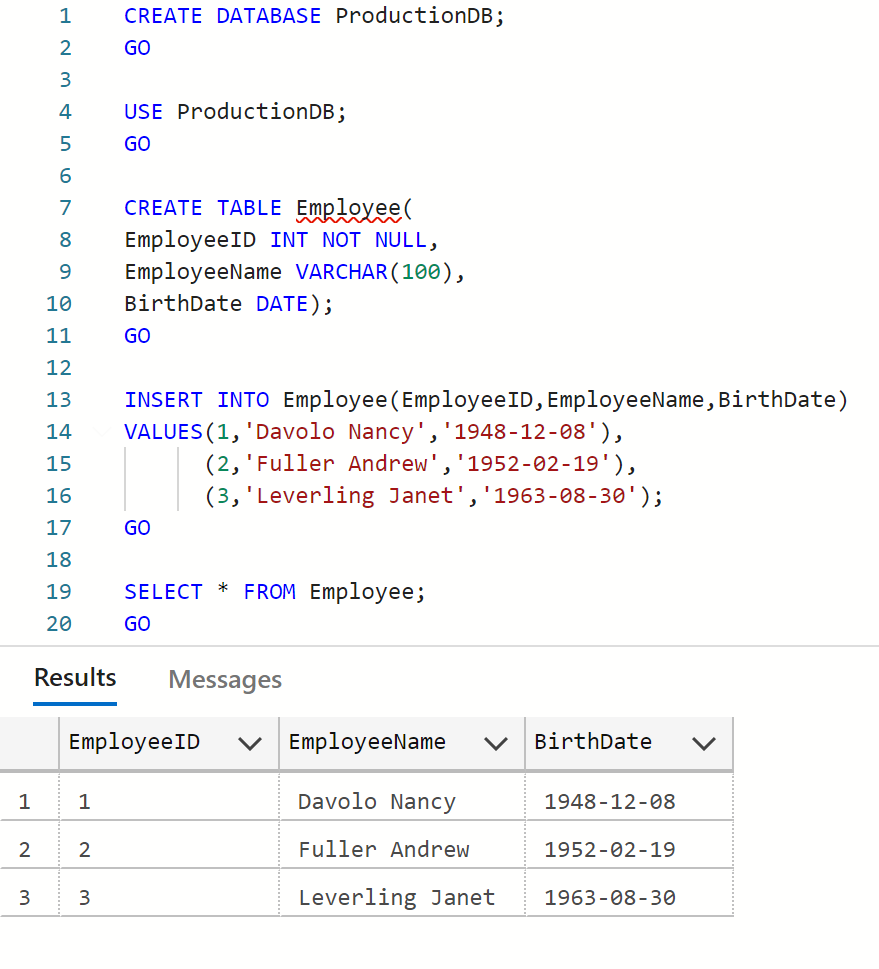
--Creating production database
CREATE DATABASE ProductionDB
GO

USE ProductionDB
GO
--Creating employee table
CREATE TABLE Employee(
EmployeeID INT NOT NULL,
EmployeeName VARCHAR(100),
BirthDate DATE);
GO
--Inserting data in employee table
INSERT INTO Employee(EmployeeID,EmployeeName,BirthDate)
VALUES(1,'Davolo Nancy','1948-12-08'),
      (2,'Fuller Andrew','1952-02-19'),
      (3,'Leverling Janet','1963-08-30');
GO

SELECT * FROM Employee;
GO
--OUTPUT
Installation:
Let’s install the extension first in few simple steps. I found the installation pretty straightforward.
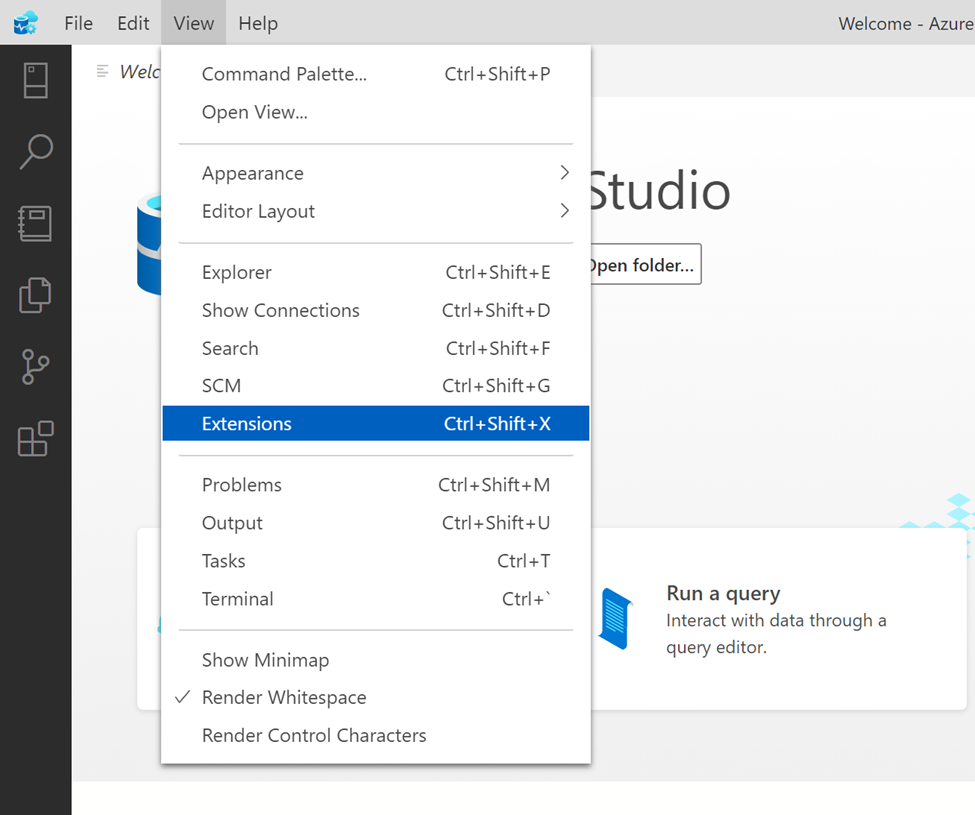
Step 1:
You need to open Azure Data Studio, then click on View menu and then click on Extensions or use shortcut CTRL+SHIFT+X as shown below.
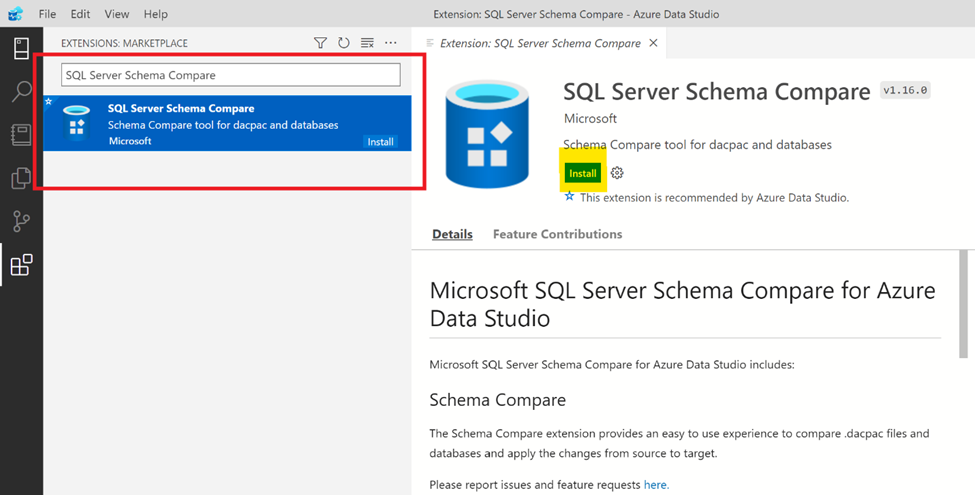
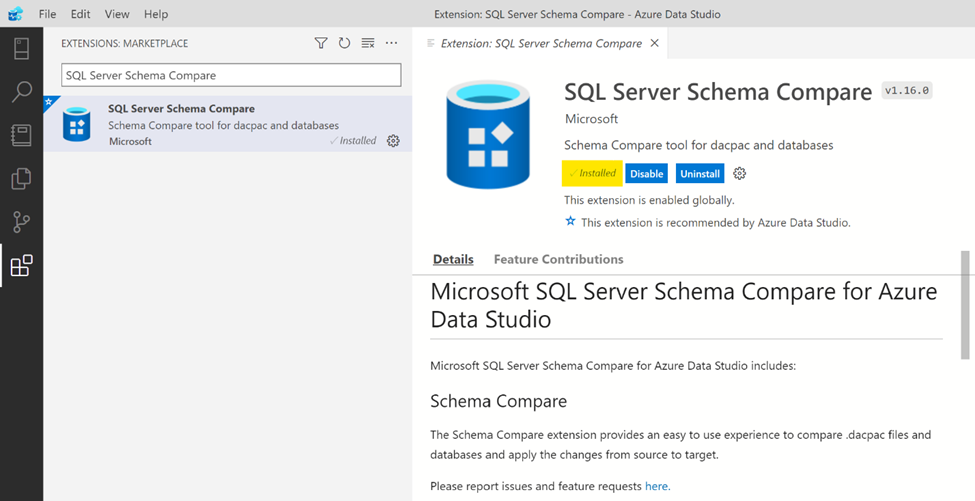
Step 2:
This will open Extensions Marketplace window where you can search SQL Server Schema Compare extension and install it by clicking Install button as shown below.
Step 3:
As we can see SQL Server Schema Compare extension is installed now and it is ready to use.
Configuration:
Let’s configure SQL Server Schema Compare extension step by step.
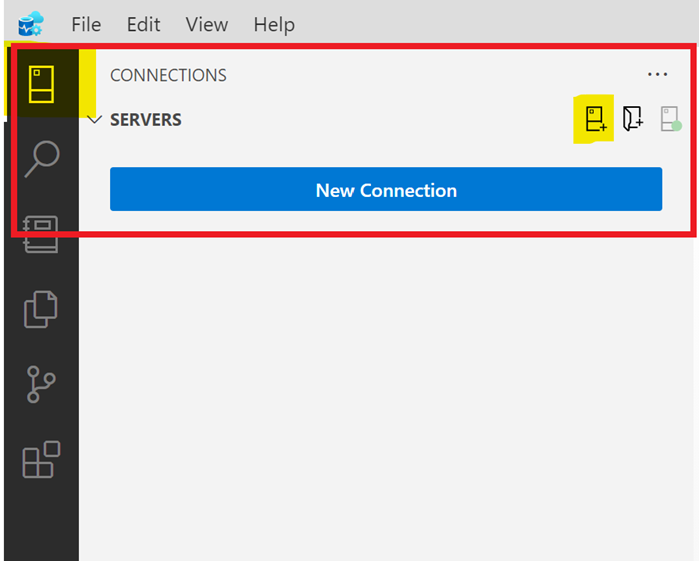
Step 1:
The first step is to connect to the SQL server instance which databases we need to compare. Let’s click on top left toolbar named Connections then click on New Connection button as shown below:
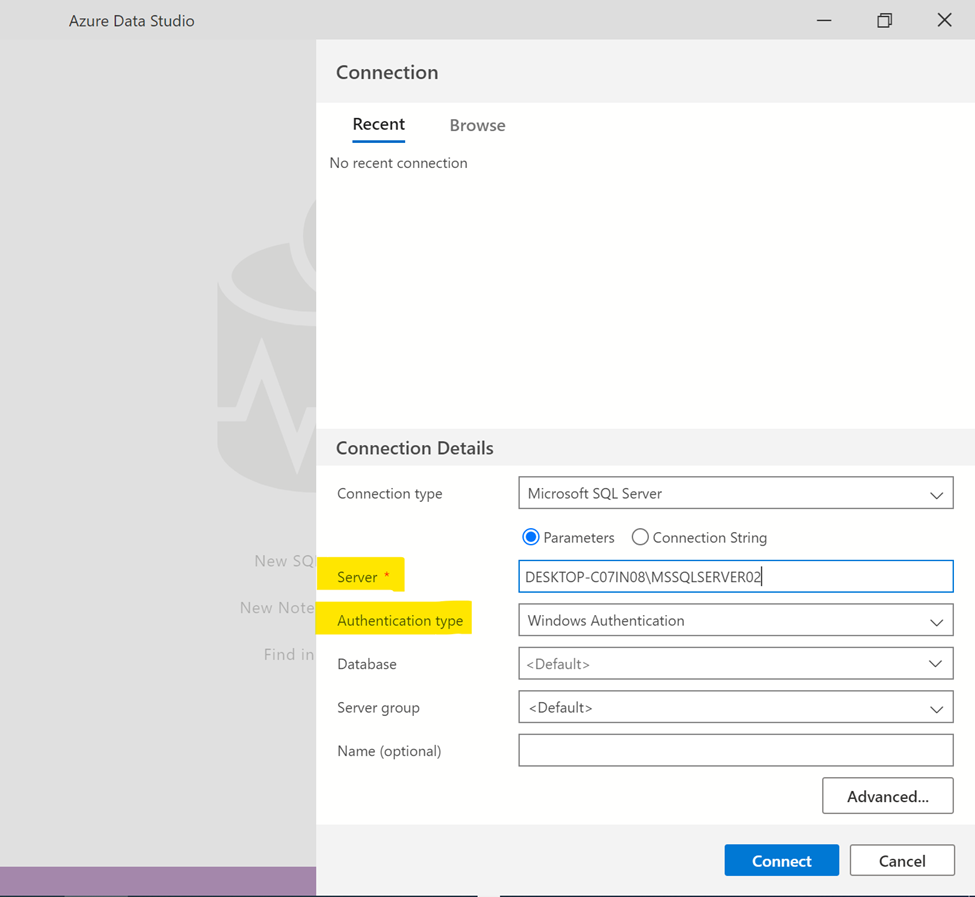
Step 2:
Now, SQL Server new connection window will open up and then you can fill the Server Name / IP address and Authentication type. I will connect via Windows Authentication in this step but you can also connect via SQL Server Authentication by providing user name and password then press Connect button to connect to respective SQL Server as shown below.
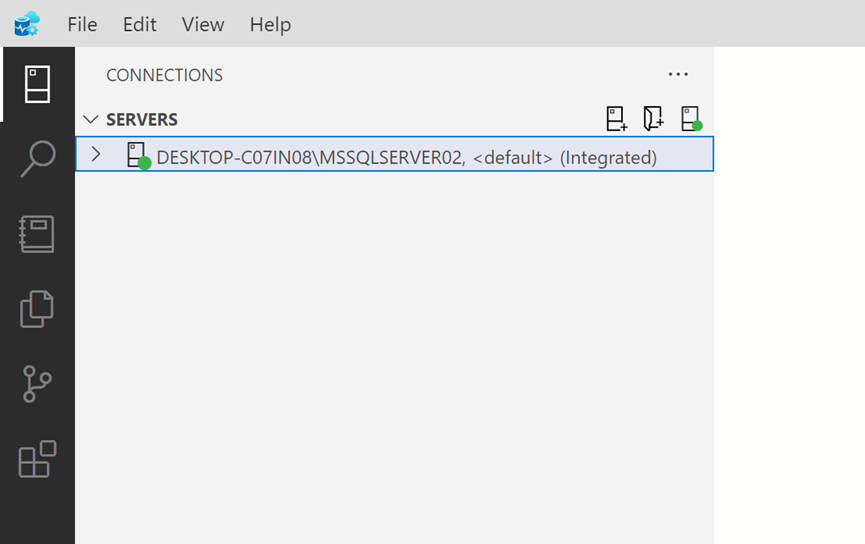
Step 3:
As you can see below, the respective SQL Server is connected and configuration is completed.
Schema Compare:
Since we installed and configured the extension, let’s compare the schema of two databases in the SQL Server connected in the earlier steps.
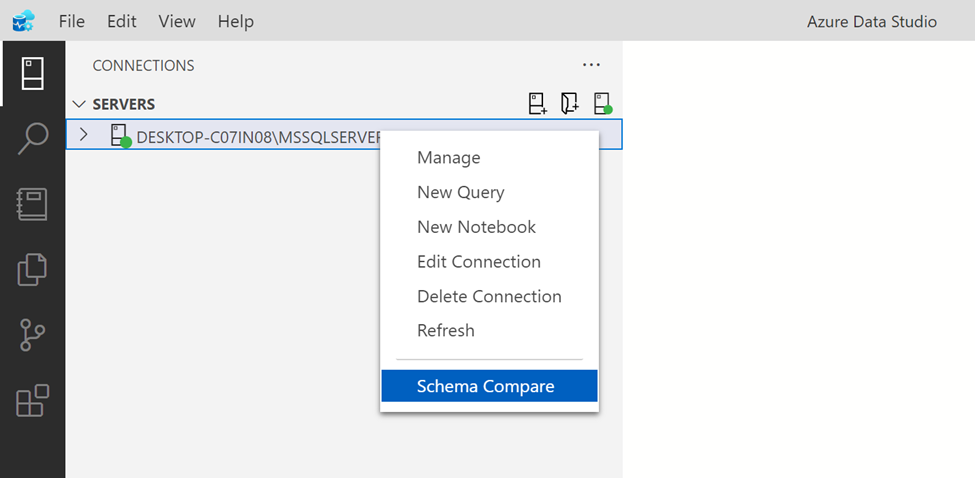
Step 1:
First step is to start comparing schema of two databases by right clicking on server name and selecting schema compare as shown below:
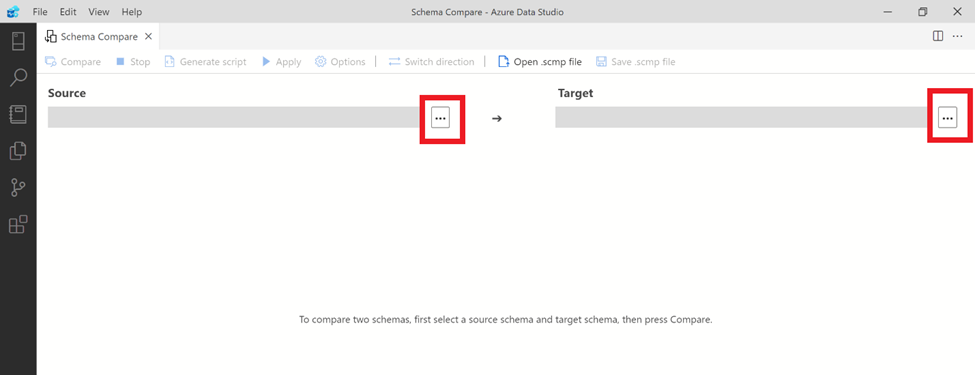
Step 2:
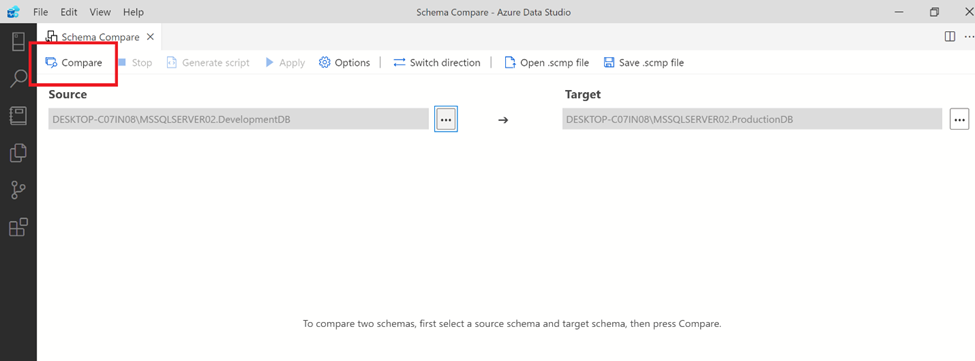
Scheme Compare menu will open Schema Compare window where you can select source and target SQL Server and databases connection by clicking (…) button as shown below.
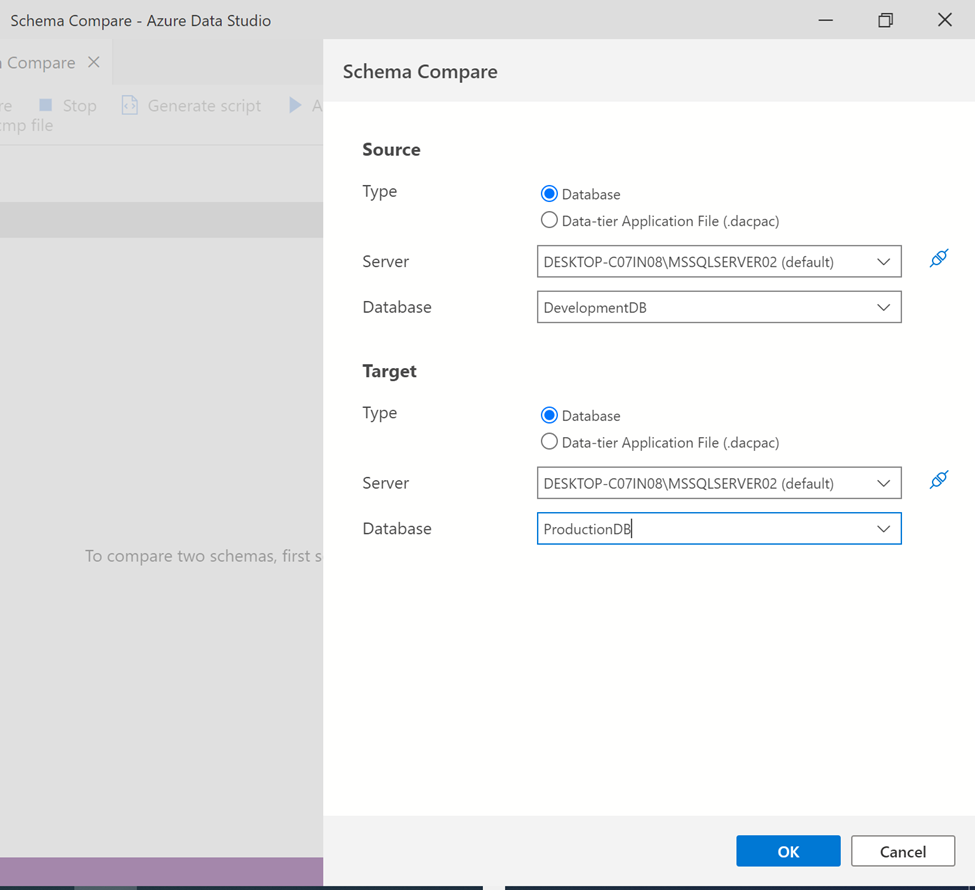
Step 3:
Once you click on one of the three dots (…) button, it will open both source and target SQL server and database connection window as shown below. Here, you need to carefully select the SQL Server and database in order to compare it and press OK button.
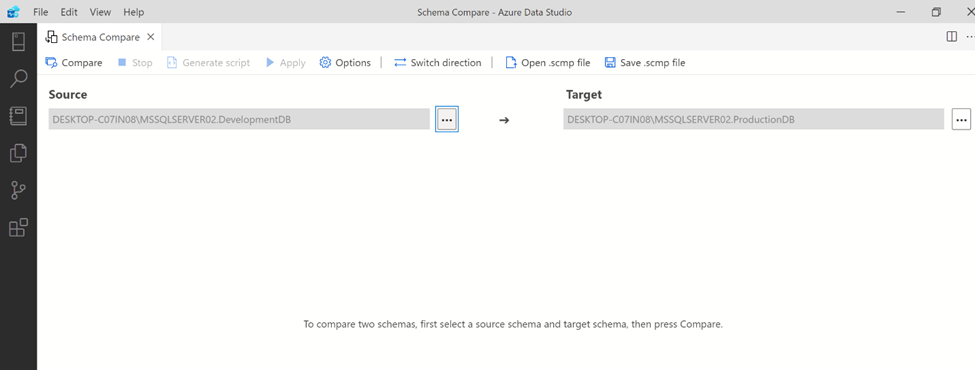
Step 4:
Once you press OK button, you will return to Schema Compare window and you are ready to compare schema of source database to target database.
Step 5:
Now, you need to just press the Compare button to compare the schema of source and target database as shown below,
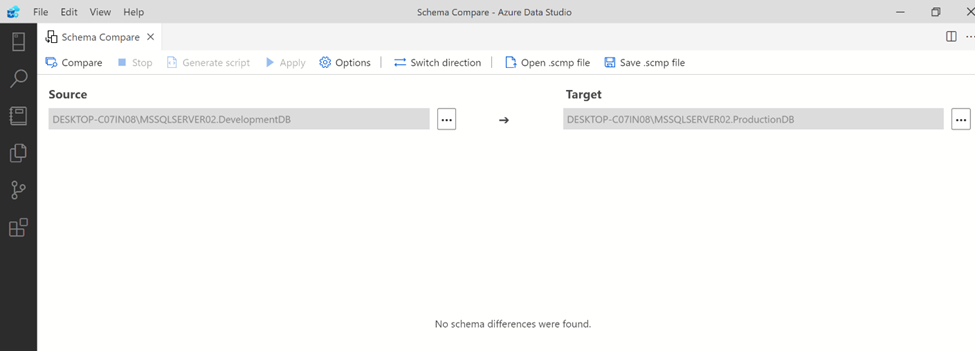
Step 6:
Now you can see, it is being compared and no difference found as shown below.
Testing:
Let’s test this extension.
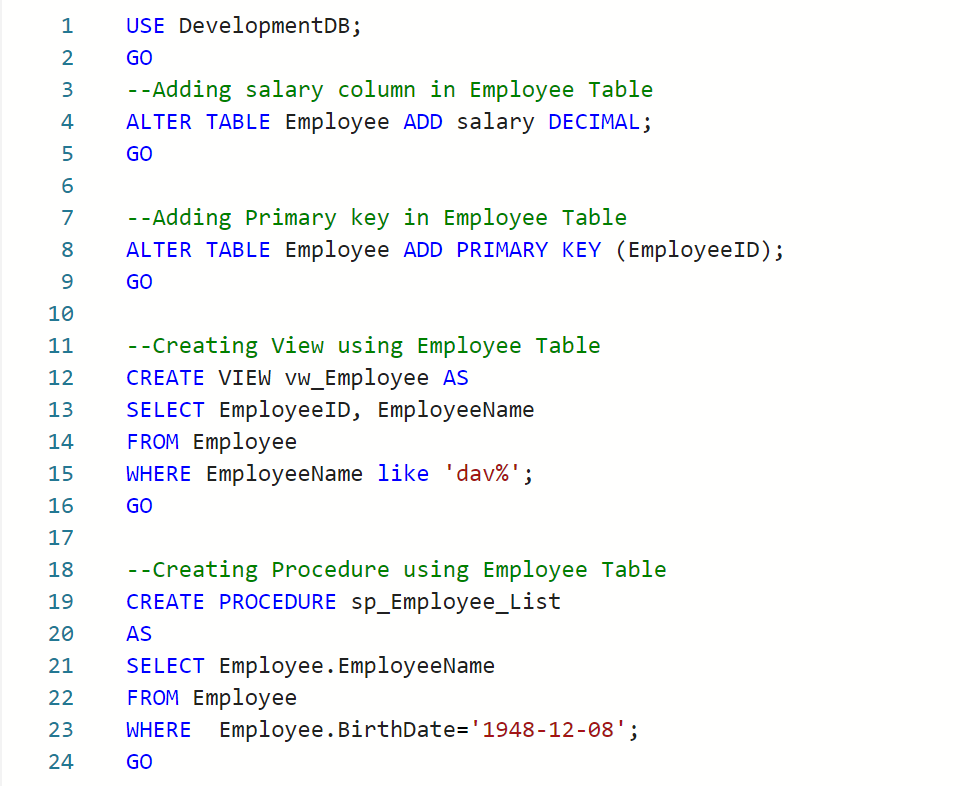
Step 1:
Now, let’s do some changes in development database and then compare it again. Given below are the scripts.
USE DevelopmentDB;
GO
--Adding salary column in Employee Table
ALTER TABLE Employee ADD salary DECIMAL;
GO

--Adding Primary key in Employee Table
ALTER TABLE Employee ADD PRIMARY KEY (EmployeeID);
GO

--Creating View using Employee Table
CREATE VIEW vw_Employee AS
SELECT EmployeeID, EmployeeName
FROM Employee
WHERE EmployeeName like 'dav%';
GO

--Creating Procedure using Employee Table
CREATE PROCEDURE sp_Employee_List
AS
SELECT Employee.EmployeeName
FROM Employee
WHERE  Employee.BirthDate='1948-12-08';
GO
--OUTPUT
Step 2:
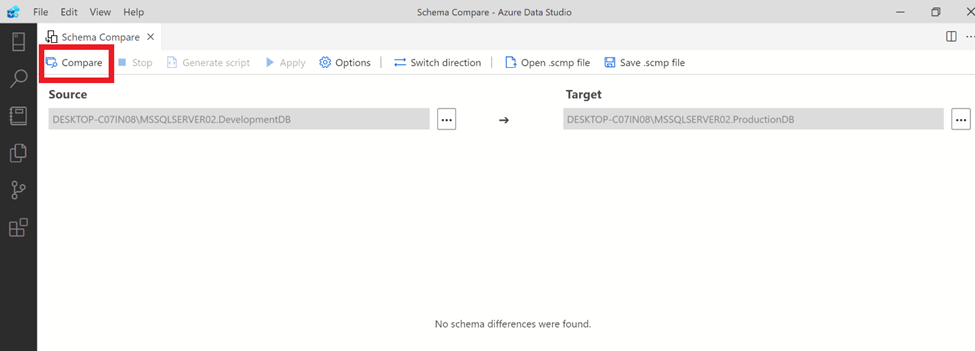
Now, changes are already done in development database. Let’s click on Compare button again to see the changes.
Step 3:
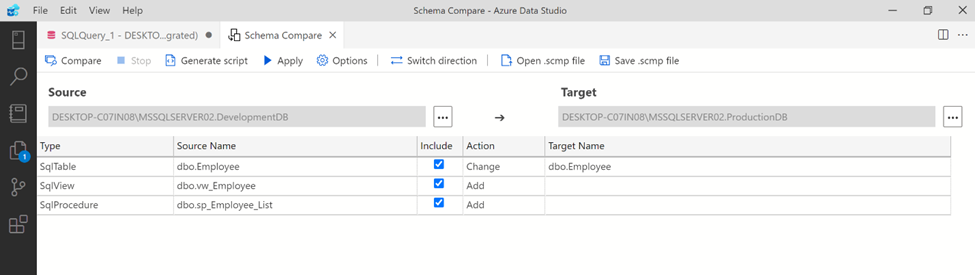
After comparing, we can see below that it detected the above changes in development database in comparison with Production Database. There is an Action column which indicates about the type of changes. There are other columns as well which gives you more details about the changes in schema and it is self explanatory.
Deployment:
As we can see above, the difference in schema in source and target database is captured by schema compare extension and it gives us TWO options to deploy these scripts in Target database (Production).
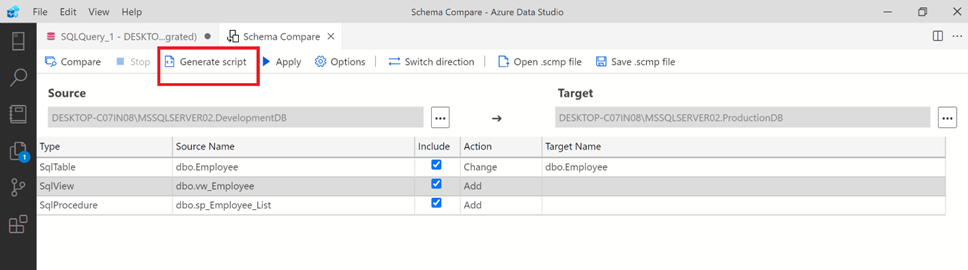
Option 1: Generate Script
Step 1:
This option generates the change script as shown below. By default, it generates all scripts checked in the include column but you can also uncheck some of the scripts which you do not want to generate the script. It gives us freedom to deploy the script(s) at a later stage. This option can be very handy where we have a separate deployment team.
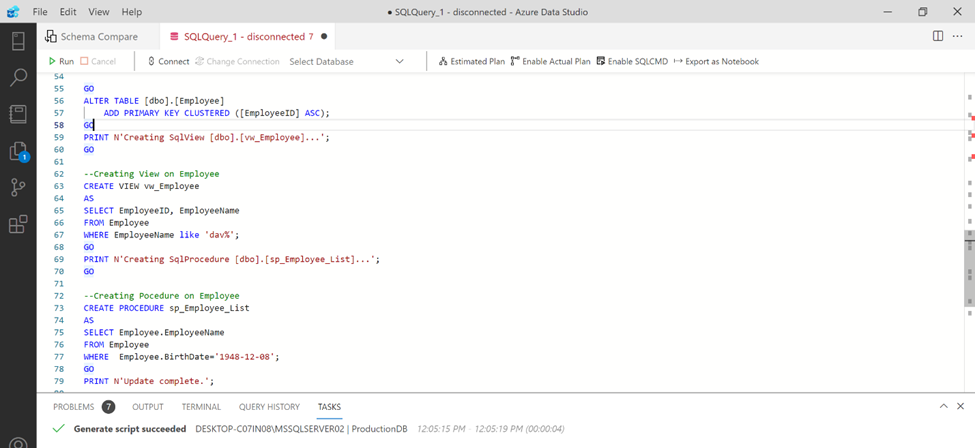
Step 2:
Once you click on the Generate Script button, it opens up like this and shows the script. You can save the script for later deployment or you can execute it immediately in the target server & database. It also gives us message that scripts generated successfully, as shown below.
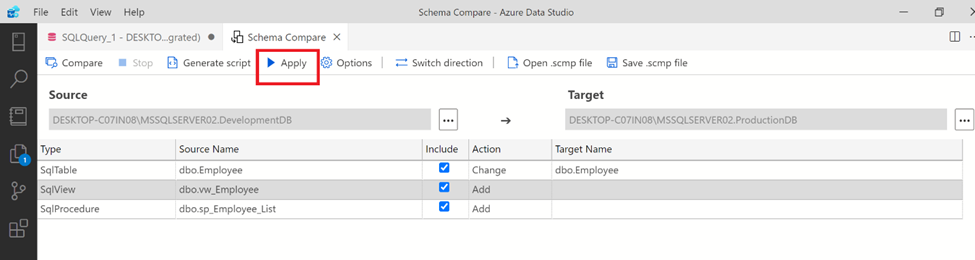
Option 2: Apply
Step 1:
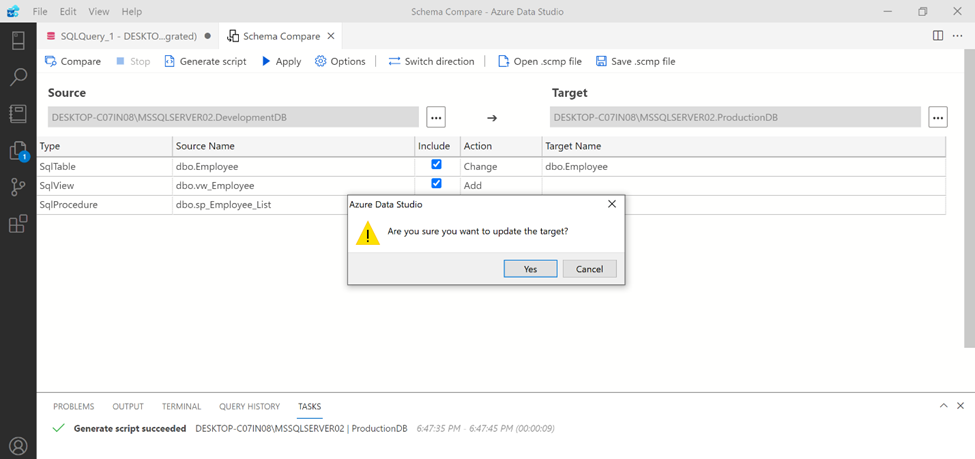
This extension provides another option to deploy the scripts immediately by simply clicking on APPLY button. In this step, you need to first select the script(s) to be deployed on the target server & database from include column. After that just click on APPLY button.
Step 2:
After that, it asks for the confirmation for the deployment. Please confirm by clicking on Yes button.
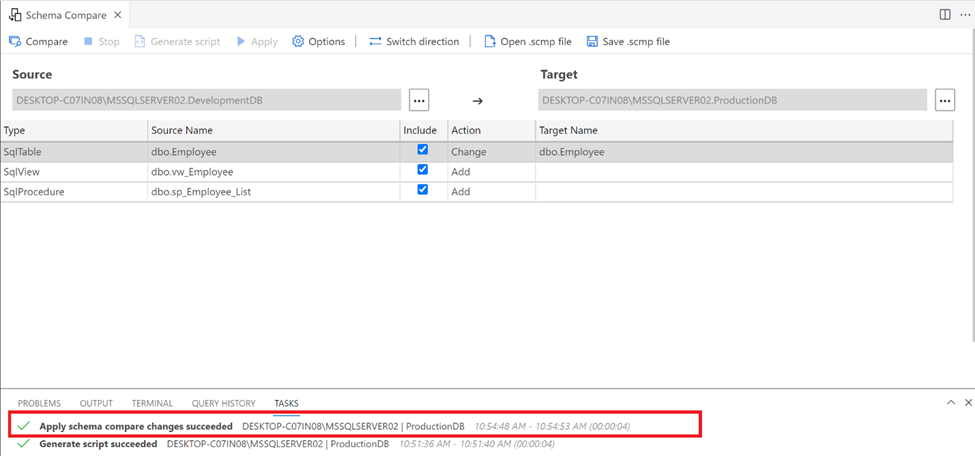
Step 3:
Upon confirmation, the target database gets updated with the changes in the source database as shown below:
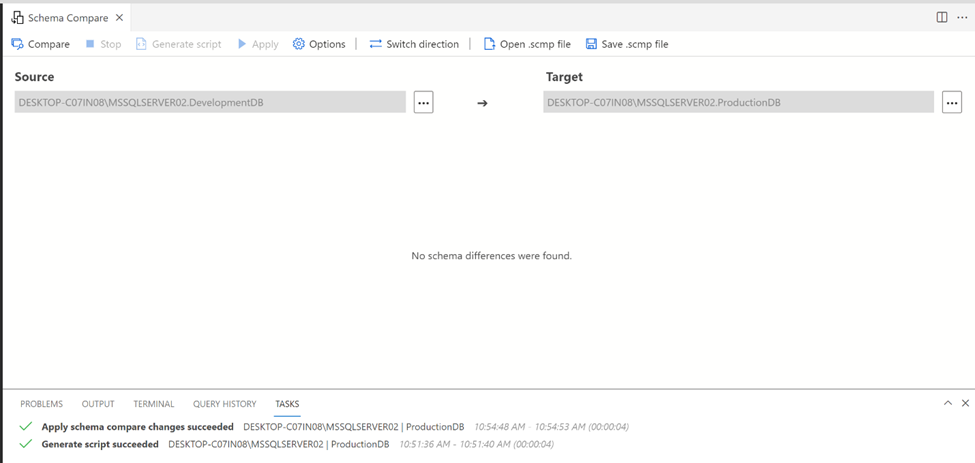
Step 4:
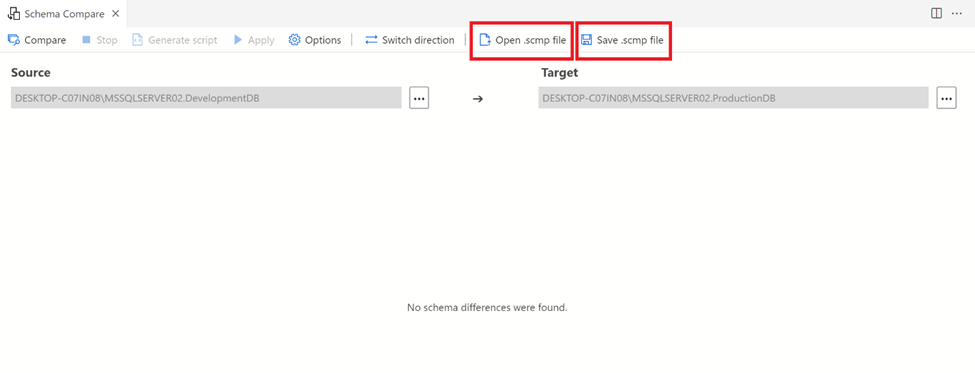
Now, you can compare again by pressing Compare button to check the differences and if successfully deployed then you will get given below message (No schema differences were found.)
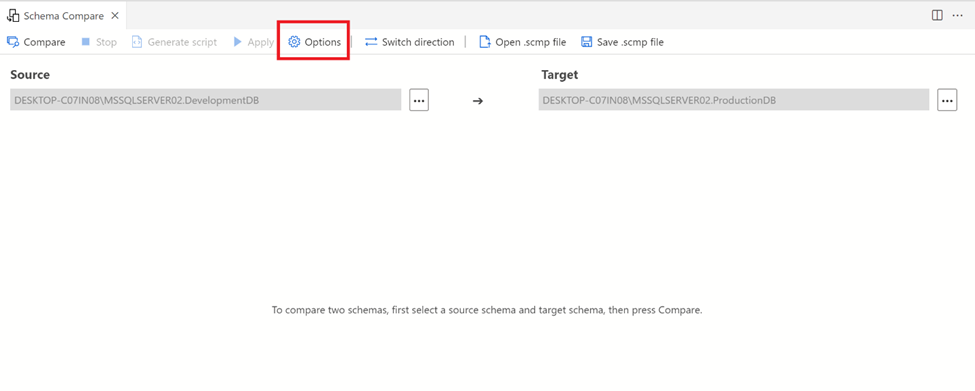
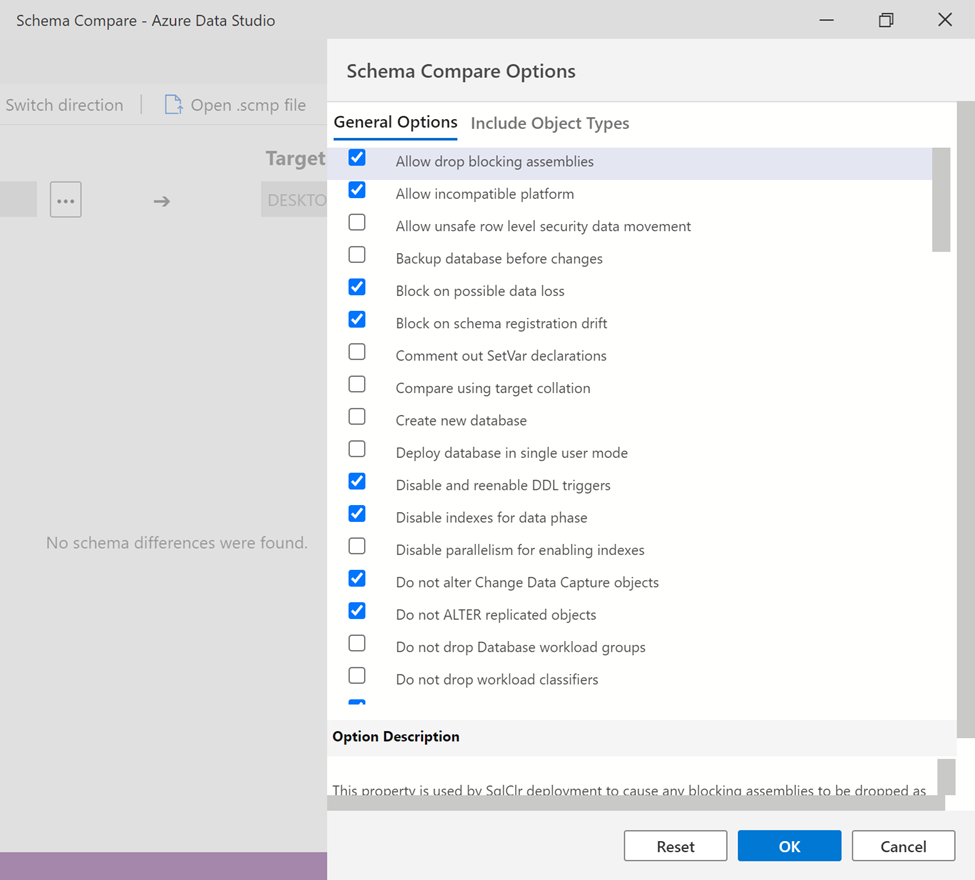
Options:
Given below Options button gives us the flexibility to select what options should be compared in the source and target databases schema.
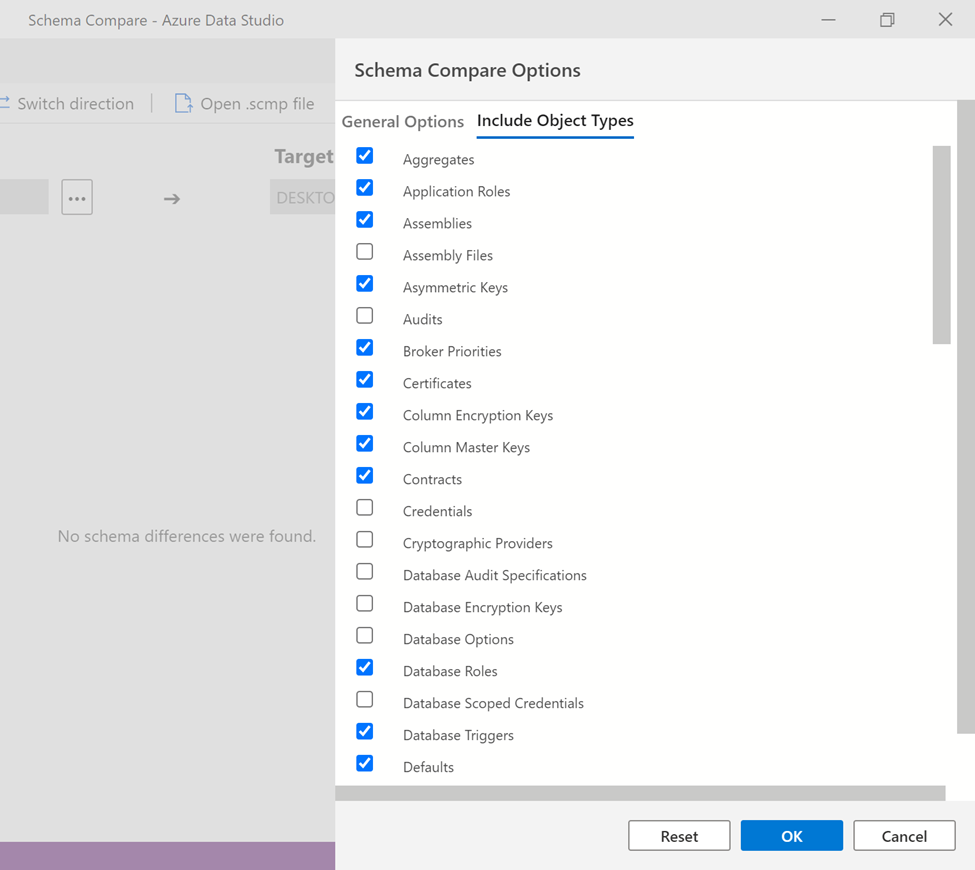
Step 1:
Once you click on Options button, it opens up Schema Compare Options window which has two tabs General Options / Include Object Types, by default most of the options are selected but many other options can be checked and unchecked from here in order to customize this compare.
Step 2:
Once you are done with the selection, just press OK button or you can Reset it to default settings by pressing Reset button.
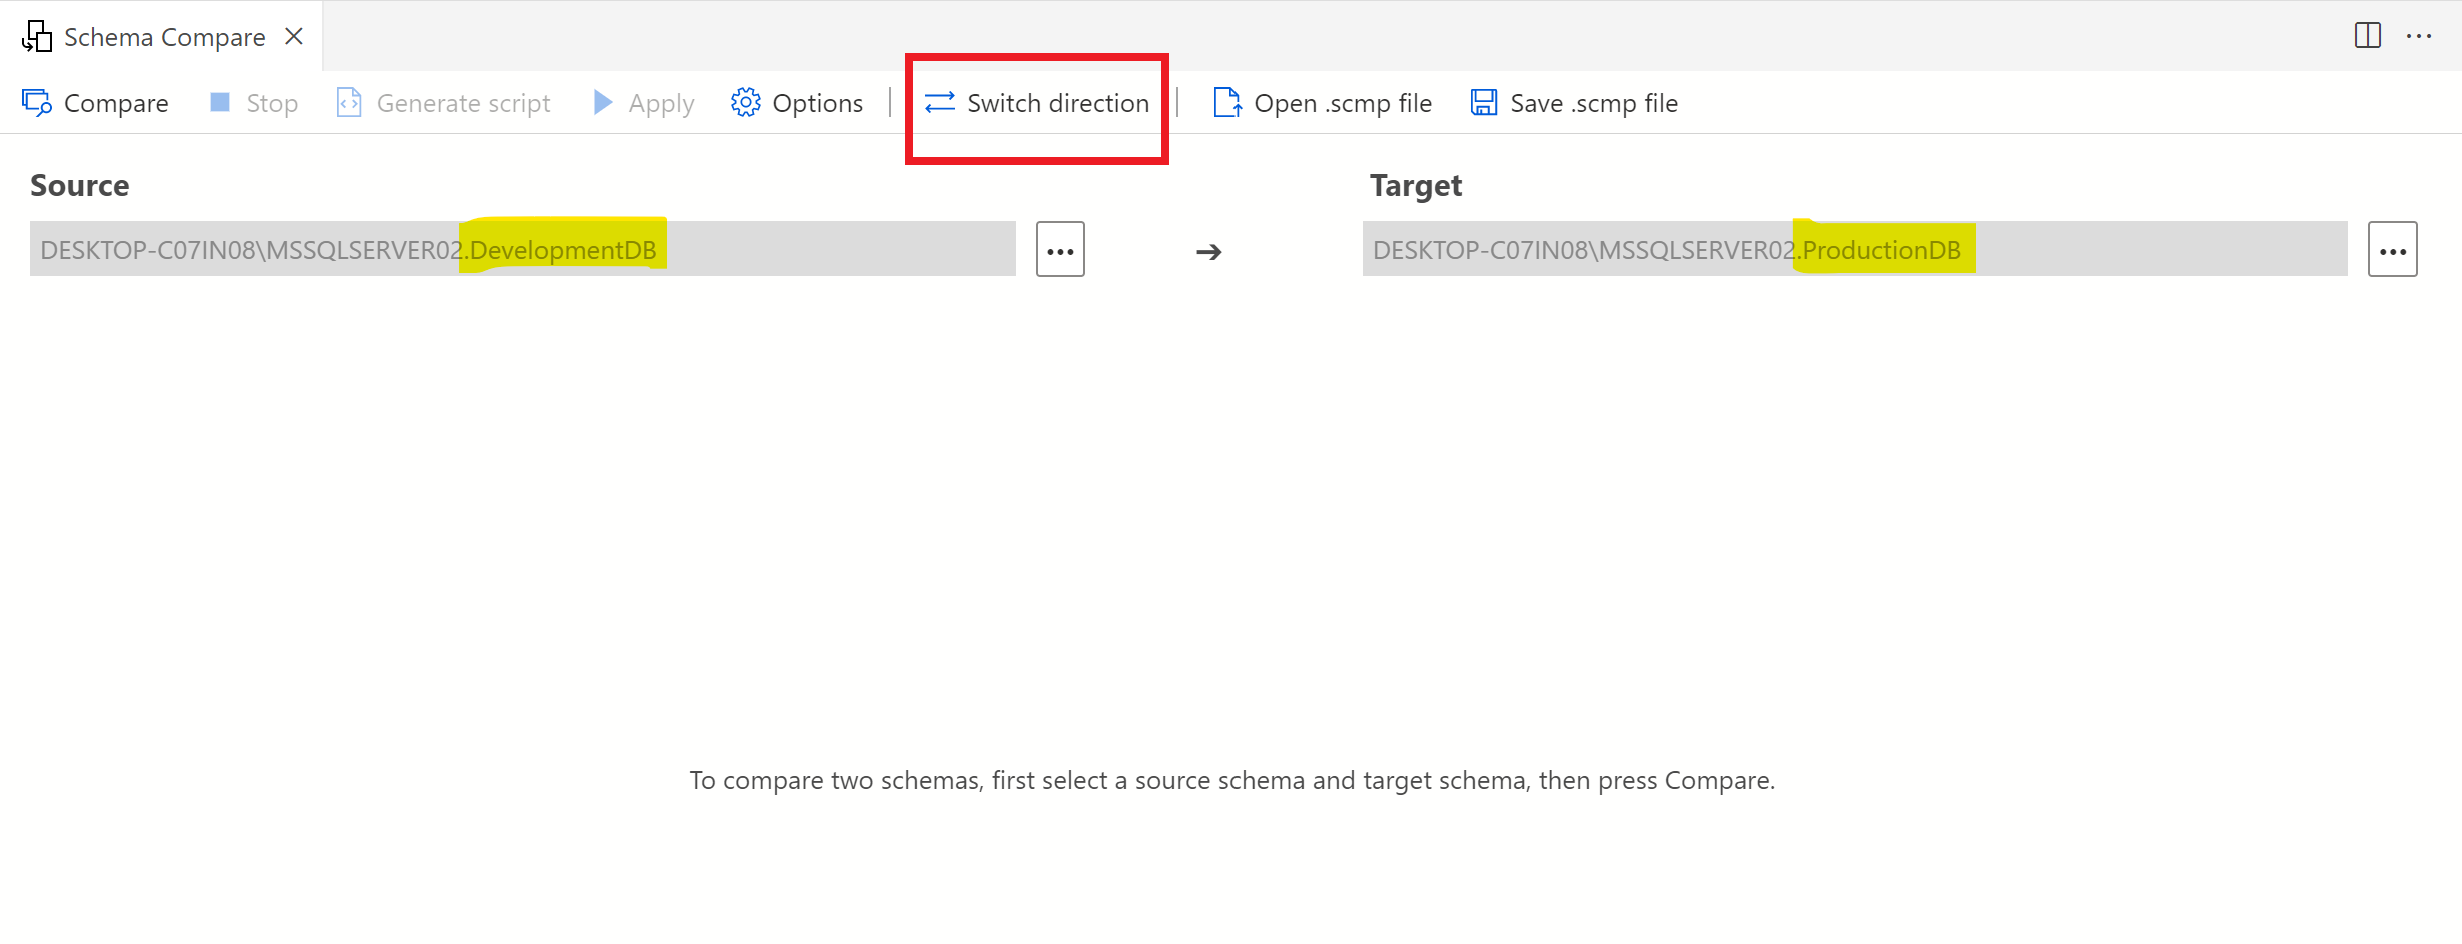
Switch direction:
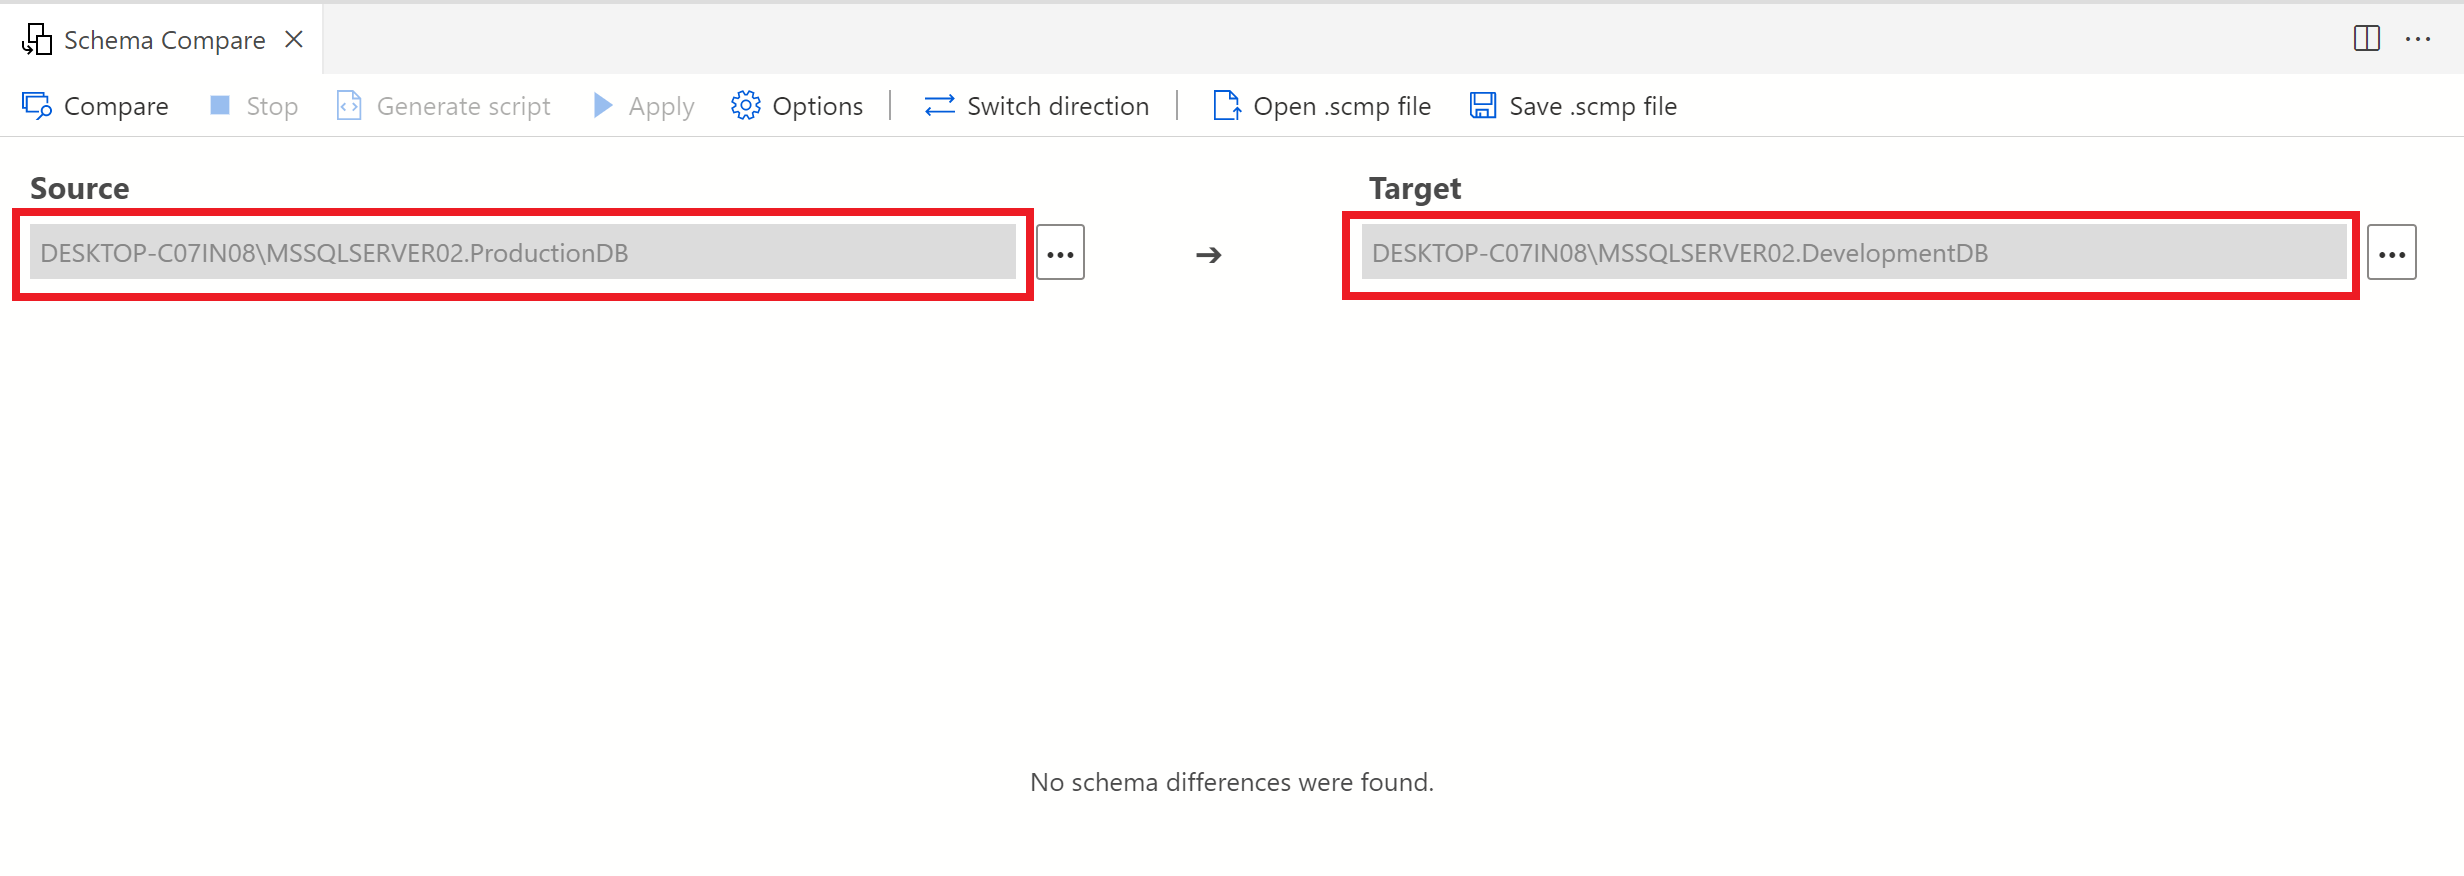
As the names implies in switch direction, this option is very handy because sometimes we select source as target and vice versa. You can just fix it by simply clicking on this button as shown below.
Direction has been changed as shown below:
Open .scmp file & Save .scmp file:
This option gives us the flexibility to save the configuration, what we did so far in the above steps and opens it up at later stage. With the help of this option, you can create all the configuration settings one time and save it and then reuse it again and again.
Clean Database:
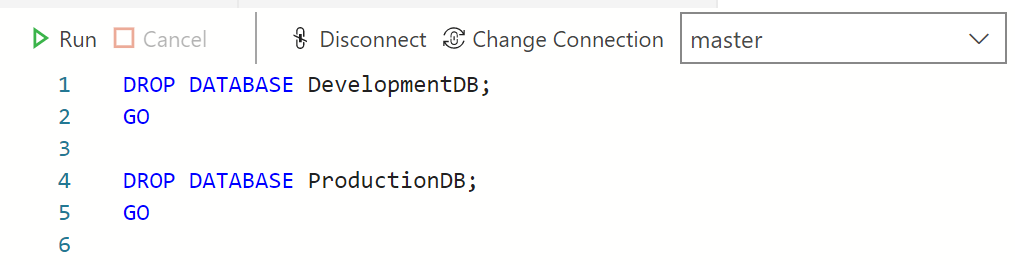
In order to clean up the databases, we can use given below dode.
DROP DATABASE DevelopmentDB;
GO

DROP DATABASE ProductionDB;
GO
--OUTPUT
Conclusion:
This is a very handy extension, when it comes to script deployment. Do let me know, how do you deploy your scripts.
Quite often we need to generate a calendar table in our database for reporting purposes with a specific date range. We may generate it for a month, a quarter or a year depending upon our requirements. Since there was no proper function available to generate calendar table in earlier version of SQL Server (Earlier than 2022), we used DATEADD(), DATEDIFF() to achieve it somehow.
In SQL Server 2022, a new function came called GENERATE_SERIES(), which was a long awaited function. One of the usages of this function is that it can easily generate calendar table between two specific dates without using any additional functions.
Let me show you in the below example, how we can use GENERATE_SERIES() function to generate calendar table in SQL Server 2022.
Compatibility Level:
Your database compatibility level MUST be 160 or higher to use this function. Given below is the query to change your database compatibility level.
ALTER DATABASE tempdb SET COMPATIBILITY_LEVEL = 160
Example :
CREATE TABLE tbl_Calendar
(
  [ID]             INT IDENTITY
, [Date]           DATE
, [Day]            INT
, [DayShortName]   VARCHAR(100)
, [DayName]        VARCHAR(100)
, [Week]           INT
, [MonthShortName] VARCHAR(100)
, [Month]          INT
, [MonthName]      VARCHAR(100)
, [Quarter]        INT
, [QuarterName]    VARCHAR(100)
, [Year]           INT
);
GO

DECLARE @SetStartDate DATE, @Start INT, @Stop INT, @Step INT;

SET @SetStartDate = '2022-01-01' --Start date of the calender;
SET @Start   = 0;
SET @Stop    = 365 -- No of days(one year) ;
SET @Step    = 1;

INSERT INTO tbl_Calendar
(
  [Date]
, [Day]
, [DayShortName]
, [DayName]
, [Week]
, [MonthShortName]
, [Month]
, [MonthName]
, [Quarter]
, [QuarterName]
, [Year]
)
SELECT DATEADD(DAY,value,@SetStartDate) AS [Date]
     , DATEPART(DAY,DATEADD(DAY,value,@SetStartDate)) AS [Day]
	 , FORMAT(DATEADD(DAY,value, @SetStartDate) ,'ddd') AS [DayShortName]
	 , DATENAME(WEEKDAY,DATEADD(WEEKDAY,value,@SetStartDate)) AS [DayName]
     , DATEPART(WEEK,DATEADD(DAY,value,@SetStartDate)) AS [Week]
	 , FORMAT(DATEADD(DAY,value, @SetStartDate) ,'MMM') AS [MonthShortName]
	 , MONTH(DATEADD(DAY,value,@SetStartDate)) AS [Month]
     , DATENAME(MONTH,DATEADD(DAY,value,@SetStartDate)) AS [MonthName]
	 , DATEPART(QUARTER,DATEADD(DAY,value,(@SetStartDate))) AS [Quarter]
	 , CONCAT('Quarter - ',DATEPART(QUARTER,DATEADD(DAY,value,(@SetStartDate)))) AS [QuarterName]
     , YEAR(DATEADD(DAY,value,@SetStartDate)) AS [Year]
FROM GENERATE_SERIES(@Start,@Stop,@Step)
GO

SELECT * FROM tbl_Calendar;
GO

--OUTPUT
Conclusion:
I used GENERATE_SERIES() function to create calendar table and I noticed that it has reduced a lot of complexity in creating the calendar table, if we compare it with earlier approach. Do let me know, if you have generated calendar table and what was the approach.
SQL Server 2022 brought some exiting features which will help us in optimising the SQL scripts. Window clause is one of the new features. Also, it helps us to reduce the code complexity when we deal with multiple OVER Clause.
Old Approach (Earlier than SQL Server 2022):
As we can see in the below example that in the OVER Clause, we defined same Partition By & Order By, over and over again, since there was no Window clause available in the earlier edition of SQL Server.
USE Northwind
GO

SELECT [OrderID]
     , [ProductID]
	 , ROW_NUMBER()     OVER (PARTITION BY [ProductID]
	                          ORDER BY     [ProductID]) AS [RowNo]
	 , [UnitPrice]
	 , [Quantity]
     , AVG([UnitPrice]) OVER (PARTITION BY [ProductID]
	                          ORDER BY     [ProductID]) AS [AverageUnitPricePerProduct]
	 , SUM([Quantity])  OVER (PARTITION BY [ProductID]
	                          ORDER BY     [ProductID]) AS [TotalQuantityPerProduct]
FROM   [dbo].[Order Details]
WHERE  [ProductID] IN (9,15);
GO
--OUTPUT
New Approach (SQL Server 2022 & Above):
Compatibility Level:
Your database compatibility level MUST be 160 or higher to use Window clause. Given below is the script to change the database compatibility level.
ALTER DATABASE Northwind SET COMPATIBILITY_LEVEL = 160
In the new approach, you can simply define a Window clause just one time and use it over and over again in your query as shown below. It gives us the same result as mentioned above but with less complexity.
USE Northwind
GO

SELECT [OrderID]
     , [ProductID]
	 , ROW_NUMBER()     OVER Window1 AS [RowNo]
	 , [UnitPrice]
	 , [Quantity]
     , AVG([UnitPrice]) OVER Window1 AS [AverageUnitPricePerProduct]
	 , SUM([Quantity])  OVER Window1 AS [TotalQuantityPerProduct]
FROM [dbo].[Order Details]
WHERE [ProductID] IN (9,15)
WINDOW Window1 AS (PARTITION BY [ProductID]
                   ORDER BY     [ProductID]);
GO
--OUTPUT
Conclusion:
The Window clause is very handy when we have the same Window clause used by multiple aggregate functions. It also reduces the complexity. Do let me know if you used Window clause and found it useful or not.
The most Azure Enabled SQL Server is now being launched as SQL server 2022(16.x). It has a lot of new features and enhancements too. You can download it from here and use its express and developer edition for FREE.
New Features & Enhancements of SQL Server 2022:
Analytics:
In analytics, there are many new features and enhancements, few of them are shown below :
Sometimes we come across a case where we need to generate a number series in SQL Server between two numbers. For example, if you give a week’s start date and end date and you need to generate whole week’s dates, it was not easy since there was no specific function available to generate series in earlier version of SQL Server (Earlier than SQL Server 2022).
In SQL Server 2022, a new function shipped namely GENERATE_SERIES() which was a long awaited function. This function will allow us to generate series of numbers between two numbers.
Old Approach (Earlier than SQL Server 2022):
Let me demonstrate how we used to struggle to generate number series in earlier versions of SQL Server, we used common table expression, Union All and a lot of other techniques to generate, it as shown below.
DECLARE @StartRange INT = 1;
DECLARE @EndRange   INT = 10;

;WITH CTE AS (
     SELECT @StartRange AS Sno
	 UNION ALL
	 SELECT Sno+1 FROM CTE WHERE Sno+1 <= @EndRange )
SELECT * FROM CTE;
GO
--OUTPUT
New Approach (SQL Server 2022 & Above):
Compatibility Level:
Your database compatibility level MUST be 160 or higher to use this function. Given below is the query to change your database compatibility level.
ALTER DATABASE tempdb SET COMPATIBILITY_LEVEL = 160
Example 1:
In this example, I will show you how to generate series between two numbers with the newly introduced function GENERATE_SERIES(). This function generates the series of numbers between the start and end numbers and takes the steps needed to jump from start until end.
DECLARE @Start INT = 1;
DECLARE @Stop  INT = 10;
DECLARE @Step  INT = 1;

SELECT value FROM
GENERATE_SERIES(@Start,@Stop,@Step);
GO
--OUTPUT
Default:
By Default, Step value is 1 in such cases, where start number is less than stop number, so we can achieve the same output as mentioned above without passing Step parameter as shown below.
DECLARE @Start INT = 1;
DECLARE @Stop  INT = 10;


SELECT value FROM
GENERATE_SERIES(@Start,@Stop);
GO
--OUTPUT
Issue:
When you want to generate series in ascending order then DON’T put NEGATIVE value in Step parameter. Even if you put negative value in Step parameter, it will not generate error but it will not give you any result as shown below.
DECLARE @Start INT = 1;
DECLARE @Stop  INT = 10;
DECLARE @Step  INT = -1;

SELECT value FROM
GENERATE_SERIES(@Start,@Stop,@Step);
GO
--OUTPUT
Example 2:
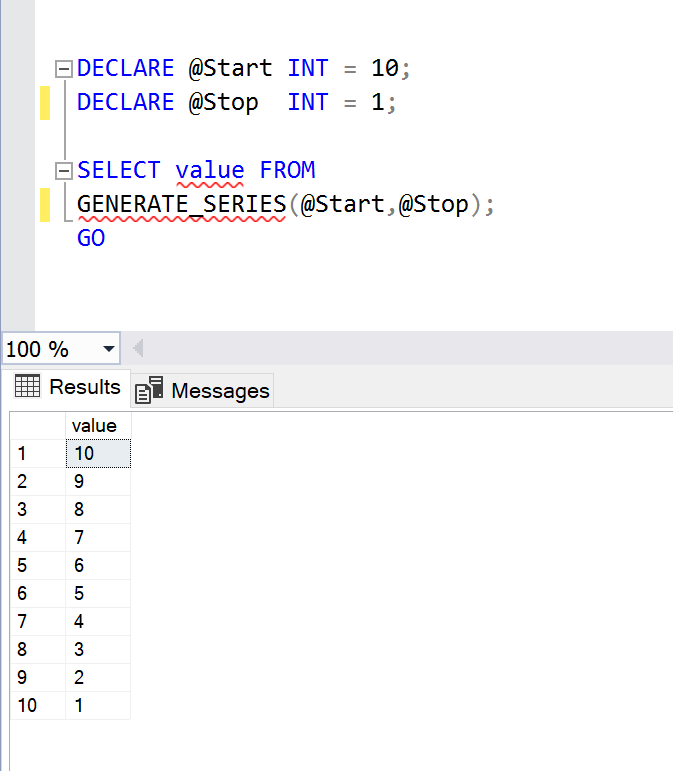
In this example, I will show you, how to generate number series in descending order using GENERATE_SERIES() function.
DECLARE @Start INT = 10;
DECLARE @Stop  INT = 1;
DECLARE @Step  INT = -1;

SELECT value FROM
GENERATE_SERIES(@Start,@Stop,@Step);
GO

--OUTPUT
Default:
By Default, Step value is -1 in such cases, where stop number is less than start number, so we can achieve the same output as mentioned above without passing Step parameter as shown below.
DECLARE @Start INT = 10;
DECLARE @Stop  INT = 1;

SELECT value FROM
GENERATE_SERIES(@Start,@Stop);
GO
--OUTPUT
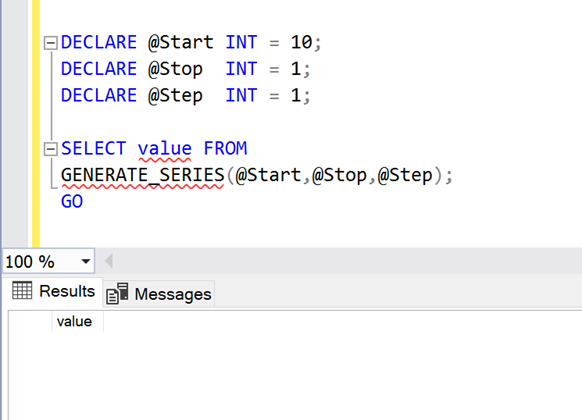
Issue:
When you want to generate series in descending order then DON’T put POSITIVE value in Step parameter. Even if you put positive value in Step parameter, it will not generate error but it will not give you any result as shown below.
DECLARE @Start INT = 10;
DECLARE @Stop  INT = 1;
DECLARE @Step  INT = 1;

SELECT value FROM
GENERATE_SERIES(@Start,@Stop,@Step);
GO
--OUTPUT
Example 3:
If we want to generate negative number series using GENERATE_SERIES() function then the query and output will be like this.
DECLARE @Start INT = -1;
DECLARE @Stop  INT = -10;
DECLARE @Step  INT = -1;

SELECT * FROM
GENERATE_SERIES(@Start,@Stop,@Step);
GO
--OUTPUT
Example 4:
In this example, I will show you how to generate Odd numbers series using GENERATE_SERIES() function.
DECLARE @Start INT = 1;
DECLARE @Stop  INT = 10;
DECLARE @Step  INT = 2;

SELECT value FROM
GENERATE_SERIES(@Start,@Stop,@Step);
GO
--OUTPUT
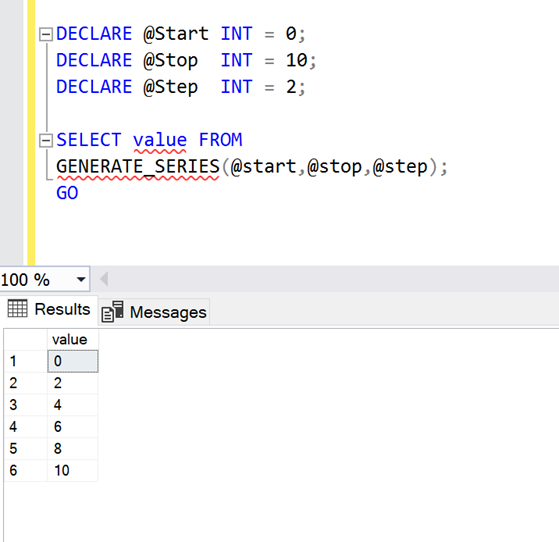
Example 5:
In this example, I will show you how to generate Even numbers series using GENERATE_SERIES() function.
DECLARE @Start INT = 0;
DECLARE @Stop  INT = 10;
DECLARE @Step  INT = 2;

SELECT value FROM
GENERATE_SERIES(@start,@stop,@step);
GO--OUTPUT
Conclusion:
I found GENERATE_SERIES() function very useful. Earlier we used multiple functions to generate the series between two numbers but now we can easily achieve with the help of GENERATE_SERIES() function. Do let me know if you will use this function and how you found it.
TRANSLATE() is one of the handy functions of SQL Server when it comes to replace one or more characters to another set of characters in one go. I have earlier written an article about it in detail.
Recently, I was using TRANSLATE() function and came across an error as mentioned below.
Error :
The second and third arguments of the TRANSLATE built-in function must contain an equal number of characters.
DECLARE @Number AS VARCHAR(15)
SET @Number='+92-3317892345'
SELECT @Number AS PhoneNumber
     , TRANSLATE(@Number,'+','00') AS TranslatedPhoneNumber;

GO
--OUTPUT
Solution:
As per SQL Server documentationtranslations must be the same data type and length as characters. And if you look at our script, the length of both characters (+) and translation (00) is not same.
In such cases, we need to simply apply REPLACE() function since TRANSLATE() function cannot handle such cases as shown below.
DECLARE @Number AS VARCHAR(15)
SET @Number='+92-3317892345'
SELECT @Number AS PhoneNumber
     , REPLACE(@Number,'+','00') AS REPLACEDPhoneNumber;
GO
--OUTPUT
Conclusion:
In case of this error, we should use REPLACE() function instead of TRANSLATE() function.
This blog/website is a personal blog/website and all articles, postings and opinions contained herein are my own. The contents of this blog/website are not intended to defame, purge or humiliate anyone should they decide to act upon or reuse any information provided by me. Comments left by any independent reader are the sole responsibility of that person. Should you identify any content that is harmful, malicious, sensitive or unnecessary, please contact me via email (imran@raresql.com) so I may rectify the problem.