Feeds:
Posts
Comments

Archive for June, 2015

Temporal Table is one of the best features available in SQL Server 2016. It actually provides your data stored in the table at any point in time. In other words, if you execute any update or delete statement on a table then the old data will be over written and after that if you query the table you will get the latest data (after update or delete), but using temporal table you can view the latest data as well as old data but how ? Let me explain how it works first.

  • How Temporal Table works ?
      • What happens when you Insert record(s) in Temporal Table ?

When you insert the data in temporal table, the data will remain in temporal table like a normal table but it will NOT affect the history table as shown below.

Temporal Table.1.7

      • What happens when you Update/Delete record(s) in Temporal Table ?

When you update/delete the data in temporal table, the existing records will be MOVED FIRST into the history table to record the changes before the data is changed in the temporal table.

Temporal Table.1.8

      • What happens when you Query record(s) in Temporal Table ?

When you Query the records from the temporal table, Temporal table is smart enough to decide whether to return the data from the temporal table or from the history table, you do NOT have to apply any joins or any sub query between temporal table and history table.

Temporal Table.1.9

  • Create Temporal Table

When you create a temporal table it automatically creates a history table (if you already have an existing history table you can link it to temporal table). As you can see below is a usual table creation script with additional columns. These additional column (fields) are specific for temporal table period definition and it will be hidden as well. So when you query the table these columns will not appear in the result. Also, I turned on the system versioning and declared the history table name “dbo.tbl_Product_History”, in this case the temporal table will create the history table as defined. If you do not declare the history table name, SQL will create a history table for the temporal table by default.

CREATE DATABASE SampleDB
GO
USE SampleDB
GO
--DROP TABLE tbl_Product
--GO
CREATE TABLE tbl_Product
(
Product_ID int NOT NULL PRIMARY KEY CLUSTERED,
Product_Name varchar(50) NOT NULL,
Rate numeric(18,2),

/*Temporal Specific Fields - Period Definition */
[Valid From] datetime2 GENERATED ALWAYS AS ROW START HIDDEN NOT NULL,
[Valid Till] datetime2 GENERATED ALWAYS AS ROW END HIDDEN NOT NULL,
PERIOD FOR SYSTEM_TIME ([Valid From] ,[Valid Till])
)
WITH
/* Temporal Specific - System-Versioning Configuration*/
(SYSTEM_VERSIONING = ON
(HISTORY_TABLE = dbo.tbl_Product_History, DATA_CONSISTENCY_CHECK = ON)
);
GO

Create Temporal Table

  • Data Manipulation Language (DML) Statements on Temporal Table ?
    Lets execute some Data Manipulation (DML) Statement on temporal table and view the impact on temporal table as well as history table.

      • INSERT STATEMENT

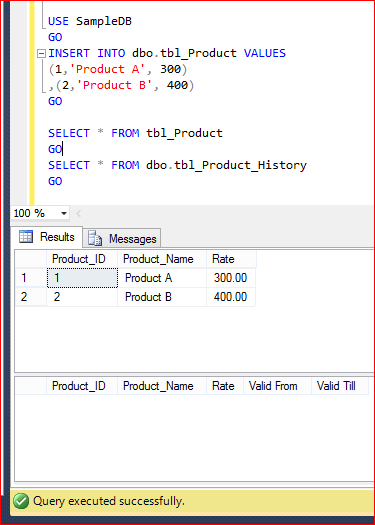
    As I explained earlier, when you execute INSERT statement on temporal table there will be NO Impact on history table. Lets execute INSERT statements and observe the results accordingly.

    USE SampleDB
    GO
    INSERT INTO dbo.tbl_Product VALUES
    (1,'Product A', 300)
    ,(2,'Product B', 400)
    GO
    
    SELECT * FROM tbl_Product
    GO
    SELECT * FROM dbo.tbl_Product_History
    GO
    

    Temporal Table.1.1

      • UPDATE STATEMENT

As I explained earlier, when you execute UPDATE statement on temporal table then the OLD version of data will be moved to history table and temporal table will have latest data ONLY. Lets execute UPDATE statements and observe the results accordingly.

USE SampleDB
GO
UPDATE tbl_Product SET Rate =Rate/2
WHERE Product_ID IN (1,2)
GO

SELECT * FROM tbl_Product
GO
SELECT * FROM dbo.tbl_Product_History
GO

Temporal Table.1.2

      • DELETE STATEMENT

As I explained earlier, when you execute DELETE statement on temporal table then the OLD version of data will be moved to history table and temporal table will have latest data ONLY. Lets execute DELETE statement and observe the results accordingly.

USE SampleDB
GO
DELETE FROM tbl_Product WHERE Product_ID = 2
GO

SELECT * FROM tbl_Product
GO
SELECT * FROM dbo.tbl_Product_History
GO

Temporal Table.1.3

      • SELECT STATEMENT

Select Statement is interesting in temporal table because it knows what you exactly want from temporal table and it internally links to history table to fulfill your requirement. Given below are some queries that we will run on temporal table and you will observe that temporal table (NOT history table) will return the current state and earlier state of the table as well. Isn’t in it amazing ?

Lets browse the TEMPORAL TABLE and it will show the latest state of the table like a NORMAL TABLE.

USE SampleDB
GO
--Current State of the table
SELECT * FROM tbl_Product
GO

Temporal Table.1.4

Lets browse the TEMPORAL TABLE FOR SYSTEM_TIME ‘2015-06-27 21:33:50.9002439’. It will give you the state of the table at ‘2015-06-27 21:33:50.9002439’ and you will be shocked to see that temporal table returned the result what was available exactly BEFORE the UPDATE statements. Wow !!!

USE SampleDB
GO
SELECT * FROM tbl_Product
FOR SYSTEM_TIME AS OF '2015-06-27 21:33:50.9002439'
GO

Temporal Table.1.5

Lets browse the TEMPORAL TABLE FOR SYSTEM_TIME at ‘2015-06-27 21:43:31.2982847’. You will be AGAIN shocked to see that temporal table returns the result what was available exactly available BEFORE the DELETE statements. Wow !!!

USE SampleDB
GO
SELECT * FROM tbl_Product
FOR SYSTEM_TIME AS OF '2015-06-27 21:43:31.2982847'
GO

Temporal Table.1.6

Conclusion :
I quickly reviewed temporal table and found it very interesting and exciting. I am sure it will change the way databases will be designed specially data warehouses because now we do not need to create separate audit tables to record each state manually by using stored procedure or triggers etc while TEMPORAL TABLE is doing it for us behind the scene automatically.

Let me know your experience about temporal table.

Reference : Channel9

Read Full Post »

Truncate table is always my preference when I need to delete all the records from any table. The reason for the preference is, actually Truncate Table is faster than delete and it takes less system and transaction log resources. However, there is a problem with TRUNCATE TABLE and that is when you EXECUTE TRUNCATE TABLE, it actually deletes all the records in the table and you cannot specify any criteria (WHERE CLAUSE) for deletion like Delete.

The Good News is in SQL Server 2016 you can specify the partition you want to delete using Truncate Table.

Let me create a sample partition table and insert some sample data in that table and then demonstrate how it works in few easy steps.

Sample :


USE master
GO
ALTER DATABASE [Sample_DB] SET SINGLE_USER WITH ROLLBACK IMMEDIATE
GO
USE [master]
GO
--Drop Sample database
DROP DATABASE [Sample_DB]
GO
--Create Sample database
CREATE DATABASE Sample_DB
GO

-- Create Filegroups
ALTER DATABASE Sample_DB ADD FILEGROUP [2014]
GO
ALTER DATABASE Sample_DB ADD FILEGROUP [2015]
GO

--Create one file for each filegroup and
--so that you can store partition data

ALTER DATABASE Sample_DB
ADD FILE
(NAME = N'FG_2014',
FILENAME = N'C:\Data\FG_2014.ndf'
)
TO FILEGROUP [2014]
GO

ALTER DATABASE Sample_DB
ADD FILE
(NAME = N'FG_2015',
FILENAME = N'C:\Data\FG_2015.ndf'
)
TO FILEGROUP [2015]
GO

USE Sample_DB
GO

-- Drop the partition function if it exists
IF( EXISTS( SELECT * FROM sys.partition_functions
WHERE name = 'OrderDateRangePFN' ) )
BEGIN
DROP PARTITION FUNCTION OrderDateRangePFN
END
GO

--Create partition function
CREATE PARTITION FUNCTION OrderDateRangePFN(DATETIME)  AS
RANGE LEFT FOR VALUES
('2014-12-31',
'2015-12-31'
)
GO

-- Drop the partition Scheme if it exists
IF( EXISTS( SELECT * FROM sys.partition_schemes
WHERE name = 'OrderDateRangePScheme' ) )
BEGIN
DROP PARTITION SCHEME OrderDateRangePScheme
END
GO

--Create partition scheme
CREATE PARTITION SCHEME OrderDateRangePScheme AS
PARTITION OrderDateRangePFN  TO
([2014],
[2015],
[PRIMARY]  )
GO

-- Drop sample table if exists
IF( OBJECT_ID( 'tbl_Sample', 'U' ) IS NOT NULL )
BEGIN
DROP TABLE tbl_Sample
END
GO

-- Create sample table
CREATE TABLE tbl_Sample
(OrderID INT NOT NULL,
[OrderDate] DATETIME)
ON OrderDateRangePScheme ([OrderDate]);
GO

-- Insert some sample data
insert into tbl_Sample Values (1,'2014-01-01')
insert into tbl_Sample Values (2,'2014-02-01')
insert into tbl_Sample Values (3,'2014-03-01')
insert into tbl_Sample Values (4,'2015-01-01')
insert into tbl_Sample Values (5,'2015-02-01')
insert into tbl_Sample Values (6,'2015-03-01')
insert into tbl_Sample Values (7,'2015-04-01')
insert into tbl_Sample Values (8,'2016-01-01')
insert into tbl_Sample Values (9,'2016-02-01')
GO

SELECT * FROM tbl_Sample
GO

Truncate Table 1.1

Step 1 :
Lets find out if the data exists in the partitions properly. Given below is the script.

USE Sample_DB
GO
-- Check if data exists in the partition properly
SELECT OBJECT_NAME(OBJECT_ID) AS [Table Name]
, partition_number AS [Partition Number]
, rows AS [Number of rows]
FROM sys.partitions
WHERE OBJECT_NAME(OBJECT_ID)='tbl_Sample';
GO

Truncate Table 1.2

Step 2 :
Lets TRUNCATE TABLE the data of PARTITION 2 in the sample table. Given below is the script.

USE Sample_DB
GO
TRUNCATE TABLE tbl_Sample
WITH (PARTITIONS (2));
GO

Truncate Table 1.3

Step 3 :
Lets find out if the data of partition 2 has been deleted in the sample table or as usual TRUNCATE TABLE has deleted all the data in the table. Given below is the script.

USE Sample_DB
GO
-- Check if data exists in the partition properly
SELECT OBJECT_NAME(OBJECT_ID) AS [Table Name]
, partition_number AS [Partition Number]
, rows AS [Number of rows]
FROM sys.partitions
WHERE OBJECT_NAME(OBJECT_ID)='tbl_Sample';
GO

Truncate Table 1.4

Wow, as expected only partition 2 data has been deleted from sample data. This feature is very helpful for the DBAs handling lots of partition in a single table and if they want to delete any particular partition(s) data quickly.

Reference : MSDN

Read Full Post »

Problem :
There is a common problem in SQL Server, when you give access of any table to any USER then the USER can view the entire table data and after giving access to the table if you would like to restrict this user NOT to view some critical data in that table, out of the box it is not possible in SQL Server, however there are some workarounds but those workarounds can make your life difficult as DBA. The GOOD NEWS is that it is POSSIBLE in SQL Server 2016 as out of the box solution and the name of this feature is Row Level Security (RLS). In this article, I will demonstrate how to implement RLS in your database environment step by step.

Before proceeding to the solution, I would like to create a sample.

Sample :
I will create two branches (Branch A & B) data in the sample table and later on restrict branch Administrator to view their own branch data and ONLY db_owner (or you can select any other role to give full access to the above table) can view all the data in the table.

CREATE DATABASE Sample_DB
GO
USE Sample_DB
GO
--DROP TABLE tbl_Sample
GO
CREATE TABLE tbl_Sample
(
[ID] int,
[Name] varchar(50),
[BranchName] varchar(50)
)
GO
INSERT INTO tbl_Sample VALUES (1,'Ken','Branch A')
INSERT INTO tbl_Sample VALUES (2,'Selena','Branch A')
INSERT INTO tbl_Sample VALUES (3,'Mae','Branch B')
INSERT INTO tbl_Sample VALUES (4,'Tom','Branch B')
INSERT INTO tbl_Sample VALUES (5,'Thomas','Branch B')
GO
SELECT * FROM tbl_Sample
GO

Row Level Security (RLS) 1.1

Solution :

Step 1 :
Let me create the Branch A and Branch B administrator role in the respective databases. Given below is the script.

USE Sample_DB
GO
EXEC sp_addrole 'Branch A Admin'
GO
EXEC sp_addrole 'Branch B Admin'
GO

Row Level Security (RLS) 1.2

Step 2 :
In the above step, I created the role for branches A & B, now let me create two users for respective branches, who can view only respective branch data in the table. Given below is the script.

USE Sample_DB
GO
CREATE USER USER_A WITHOUT LOGIN; -- Branch A Admin
GO
CREATE USER USER_B WITHOUT LOGIN; -- Branch B Admin
GO

Row Level Security (RLS) 1.3

Step 3 :
Lets add User A & B (created in step 2) as a member in the respective roles (created in step 1). Given below is the script.

USE Sample_DB
GO
EXEC sp_addrolemember 'Branch A Admin', 'USER_A'
GO
EXEC sp_addrolemember 'Branch B Admin', 'USER_B'
GO

Step 4:
Grant the SELECT access of table (tbl_Sample) to the users (User_A & User_B). After granting the Select access they (USER_A, USER_B) can view the entire data in the table (tbl_Sample). Given below is the script.

USE Sample_DB
GO
GRANT SELECT ON tbl_Sample TO USER_A;
GO
GRANT SELECT ON tbl_Sample TO USER_B;
GO

Step 5:
Lets find out the member principal ID. This is a unique ID corresponding to each member of the role. Using member principal ID, we will allow users to view the respective data ONLY in the table, later in the article. Given below is the script.

USE Sample_DB
GO
SELECT role_principal_id,
USER_NAME(role_principal_id) As [Role],
member_principal_id,
USER_NAME(member_principal_id) As [Member]
FROM sys.database_role_members
WHERE USER_NAME(role_principal_id)
IN ('Branch A Admin','Branch B Admin')
GO

Row Level Security (RLS) 1.4

Step 6:
Lets create a user defined table where we must enter the receptive Branch Name and member Principal ID which we found in the previous step (Step 5). Actually, now we are trying to assign each branch access to respective users using Database Principal ID (Member Principal ID). Given below is the script.

USE Sample_DB
GO
DROP TABLE dbo.tbl_user
GO
CREATE TABLE dbo.tbl_user
(
[ID] int,
[Name] varchar(50),
[BranchName] varchar(50),
[DatabasePrincipalID] int
)
GO
INSERT INTO dbo.tbl_user VALUES (1,'USER A','Branch A',7)
INSERT INTO dbo.tbl_user VALUES (2,'USER B','Branch B',8)
GO

SELECT * FROM dbo.tbl_user
GO

Row Level Security (RLS) 1.5

Step 7:
Lets create a separate scheme (Security) which we will use to create RLS object (predicate function & security object) later in this article. Note : It is a best practice to create RLS object in a separate scheme. Given below is the script.

USE Sample_DB
GO
CREATE SCHEMA Security;
GO

Step 8:
Now, it is time to create a predicate function (inline table valued function) to make restricted access for each branch data & for each user. However, db_owner will have full access on the table. Given below is the script.

USE Sample_DB
GO
--DROP FUNCTION [Security].fn_securitypredicate
--GO
CREATE FUNCTION [Security].fn_securitypredicate(@BranchName varchar(50))
RETURNS TABLE
WITH SCHEMABINDING
AS
RETURN SELECT 1 AS fn_securitypredicate_result
FROM dbo.tbl_user a Where  (a.DatabasePrincipalID = DATABASE_PRINCIPAL_ID()
And a.BranchName = @BranchName) OR IS_MEMBER('db_owner')=1
GO

Step 9:
Once predicate function (inline table valued function) has been created, lets create a security policy and add the predicate function (created in the above step) as a filter predicate. Please make sure that the STATE must be ON. Given below is the script.

USE Sample_DB
GO
--DROP SECURITY POLICY [Security].[BranchSecurityPolicy]
--GO
CREATE SECURITY POLICY [Security].[BranchSecurityPolicy]
ADD FILTER PREDICATE [Security].fn_securitypredicate([BranchName])
ON [dbo].[tbl_Sample]
WITH (STATE= ON);
GO

Step 10:
Now, we are done with the setup. Lets test the access of each user on the table (tbl_Sample). Given below is the script.

  • USER_A can view ONLY Branch A data as shown below.
USE Sample_DB
GO
EXECUTE('Select * from tbl_Sample;') AS USER ='USER_A'
GO

Row Level Security (RLS) 1.6

  • USER_B can view ONLY Branch B data as shown below.
USE Sample_DB
GO
EXECUTE('Select * from tbl_Sample;') AS USER ='USER_B'
GO

Row Level Security (RLS) 1.7

  • Admin, whose is member of db_owner can view Entire Table data as shown below.
USE Sample_DB
GO
EXECUTE('Select * from tbl_Sample;') AS USER ='Admin'
GO

Row Level Security (RLS) 1.8

Conclusion :
As you can see above by creating few RLS objects we can restrict each user access at the row level even though the user has Select access on the respective table.

Reference : MSDN

Read Full Post »