Feeds:
Posts
Comments

Archive for the ‘DML’ Category

SQL Server 2016 shipped with a lot of TSQL Enhancements and one of them is DROP IF EXISTS. It actually minimizes the size of the script which you can use to drop any object (AGGREGATE, ASSEMBLY, COLUMN, CONSTRAINT, DATABASE, DEFAULT, FUNCTION, INDEX, PROCEDURE, ROLE, RULE, SCHEMA, SECURITY POLICY, SEQUENCE, SYNONYM, TABLE, TRIGGER, TYPE, USER, and VIEW). In other words, you DO NOT need to write long IF EXISTS Statements anymore to drop any object.
The beauty of this TSQL is that if it fails (in case, if object does not exist), it DOES NOT give you error message.

Lets me create a sample table to demonstrate how it works but as I mentioned earlier you can use this script to drop any object.

SAMPLE:


USE tempdb
GO
--Create Sample table
CREATE TABLE dbo.tbl_Sample
(
[ID] INT,
[Name] NVARCHAR(50)
)
GO

OLD METHOD:
Given below methods are compatible with SQL Server 2005 and above.

--Method 1
USE tempdb
GO
IF OBJECT_ID('dbo.tbl_Sample', 'U') IS NOT NULL
DROP TABLE dbo.tbl_Sample
GO

--Method 2
USE tempdb
GO
IF EXISTS (SELECT * FROM sys.tables WHERE name = 'tbl_Sample')
DROP TABLE dbo.tbl_Sample
GO

NEW METHOD:
Given below method is compatible with SQL Server 2016 and above.

USE tempdb
GO
DROP TABLE IF EXISTS tbl_Sample;
GO

Reference : MSDN

Read Full Post »

Truncate table is always my preference when I need to delete all the records from any table. The reason for the preference is, actually Truncate Table is faster than delete and it takes less system and transaction log resources. However, there is a problem with TRUNCATE TABLE and that is when you EXECUTE TRUNCATE TABLE, it actually deletes all the records in the table and you cannot specify any criteria (WHERE CLAUSE) for deletion like Delete.

The Good News is in SQL Server 2016 you can specify the partition you want to delete using Truncate Table.

Let me create a sample partition table and insert some sample data in that table and then demonstrate how it works in few easy steps.

Sample :


USE master
GO
ALTER DATABASE [Sample_DB] SET SINGLE_USER WITH ROLLBACK IMMEDIATE
GO
USE [master]
GO
--Drop Sample database
DROP DATABASE [Sample_DB]
GO
--Create Sample database
CREATE DATABASE Sample_DB
GO

-- Create Filegroups
ALTER DATABASE Sample_DB ADD FILEGROUP [2014]
GO
ALTER DATABASE Sample_DB ADD FILEGROUP [2015]
GO

--Create one file for each filegroup and
--so that you can store partition data

ALTER DATABASE Sample_DB
ADD FILE
(NAME = N'FG_2014',
FILENAME = N'C:\Data\FG_2014.ndf'
)
TO FILEGROUP [2014]
GO

ALTER DATABASE Sample_DB
ADD FILE
(NAME = N'FG_2015',
FILENAME = N'C:\Data\FG_2015.ndf'
)
TO FILEGROUP [2015]
GO

USE Sample_DB
GO

-- Drop the partition function if it exists
IF( EXISTS( SELECT * FROM sys.partition_functions
WHERE name = 'OrderDateRangePFN' ) )
BEGIN
DROP PARTITION FUNCTION OrderDateRangePFN
END
GO

--Create partition function
CREATE PARTITION FUNCTION OrderDateRangePFN(DATETIME)  AS
RANGE LEFT FOR VALUES
('2014-12-31',
'2015-12-31'
)
GO

-- Drop the partition Scheme if it exists
IF( EXISTS( SELECT * FROM sys.partition_schemes
WHERE name = 'OrderDateRangePScheme' ) )
BEGIN
DROP PARTITION SCHEME OrderDateRangePScheme
END
GO

--Create partition scheme
CREATE PARTITION SCHEME OrderDateRangePScheme AS
PARTITION OrderDateRangePFN  TO
([2014],
[2015],
[PRIMARY]  )
GO

-- Drop sample table if exists
IF( OBJECT_ID( 'tbl_Sample', 'U' ) IS NOT NULL )
BEGIN
DROP TABLE tbl_Sample
END
GO

-- Create sample table
CREATE TABLE tbl_Sample
(OrderID INT NOT NULL,
[OrderDate] DATETIME)
ON OrderDateRangePScheme ([OrderDate]);
GO

-- Insert some sample data
insert into tbl_Sample Values (1,'2014-01-01')
insert into tbl_Sample Values (2,'2014-02-01')
insert into tbl_Sample Values (3,'2014-03-01')
insert into tbl_Sample Values (4,'2015-01-01')
insert into tbl_Sample Values (5,'2015-02-01')
insert into tbl_Sample Values (6,'2015-03-01')
insert into tbl_Sample Values (7,'2015-04-01')
insert into tbl_Sample Values (8,'2016-01-01')
insert into tbl_Sample Values (9,'2016-02-01')
GO

SELECT * FROM tbl_Sample
GO

Truncate Table 1.1

Step 1 :
Lets find out if the data exists in the partitions properly. Given below is the script.

USE Sample_DB
GO
-- Check if data exists in the partition properly
SELECT OBJECT_NAME(OBJECT_ID) AS [Table Name]
, partition_number AS [Partition Number]
, rows AS [Number of rows]
FROM sys.partitions
WHERE OBJECT_NAME(OBJECT_ID)='tbl_Sample';
GO

Truncate Table 1.2

Step 2 :
Lets TRUNCATE TABLE the data of PARTITION 2 in the sample table. Given below is the script.

USE Sample_DB
GO
TRUNCATE TABLE tbl_Sample
WITH (PARTITIONS (2));
GO

Truncate Table 1.3

Step 3 :
Lets find out if the data of partition 2 has been deleted in the sample table or as usual TRUNCATE TABLE has deleted all the data in the table. Given below is the script.

USE Sample_DB
GO
-- Check if data exists in the partition properly
SELECT OBJECT_NAME(OBJECT_ID) AS [Table Name]
, partition_number AS [Partition Number]
, rows AS [Number of rows]
FROM sys.partitions
WHERE OBJECT_NAME(OBJECT_ID)='tbl_Sample';
GO

Truncate Table 1.4

Wow, as expected only partition 2 data has been deleted from sample data. This feature is very helpful for the DBAs handling lots of partition in a single table and if they want to delete any particular partition(s) data quickly.

Reference : MSDN

Read Full Post »

Mostly, there are multiple ways to write a script to perform a single task. It varies from Developers to Developers, who normally try to follow the best practice. But sometimes some standards discard from time to time (version to version). In this article, I will go through some standard formats that we used in the prior version of SQL server but does not work in SQL Server 2012. It may break your script.

Let me create a sample in SQL Server 2005/ 2008 to explain it.

USE [test]
GO
CREATE TABLE [dbo].[t_Student](
[Student ID] [int] IDENTITY(1,1) NOT NULL,
[Student Name] [nvarchar](50) NULL
)

After creating the sample table lets alter this table. But there are three different formats that you can use to alter the table in earlier version of SQL server (2005/2008)


Method 1 :
In method 1, the format to alter the table will be .Database Name.Schema.Table Name

Alter table .[test].dbo.[t_Student] Add [Contact Details] varchar(50) NULL
--OUTPUT

Command(s) completed successfully

Method 2 :
In method 2, the format to alter the table will be ..Schema.Table Name

use test
GO
Alter table ..dbo.[t_Student] Add [Date of Birth] Datetime NULL
--OUTPUT

Command(s) completed successfully

Method 3 :
In method 3, the format to alter the table will be Schema.Table Name

use test
GO
Alter table dbo.[t_Student] Add [Date of Admission] Datetime NULL
--OUTPUT

Command(s) completed successfully

All of the above methods executed successfully in SQL Server 2005/ 2008.

Lets browse the table.

Select * from t_Student

alter table 1.1

Now, lets do the same exercise in SQL Server 2012.

Method 1 :
In method 1, the format to alter the table will be .Database Name.Schema.Table Name

Alter table .[test].dbo.[t_Student] Add [Contact Details] varchar(50) NULL
--OUTPUT

Msg 117, Level 15, State 1, Line 1
The object name ‘.test.dbo.t_Student’ contains more than the maximum number of prefixes. The maximum is 2.

Method 2 :
In method 2, the format to alter the table will be ..Schema.Table Name

use test
GO
Alter table ..dbo.[t_Student] Add [Date of Birth] Datetime NULL
--OUTPUT

Msg 117, Level 15, State 1, Line 1
The object name ‘..dbo.t_Student’ contains more than the maximum number of prefixes. The maximum is 2.

Method 3 :
In method 3, the format to alter the table will be Schema.Table Name

use test
GO
Alter table dbo.[t_Student] Add [Date of Admission] Datetime NULL
--OUTPUT

Command(s) completed successfully

Conclusion :
If you are planning to upgrade your SQL Server earlier version to SQL Server 2012 or you are using SQL Server 2012, remember, it will not allow you to use methods 1 & 2. In case your are using above methods 1 & 2 in Dynamic SQL or Static SQL, it may break your script.

Reference : MSDN

Read Full Post »

In my previous post, I discussed how we could apply different Data Definition Language (DDL) Statements on File Table. Today, we will discuss how to apply Data Manipulation Language (DML) Statements on a File Table.

  • Insert record in File Table :

There are two ways to do it.

  1. Via SQL Server Management Studio (GUI)
  2. Via Transact SQL

1-Via SQL Server Management Studio (GUI)
This is the simplest way of insertion of any record in the File Table.
Lets do it step by step :

Step 1:
First copy the file that you want to place in the file table. For example abc.txt (text file).

Step 2:
Then go to the database, where you have created a file table and then select the file table and right click on it.

filetable3.1.1
Step 3:
Click on the Explore File Table Directory

Step 4:
It will open the directory pointing to this file table. Just paste the file (abc.txt) in it.
filetable3.1.2

Step 5:
After that just execute the select statement to verify whether the file is there or not.

Use MyFileTableDB
GO
select * from databank

filetable3.1.3

2-Via Transact SQL

Given below is the method to insert data into file table. But make sure the file is more than 0 KB.

INSERT INTO [dbo].[databank] ([name],[file_stream])
SELECT'Test file',
* FROM OPENROWSET(BULK N'C:\abc-2.txt', SINGLE_BLOB) AS FileData
GO
  • Select records from File Table :

The select statement of a file table is same like a normal table. Given below is the script to browse file table :

Select * from dbo.DataBank

filetable2.1.4

  • Update records in File Table :

Given below is the script to update file table.

Update Databank set [name]='test file-2' where [name]='test file'

Once you update the file table and change the name of the file, execute the select statement to verify whether the update is successfully done or not.

Select * from dbo.DataBank

filetable2.1.5

  • Delete records in File Table :

Given below is the script to delete files from the file table. Make sure you select the correct file name, because it will not only delete record from the file table but also physically delete the file from the directory as well.

Delete from DataBank where [name]='test file-2'

Once you delete the file from file table, execute the select statement to verify whether the delete is successfully done or not.

Select * from dbo.DataBank

filetable2.1.6

Read Full Post »

File table is one of the excellent features introduced in SQL Server 2012. This feature provides the compatibility between windows application and file data stored in SQL Server and gives the support of windows file names space (Windows API) as well. In simple words you can say, from File table you can handle windows files and directories via SQL server 2012. This nice feature is a build on top of file stream technology. In other words, you must enable file stream to use File Table.

In this article, we will learn how to enable File Stream and create File Table in sql server.

Let’s do it step by step to view how it works.

Step 1: Enable File Stream in SQL server 2012:
There are 2 ways to enable file stream in SQL server 2012.

  1. Via T-SQL
  2. Via Configuration Manager

1- Via T-SQL
Given below is the script to enable file stream in SQL server 2012. Execute the given below code and don’t forget to restart the SQL Server Service.

EXEC sp_configure filestream_access_level, 2
RECONFIGURE

2- Via Configuration Manager
Through configuration manager, we need to follow certain steps to enable file stream in sql server:
Step I
Open SQL Server configuration Manager.
Step II
Then locate the sql server instance on which, you need to enable file stream on it.
Step III
Then select the instance and right click on it and select properties.
Enablefilestream1.1
Step IV
Select Filestream Tab and Enable FILESTREM for transact SQL access and give windows share name as well. By default it is instance name. If remote users need the access of file stream then you should also allow remote client access to file stream data.
Enablefilestream1.2
Step V
Click apply

Step 2: Create File table enabled Database in SQL server 2012:
There are 2 ways to create file table enabled database in SQL server 2012.

  1. Via T-SQL
  2. Via SSMS GUI Interface

1- Via T-SQL
Execute the given below script to create a file table enabled database.

CREATE DATABASE [MyFileTableDB]
ON PRIMARY
( NAME = N'MyFileTableDB', FILENAME = N'C:\DATA\MyFileTableDB.mdf'),
FILEGROUP MyFileGroup CONTAINS FILESTREAM (NAME = MyFileTableFS,FILENAME='C:\Data\MyFileTable')
LOG ON
( NAME = N'MyFileTableDB_log', FILENAME = N'C:\DATA\MyFileTableDB_log.ldf')
WITH FILESTREAM ( NON_TRANSACTED_ACCESS = FULL, DIRECTORY_NAME = N'MyFileTableDB' )
GO

2- Via SSMS GUI Interface
Right click on the databases and create a new database in SSMS and enter all the information required to create a simple database, then go to options and set two properties.

  •   Enter FILESTREAM Directory name = MyFileTableDB
  •   Make FILESTEAM Non-Transacted Access = FULL

Enablefilestream1.3

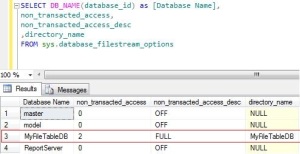
Lets check that file table enabled database is whether created or not.

SELECT DB_NAME(database_id) as [Database Name],
non_transacted_access,
non_transacted_access_desc
,directory_name
FROM sys.database_filestream_options

Enablefilestream1.4

Step 2.1: Enable a file table in an existing Database in SQL server 2012:
There are 2 ways to enable file table in an existing database in SQL server 2012.

  1. Via T-SQL
  2. Via SSMS GUI Interface

1- Via T-SQL
Execute the given below script to enable a file table in an existing database.

ALTER DATABASE test
SET FILESTREAM ( NON_TRANSACTED_ACCESS = FULL, DIRECTORY_NAME = N'testfiletable' )
GO

2- Via SSMS GUI Interface
Right click on the databases goto options and set two properties.

  • Enter FILESTREAM Directory name = MyFileTableDB
  • Make FILESTEAM Non-Transacted Access = FULL

Enablefilestream1.3

Will discuss another nice features of file table in up coming posts.

Read Full Post »