Feeds:
Posts
Comments

Archive for the ‘Solutions’ Category

WeatherAPI provides an API to get Weather condition of any location. In this article, we will use this API in SQL Server in order to get weather conditions of any location. 

Let me explain it step by step.

Step 1:

Please Sign Up in WeatherAPI and create an account as shown below.

Step 2:

After Sign Up, login to the account, created in Step 1, it will direct to the screen where you can find your API key as shown below, please make a note of this Key.

Step 3:

You need to run given below script to enable OLE Automation Procedures. This is a prerequisite for next step.

 
sp_configure 'show advanced options', 1;
GO
RECONFIGURE;
GO
sp_configure 'Ole Automation Procedures', 1;
GO
RECONFIGURE;
GO

Step 4:

Let’s create given below stored procedure which takes location as an input and provides weather condition of that location.

 
USE tempdb
GO
 
CREATE OR ALTER PROCEDURE sp_Weather_Details
@Location NVARCHAR(250)

AS
DECLARE @URL NVARCHAR(250) = 'https://api.weatherapi.com/v1/current.json';
DECLARE @key VARCHAR(250) ='xxxxxxxxxxxxxxxxxxxxxxxxx'; --Enter your own API Key generated in Step 2
DECLARE @ConsolidatedURL NVARCHAR(250) = CONCAT(@URL,'?key=',@Key,'&q=',@location,'&aqi=no'); 
DECLARE @Object INT;
DECLARE @Json TABLE(DATA NVARCHAR(MAX));
DECLARE @ResponseText NVARCHAR(MAX);
 
EXEC sp_OACreate 'MSXML2.XMLHTTP', @Object OUT;
EXEC sp_OAMethod @Object, 'OPEN', NULL, 'GET', @ConsolidatedURL, 'FALSE';
EXEC sp_OAMethod @Object, 'SEND';
EXEC sp_OAMethod @Object, 'RESPONSETEXT', @ResponseText OUTPUT , @Json OUTPUT;
 
INSERT INTO @Json exec sp_OAGetProperty @Object, 'RESPONSETEXT';
 
DECLARE @Data NVARCHAR(MAX) = (SELECT DATA FROM @Json);
SELECT * FROM OPENJSON(@Data)
WITH
( 
  [Country] NVARCHAR(500)  '$.location.country',
  [Region] NVARCHAR(500) '$.location.region',
  [City] NVARCHAR(500)  '$.location.name',
  [Current Temprature] NUMERIC(18,1) '$.current.temp_c',
  [Humidity] NUMERIC(18,1) '$.current.humidity',
  [Weather Condition] NVARCHAR(500) '$.current.condition.text',
  [Wind Speed] NUMERIC(18,1) '$.current.wind_kph'
);
GO

Let’s run few examples and see the weather conditions.

  • Example 1:

Location: Karachi, Pakistan


USE tempdb
GO

EXEC sp_Weather_Details 'Karachi';
GO

  • Example 2:

Location: Dubai, UAE


USE tempdb
GO

EXEC sp_Weather_Details 'Dubai';
GO
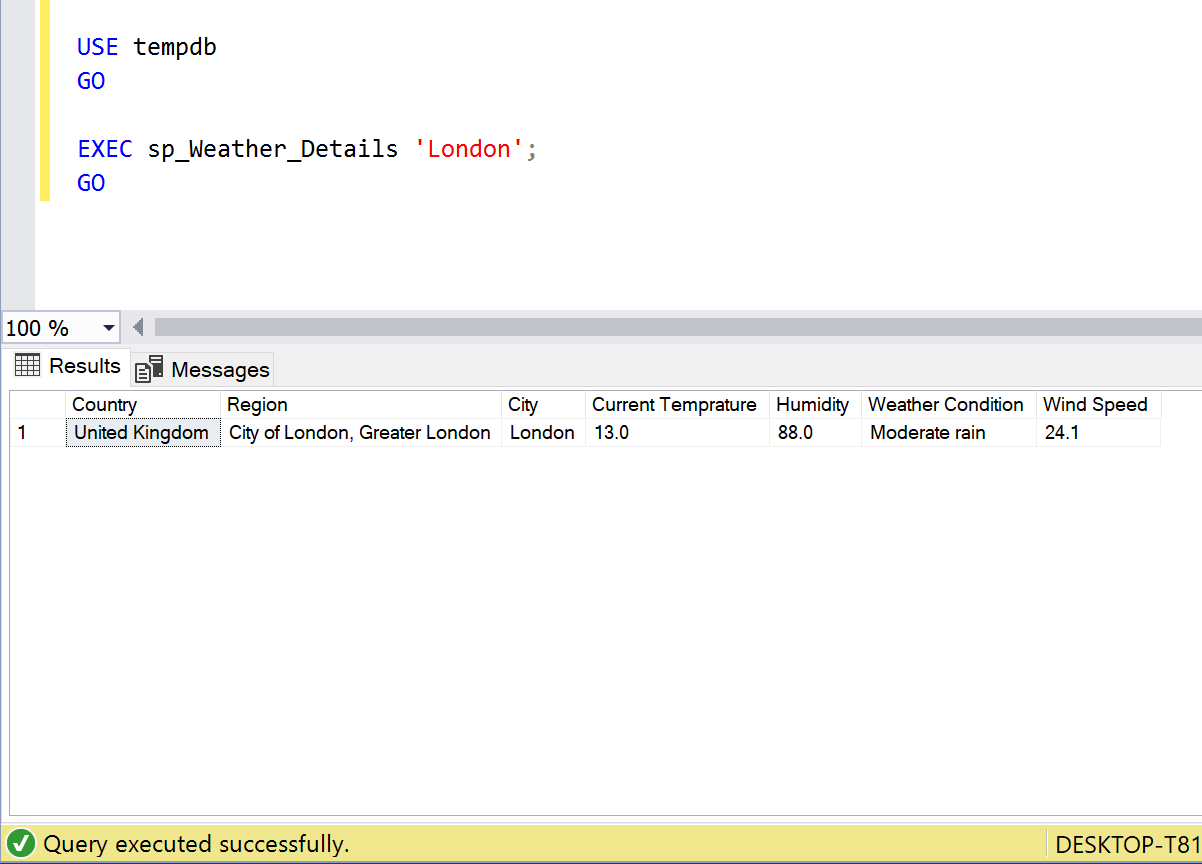
  • Example 3:

Location: London, UK


USE tempdb
GO

EXEC sp_Weather_Details 'London';
GO

Example 4:

Location: New York, USA


USE tempdb
GO

EXEC sp_Weather_Details 'New York';
GO

Conclusion:

I found this API very useful whenever I need to find the weather of any location. Do let me know your feedback.

Read Full Post »

Google translate provides API to translate text from one language to another. In this article, we will use this API in SQL Server and translate some text. Please sign up in google translate and create an account which provides you the Key.
Please use this Key in the given below stored procedure.

Before creating the stored procedure, you need to run given below script to enable Ole Automation Procedures. This is a prerequisite for the given below solution.

Enable OLE Automation procedures:

 
sp_configure 'show advanced options', 1;
GO
RECONFIGURE;
GO
sp_configure 'Ole Automation Procedures', 1;
GO
RECONFIGURE;
GO

Solution:


USE tempdb
GO

CREATE OR ALTER PROCEDURE sp_translate_text
@TextToBeTranslated NVARCHAR(500),
@SourceLanguage NVARCHAR(50),
@TargetLanguage NVARCHAR(50),
@Key NVARCHAR(250) = 'Please use Translate API key provided by google'  

AS

DECLARE @URL NVARCHAR(250) = 'https://translation.googleapis.com/language/translate/v2';
DECLARE @ConsolidatedURL NVARCHAR(250) = CONCAT(@URL,'?key=',@Key); 
DECLARE @Object INT;
DECLARE @Json TABLE(DATA NVARCHAR(MAX));
DECLARE @ResponseText NVARCHAR(MAX);
DECLARE @Body NVARCHAR(MAX)  = CONCAT('{','"q":','"',@TextToBeTranslated,'"',',','"target":','"',@TargetLanguage,'"',',','"source":','"',@SourceLanguage,'"','}');

EXEC sp_OACreate 'MSXML2.XMLHTTP', @Object OUT;
EXEC sp_OAMethod @Object, 'OPEN', NULL, 'POST', @ConsolidatedURL, 'FALSE';
EXEC sp_OAMethod @Object, 'SETREQUESTHEADER', NULL, 'CONTENT-TYPE', 'APPLICATION/JSON';
EXEC sp_OAMethod @Object, 'SEND', NULL, @Body;

EXEC sp_OAMethod @Object, 'RESPONSETEXT', @ResponseText OUTPUT , @Json OUTPUT;
INSERT INTO @Json exec sp_OAGetProperty @Object, 'RESPONSETEXT';

DECLARE @Data NVARCHAR(MAX) = (SELECT DATA FROM @Json);

SELECT @SourceLanguage AS [Source Language]
	 , @TargetLanguage AS [Target Language]
	 , TranslatedText  AS [Translated Text]
FROM OPENJSON(@Data,'$.data.translations')
WITH
(
 [TranslatedText] NVARCHAR(500) '$.translatedText'  
);
GO

  • Example 1:

Text to be translated: “How are you”

Source Language: English

Target Language: Urdu


USE tempdb
GO

EXEC sp_translate_text N'how are you','en','ur';
GO

  • Example 2:

Text to be translated: “آپ کیسے ہو”

Source Language: Urdu

Target Language: English


USE tempdb
GO

EXEC sp_translate_text N'آپ کیسے ہو','ur','en';
GO

  • Example 3:

Text to be translated: “How are you”

Source Language: English

Target Language: Arabic


USE tempdb
GO

EXEC sp_translate_text N'how are you','en','ar';
GO

  • Example 4:

Text to be translated: “كيف حالكم”

Source Language: Arabic

Target Language: English


USE tempdb
GO

EXEC sp_translate_text N'كيف حالكم','ar','en';
GO

  • Example 5:

Text to be translated: “How are you”

Source Language: English

Target Language: Hindi


USE tempdb
GO

EXEC sp_translate_text N'how are you','en','hi';
GO

  • Example 6:

Text to be translated: “आप कैसे हैं”

Source Language: Hindi

Target Language: English


USE tempdb
GO

EXEC sp_translate_text N'आप कैसे हैं','hi','en';
GO

Conclusion:

I found Google translate API very useful whenever I need to convert any text from one language to another. It works very smoothly. Do let me know if you use it and how did you find it.

Read Full Post »

Sometimes, we come across a situation where the transaction log file grows unexpectedly, and it needs to be managed properly. One of the options is to reduce the size of database transaction log by shrinking the database transaction log file. Please be careful while implementing this solution on production databases.

Let me create a sample and then expalin it step by step as shown below.

Sample:

 
CREATE DATABASE SampleDB;
GO

Use SampleDB
GO

CREATE TABLE [Customers]
(
 [CustomerID]         INT IDENTITY(1,1),
 [CustomerName]       VARCHAR(250),
 [RegistrationDate]   DATE,
 [EmailAddress]       VARCHAR(100),
 [Address]            VARCHAR(500),
 [PhoneNumber]        VARCHAR(100)
);
GO

--Lets's insert 3,000,000 records in customer table
INSERT INTO [Customers]
(CustomerName,RegistrationDate,EmailAddress,Address,PhoneNumber)
VALUES('John','01-13-2023','John@raresql.com','AB Street','0134018201');
GO 3000000

Step 1:

Let’s check the size of the database files as shown below.

 
Use SampleDB
GO

SELECT name           AS [DB File Name]
     , size           AS [Size in KBs]
     , size * 8/1024  AS [Size in MBs]
     , Max_Size       AS [Max Size]
FROM sys.master_files
WHERE DB_NAME(database_id) = 'SampleDB';
GO

Step 2:

Now, let’s take the full backup of the database by using the following query.

 
--Backup database
BACKUP DATABASE [SampleDB] TO  DISK = N'D:\SampleDB_Backup.bak';
GO

Step 3:

Let’s shrink database log file by using the following script.

 
Use SampleDB
GO

--Let's change recovery model to simple
ALTER DATABASE SampleDB 
SET RECOVERY SIMPLE;
GO

--Let's shrink the database log file
DBCC SHRINKFILE (SampleDB_log, 1, TRUNCATEONLY);
GO

--Let's change recovery model to full
ALTER DATABASE SampleDB 
SET RECOVERY FULL;
GO

Step 4:

Let’s check the database log file size again. As we can see below the database_log file size has been reduced.

 
Use SampleDB
GO

SELECT name           AS [DB File Name]
     , size           AS [Size in KBs]
     , size * 8/1024  AS [Size in MBs]
     , Max_Size       AS [Max Size]
FROM sys.master_files
WHERE DB_NAME(database_id) = 'SampleDB';
GO

Conclusion:

This is one of easiest ways to shrink the database transation log. Do let me know, which method you use and how effective it is.

Read Full Post »

Policy Based Management (PBM) is one of the greatest features shipped with SQL Server 2008. It made DBA’s life easier when it comes to implementation, compliance as well as changing any database/ server properties, especially when you need to implement /check some database / server settings across the databases/ servers. Recently, we have implemented Delayed durability database setting to Forced in one of our clients’ databases using Policy Based Management across the databases. Delayed durability is actually one of the best features shipped with SQL Server 2014. What made it best actually is its handling vs performance. You can just enable with a single statement and you get a huge performance boast.

 Note: Delayed durability is disabled by default. 

In this article, I will show you step by step, how to implement any database / server settings across the databases / servers using few clicks with the help of Policy Based Management.

Step 1:
Open SQL Server Management Studio (SSMS) and Select Management >>Policy Management >>Conditions and right click on it to Select New Condition… as shown below.

PBM - Delayed Durability 1.0

Step 2:
Now, we are in condition building screen, so lets build the 1st condition and that is to check delayed durability in all user databases which is online ONLY. Given below is the configuration. Do not forget to give a proper name to this condition.

PBM - Delayed Durability 1.1

Step 3:
Lets repeat Step 1 and open the condition creation screen. This time we will create the condition to check database setting which is delayed durability=FORCED. Given below is the configuration.

PBM - Delayed Durability 1.2

Step 4:
Now we are done with the conditions, so the next step is to build the Policy. In order to build the policy you need to Select Management >>Policy Management >> Policies and right click on it to select New Policy… as shown below.

PBM - Delayed Durability 1.4

Step 5:
Now, we are in policy creation screen, here we need to give a proper Policy Name and then select the conditions created in Step 2 and Step 3 shown below in red and blue color border respectively.  In  other words, we are trying to make policy which checks the delayed durability is forced or NOT in all user databases which is online.

PBM - Delayed Durability 1.6

Usually I choose the Evaluation Mode to “On Demand” showing above because it is the easiest way to evaluate and fix any discrepancy across the databases / servers, however, you can select On Schedule as well and Press OK.

Step 6:
Now, the policy has been created and you can see it under policies as shown below. Just right click on and select Evaluate to evaluate the policy as shown below.

PBM - Delayed Durability 1.7

Step 7:
You are in evaluation screen and you can see all the user databases shows in red color because none of them is having database settings to delayed durability= force.

PBM - Delayed Durability 1.8

Step 8:
Lets click on View Details to see the difference in database settings as shown below. You can see that Policy is expecting the Delayed durability = force but the actual value is disabled.

PBM - Delayed Durability 1.9

Step 9:
Lets select the databases where you want to change the database settings of delayed durability to FORCE and press Apply button. It gives the given below messages. Press YES button.

PBM - Delayed Durability 1.10

Step 10:
Once the policy has been implemented, policy based management will automatically evaluate the policy again and shows as green color icon as shown below.

PBM - Delayed Durability 1.11

Let me know if you have implemented any databases / servers settings using Policy Based Management.

Read Full Post »

Sometimes, we come across a case where we have given one date and we need to calculate multiple dates based on this date. This can be achieved in the earlier versions of the SQL Server (earlier than 2022), but we had to use multiple functions like CONVERT(), DATEADD(), DATEDIFF() etc with lots of complexity.

Fortunately, a new function shipped in SQL Server 2022 namely DATETRUNC() which helps us to achieve this scenario easily.

Compatibility Level:

Your database compatibility level MUST be 160 or higher to use this new function.

 ALTER DATABASE tempdb SET COMPATIBILITY_LEVEL = 160 

Prerequisite:

In order to set the first day of the week as Monday, we need to run the below script.


SET DATEFIRST 1;
GO

First Date of Previous Week

  • Old Approach

In the old approach, we have to extract first date of the previous week using multiple functions (CONVERT(), DATEADD(), DATEDIFF()) as shown below.

DECLARE @Date DATE;
SET @Date = GETDATE();

SELECT  @Date							 AS [Current Date]
	  , CONVERT(DATE
	  , DATEADD(WEEK
	  , DATEDIFF(WEEK, 0, @Date) -1, 0)) AS [First Date Of Previous Week];
GO
--OUTPUT

  • New Approach

In the new approach, we can extract the first date of the previous week using DATETRUNC() & DATEADD() function as shown below.

DECLARE @Date Date;
SET @Date = GETDATE();

SELECT  @Date					  AS [Current Date]
	  , DATEADD(WEEK, -1
	  , DATETRUNC(WEEK, @Date))   AS [First Date Of Previous Week];
GO
--OUTPUT

Last Date of Previous Week

  • Old Approach

In the old approach, we have to extract last date of the previous week using multiple functions (CONVERT(), DATEADD(), DATEDIFF()) as shown below.

DECLARE @Date DATE;
SET @Date = GETDATE();

SELECT  @Date							  AS [Current Date]
      , CONVERT(DATE
	  , DATEADD(WEEK
	  , DATEDIFF(WEEK, 0, @Date) +0, -1)) AS [Last Date Of Previous Week];
GO
--OUTPUT

  • New Approach

In the new approach, we can extract the last date of the previous week using DATETRUNC() & DATEADD() function as shown below.

DECLARE @Date DATE;
SET @Date = GETDATE();

SELECT  @Date					  AS [Current Date]
	  , DATEADD(DAY, -1
	  , DATEADD(WEEK, 0
	  , DATETRUNC(WEEK, @Date)))  AS [Last Date Of Previous Week];
GO
--OUTPUT

First Date of Current Week

  • Old Approach

In the old approach, we have to extract first date of the current week using multiple functions (CONVERT(), DATEADD(), DATEDIFF()) as shown below.

DECLARE @Date DATE;
SET @Date = GETDATE();

SELECT  @Date							 AS [Current Date]
	  , CONVERT(DATE
	  , DATEADD(WEEK
	  , DATEDIFF(WEEK, 0, @Date) +0, 0)) AS [First Date Of Current Week];
GO
--OUTPUT

  • New Approach

In the new approach, we can extract the first date of the current week using DATETRUNC() function as shown below.

DECLARE @Date Date;
SET @Date = GETDATE();

SELECT  @Date				   AS [Current Date]
	  , DATETRUNC(WEEK, @Date) AS [First Date of Current Week];
GO
--OUTPUT

Last Date of Current Week

  • Old Approach

In the old approach, we have to extract last date of the current week using multiple functions (CONVERT(), DATEADD(), DATEDIFF()) as shown below.

DECLARE @Date DATE;
SET @Date = GETDATE();

SELECT  @Date							  AS [Current Date]
      , CONVERT(DATE
	  , DATEADD(WEEK
	  , DATEDIFF(WEEK, 0, @Date) +1, -1)) AS [Last Date Of Current Week];
GO
--OUTPUT

  • New Approach

In the new approach, we can extract the last date of the current week using DATETRUNC() & DATEADD() function as shown below.

DECLARE @Date DATE;
SET @Date = GETDATE()

SELECT  @Date					 AS [Current Date]
      , DATEADD(DAY, -1
	  , DATEADD(WEEK, 1
	  , DATETRUNC(WEEK, @Date))) AS [Last Date Of Current Week];
GO
--OUTPUT

First Date of Next Week

  • Old Approach

In the old approach, we have to extract first date of the next week using multiple functions (CONVERT(), DATEADD(), DATEDIFF()) as shown below.

DECLARE @Date DATE;
SET @Date = GETDATE();

SELECT  @Date							 AS [Current Date]
	  , CONVERT(DATE
	  , DATEADD(WEEK
	  , DATEDIFF(WEEK, 0, @Date) +1, 0)) AS [First Date Of Next Week];
GO
--OUTPUT

  • New Approach

In the new approach, we can extract the first date of the next week using DATETRUNC() & DATEADD() function as shown below.

DECLARE @Date DATE;
SET @Date = GETDATE();

SELECT  @Date					 AS [Current Date]
	  , DATEADD(WEEK, 1
	  , DATETRUNC(WEEK, @Date))  AS [First Date Of Next Week];
GO

--OUTPUT

Last Date of Next Week

  • Old Approach

In the old approach, we have to extract last date of the next week using multiple functions (CONVERT(), DATEADD(), DATEDIFF()) as shown below.

DECLARE @Date DATE;
SET @Date = GETDATE();

SELECT  @Date							  AS [Current Date]
      , CONVERT(DATE
	  , DATEADD(WEEK
	  , DATEDIFF(WEEK, 0, @Date) +2, -1)) AS [Last Date Of Next Week];
GO
--OUTPUT

  • New Approach

In the new approach, we can extract the last date of the next week using DATETRUNC() & DATEADD() function as shown below.


DECLARE @Date DATE;
SET @Date = GETDATE();

SELECT  @Date					 AS [Current Date]
      , DATEADD(DAY, -1
	  , DATEADD(WEEK, 2
	  , DATETRUNC(WEEK, @Date))) AS [Last Date Of Next Week];
GO
--OUTPUT

Conclusion:

We used DATETRUNC() function to achieve it and found it easier & simpler as compared to earlier version of SQL Server.

Read Full Post »

Sometimes, we come across a case where we have given one date and we need to calculate multiple dates based on this date. This can be achieved in the earlier versions of the SQL Server (earlier than 2022), but we had to use multiple functions like CONVERT(), DATEADD(), DATEDIFF() etc with lots of complexity.

Fortunately, a new function shipped in SQL Server 2022 namely DATETRUNC() which helps us to achieve this scenario easily.

Compatibility Level:

Your database compatibility level MUST be 160 or higher to use this new function.

 ALTER DATABASE tempdb SET COMPATIBILITY_LEVEL = 160 

First Date of Previous Month

  • Old Approach

In the old approach, we have to extract first date of the previous month using multiple functions (CONVERT(), DATEADD(), DATEDIFF()) as shown below.

DECLARE @Date DATE;
SET @Date = GETDATE();

SELECT  @Date							  AS [Current Date]
	  , CONVERT(DATE
	  , DATEADD(MONTH
	  , DATEDIFF(MONTH, 0, @Date) -1, 0)) AS [First Date Of Previous Month];
GO
--OUTPUT

  • New Approach

In the new approach, we can extract the first date of the previous month using DATETRUNC() & DATEADD() function as shown below.

DECLARE @Date DATE;
SET @Date = GETDATE();

SELECT  @Date					 AS [Current Date]
	  , DATEADD(MONTH, -1
	  , DATETRUNC(MONTH, @Date)) AS [First Date Of Previous Month];
GO
--OUTPUT

Last Date of Previous Month

  • Old Approach

In the old approach, we have to extract last date of the previous month using multiple functions (CONVERT(), DATEADD(), DATEDIFF()) as shown below.

DECLARE @Date DATE;
SET @Date = GETDATE();

SELECT  @Date							   AS [Current Date]
      , CONVERT(DATE
	  , DATEADD(MONTH
	  , DATEDIFF(MONTH, 0, @Date) +0, -1)) AS [Last Date Of Previous Month];
GO
--OUTPUT

  • New Approach

In the new approach, we can extract the last date of the previous month using DATETRUNC() & DATEADD() function as shown below.

DECLARE @Date DATE;
SET @Date = GETDATE();

SELECT  @Date					 AS [Current Date]
      , DATEADD(DAY, -1
	  , DATETRUNC(MONTH, @Date)) AS [Last Date Of Previous Month];
GO
--OUTPUT

First Date of Current Month

  • Old Approach

In the old approach, we have to extract first date of the current month using multiple functions (CONVERT(), DATEADD(), DATEDIFF()) as shown below.

DECLARE @Date DATE;
SET @Date = GETDATE();

SELECT  @Date							  AS [Current Date]
	  , CONVERT(DATE
	  , DATEADD(MONTH
	  , DATEDIFF(MONTH, 0, @Date) +0, 0)) AS [First Date Of Current Month];
GO
--OUTPUT

  • New Approach

In the new approach, we can extract the first date of the current month using DATETRUNC() function as shown below.

DECLARE @Date DATE;
SET @Date = GETDATE();

SELECT  @Date					AS [Current Date]
	  , DATETRUNC(MONTH, @Date) AS [First Date of Current Month];
GO
--OUTPUT

Last Date of Current Month

  • Old Approach

In the old approach, we have to extract last date of the current month using multiple functions (CONVERT(), DATEADD(), DATEDIFF()) as shown below.

DECLARE @Date DATE;
SET @Date = GETDATE();

SELECT  @Date							   AS [Current Date]
      , CONVERT(DATE
	  , DATEADD(MONTH
	  , DATEDIFF(MONTH, 0, @Date) +1, -1)) AS [Last Date Of Current Month];
GO
--OUTPUT

  • New Approach

In the new approach, we can extract the last date of the current month using DATETRUNC() & DATEADD() function as shown below.

DECLARE @Date DATE;
SET @Date = GETDATE();

SELECT  @Date					  AS [Current Date]
      , DATEADD(DAY, -1
	  , DATEADD(MONTH, 1
	  , DATETRUNC(MONTH, @Date))) AS [Last Date Of Current Month];
GO
--OUTPUT

First Date of Next Month

  • Old Approach

In the old approach, we have to extract first date of the next month using multiple functions (CONVERT(), DATEADD(), DATEDIFF()) as shown below.

DECLARE @Date DATE;
SET @Date = GETDATE();

SELECT  @Date							  AS [Current Date]
	  , CONVERT(DATE
	  , DATEADD(MONTH
	  , DATEDIFF(MONTH, 0, @Date) +1, 0)) AS [First Date Of Next Month];
GO
--OUTPUT

  • New Approach

In the new approach, we can extract the first date of the next month using DATETRUNC() & DATEADD() function as shown below.

DECLARE @Date DATE;
SET @Date = GETDATE();

SELECT  @Date					 AS [Current Date]
	  , DATEADD(MONTH, 1
	  , DATETRUNC(MONTH, @Date)) AS [First Date of Next Month];
GO
--OUTPUT

Last Date of Next Month

  • Old Approach

In the old approach, we have to extract last date of the next month using multiple functions (CONVERT(), DATEADD(), DATEDIFF()) as shown below.

DECLARE @Date DATE;
SET @Date = GETDATE();

SELECT  @Date							   AS [Current Date]
      , CONVERT(DATE
	  , DATEADD(MONTH
	  , DATEDIFF(MONTH, 0, @Date) +2, -1)) AS [Last Date Of Next Month];
GO
--OUTPUT

  • New Approach

In the new approach, we can extract the last date of the next month using DATETRUNC() & DATEADD() function as shown below.


DECLARE @Date DATE;
SET @Date = GETDATE();

SELECT  @Date					  AS [Current Date]
      , DATEADD(DAY, -1
	  , DATEADD(MONTH, 2
	  , DATETRUNC(MONTH, @Date))) AS [Last Date Of Next Month];
GO
--OUTPUT

Conclusion:

We used DATETRUNC() function to achieve it and found it easier & simpler as compared to earlier version of SQL Server.

Read Full Post »

Sometimes, we come across a case where we have given one date and we need to calculate multiple dates based on this date. This can be achieved in the earlier versions of the SQL Server (earlier than 2022), but we had to use multiple functions like CONVERT(), DATEADD(), DATEDIFF() etc with lots of complexity.

Fortunately, a new function shipped in SQL Server 2022 namely DATETRUNC() which helps us to achieve this scenario easily.

Compatibility Level:

Your database compatibility level MUST be 160 or higher to use this new function.

 ALTER DATABASE tempdb SET COMPATIBILITY_LEVEL = 160 

First Date of Previous Year

  • Old Approach

In the old approach, we had to extract first date of the previous year using multiple functions (CONVERT(), DATEADD(), DATEDIFF()) as shown below.


DECLARE @Date DATE;
SET @Date = GETDATE();
 
SELECT @Date                            AS [Current Date]
     , CONVERT(DATE
     , DATEADD(Year
     , DATEDIFF(Year, 0, @Date) -1, 0)) AS [First Date Of Previous Year];
GO
--OUTPUT

  • New Approach

In the new approach, we can extract the first date of the previous year using DATETRUNC() & DATEADD() function as shown below.

DECLARE @Date DATE;
SET @Date = GETDATE();
   
SELECT @Date                   AS [Current Date]
     , DATEADD(YEAR, -1 
     , DATETRUNC(YEAR, @Date)) AS [First Date Of Previous Year]; 
GO
--OUTPUT

Last Date of Previous Year

  • Old Approach

In the old approach, we had to extract last date of the previous year using multiple functions (CONVERT(), DATEADD(), DATEDIFF()) as shown below.

DECLARE @Date DATE;
SET @Date = GETDATE();
 
SELECT @Date                             AS [Current Date]
     , CONVERT(DATE
     , DATEADD(YEAR
     , DATEDIFF(YEAR, 0, @Date) +0, -1)) AS [Last Date Of Previous Year];
GO
--OUTPUT

  • New Approach

In the new approach, we can extract the last date of the previous year using DATETRUNC() & DATEADD() function as shown below.

DECLARE @Date DATE;
SET @Date = GETDATE();
 
SELECT @Date                    AS [Current Date]
     , DATEADD(DAY, -1
     , DATETRUNC(YEAR, @Date))  AS [Last Date Of Previous Year];
GO
--OUTPUT

First Date of Current Year

  • Old Approach

In the old approach, we had to extract first date of the current year using multiple functions (CONVERT(), DATEADD(), DATEDIFF()) as shown below.

DECLARE @Date DATE;
SET @Date = GETDATE();
  
SELECT @Date                         AS [Current Date]
     , CONVERT(DATE
     , DATEADD(YEAR
     , DATEDIFF(YEAR, 0, @Date), 0)) AS [First Date of Current Year];
GO
--OUTPUT

  • New Approach

In the new approach, we can extract the first date of current year using DATETRUNC() & DATEADD() function as shown below.

DECLARE @Date DATE; 
SET @Date = GETDATE();
 
SELECT @Date                  AS [Current Date]
     , DATETRUNC(YEAR, @Date) AS [First Date of Current Year];
GO
--OUTPUT

Last Date of Current Year

  • Old Approach

In the old approach, we had to extract last date of the current year using multiple functions (CONVERT(), DATEADD(), DATEDIFF()) as shown below.

DECLARE @Date DATE;
SET @Date = GETDATE();

SELECT @Date                             AS [Current Date]
     , CONVERT(DATE
	 , DATEADD(YEAR
	 , DATEDIFF(YEAR, 0, @Date) +1, -1)) AS [Last Date Of Current Year];
GO
--OUTPUT

  • New Approach

In the new approach, we can extract the last date of current year using DATETRUNC() & DATEADD() function as shown below.

DECLARE @Date DATE
SET @Date = GETDATE()
   
SELECT @Date                    AS [Current Date]
     , DATEADD(DAY, -1
     , DATEADD(YEAR, 1
     , DATETRUNC(YEAR, @Date))) AS [Last Date of Current Year];
GO
--OUTPUT

First Date of Next Year

  • Old Approach

In the old approach, we had to extract first date of the next year using multiple functions (CONVERT(), DATEADD(), DATEDIFF()) as shown below.

DECLARE @Date DATE;
SET @Date = GETDATE();
  
SELECT @Date                            AS [Current Date]
     , CONVERT(DATE
     , DATEADD(Year
     , DATEDIFF(Year, 0, @Date) +1, 0)) AS [First Date Of Next Year];
GO
--OUTPUT

  • New Approach

In the new approach, we can extract the first date of the next year using DATETRUNC() & DATEADD() function as shown below.

DECLARE @Date DATE;
SET @Date = GETDATE();
  
SELECT @Date				   AS [Current Date]
	 , DATEADD(YEAR, 1 
	 , DATETRUNC(YEAR, @Date)) AS [First Date Of Next Year]; 
GO
--OUTPUT

Last Date of Next Year

  • Old Approach

In the old approach, we had to extract last date of the next year using multiple functions (CONVERT(), DATEADD(), DATEDIFF()) as shown below.

DECLARE @Date DATE;
SET @Date = GETDATE();
   
SELECT @Date                             AS [Current Date]
     , CONVERT(DATE
     , DATEADD(Year
     , DATEDIFF(Year, 0, @Date) +2, -1)) AS [Last Date Of Next Year];
GO
--OUTPUT

  • New Approach

In the new approach, we can extract the last date of the next year using DATETRUNC() & DATEADD() function as shown below.


DECLARE @Date DATE
SET @Date = GETDATE();

SELECT @Date                    AS [Current Date]
     , DATEADD(DAY, -1
	 , DATEADD(YEAR, 2
	 , DATETRUNC(YEAR, @Date))) AS [Last Date Of Next Year];
GO
--OUTPUT

Conclusion:

We used DATETRUNC() function to achieve above mentioned dates and found it easier and simpler as compared to earlier version of SQL Server.

Read Full Post »

To test any functionality in SQL Server, we need sample databases to test different scenarios. Few of the sample databases are already available as shown below and you can download and use for FREE.

  1. AdventureWorks
  2. WideWorldImporters
  3. Northwind
  4. Pubs

Sometimes, we need a customized sample table to test one of the SQL Server features. In such cases, above mentioned sample databases are not enough. So we need to create our own test table with some data too. Since there was no proper function available to generate a sample table in earlier version of SQL Server (before 2022), we used CAST(), RAND() and many other functions to achieve it somehow.

In SQL Server 2022, a new function came called GENERATE_SERIES(), which was a long awaited function. One of the usages of this function is that it can easily generate sample table having as much data as we want.

Compatibility Level:

Your database compatibility level MUST be 160 or higher to use this function. Given below is the query to change your database compatibility level.

ALTER DATABASE tempdb SET COMPATIBILITY_LEVEL = 160

Let me show you in the below example, how can we use GENERATE_SERIES() function to generate sample table in SQL Server 2022.

Example :

USE tempdb
GO

CREATE TABLE [Customers]
(
 [CustomerID]         INT,
 [CustomerName]       VARCHAR(250),
 [RegistrationDate]   DATE,
 [EmailAddress]       VARCHAR(100),
 [Address]            VARCHAR(500),
 [PhoneNumber]        VARCHAR(100),
 [DiscountPercentage] NUMERIC(18,6)
);
GO

DECLARE @Start INT = 1;    --Starting point of the record
DECLARE @Stop  INT = 1000; --Ending point of the record

INSERT INTO [Customers]
(
 [CustomerID],
 [CustomerName],
 [RegistrationDate],
 [EmailAddress],
 [Address],
 [PhoneNumber],
 [DiscountPercentage]
)

SELECT  
  value                                           AS [CustomerID]
, CONCAT('John',' - ',value)                      AS [CustomerName]
, DATEADD(day,value,'1753-01-01')                 AS [RegistrationDate]
, CONCAT('John',value,'@raresql.com')             AS [EmailAddress]
, CONCAT(value,' N. 10th Street')                 AS [Address]
, '1 (11) '+ RIGHT(CONCAT('0000000000',value),11) AS [PhoneNumber]
, CONVERT(NUMERIC(18,6),value)/@Stop              AS [DiscountPercentage]

FROM GENERATE_SERIES(@Start,@Stop);
GO

SELECT * FROM [Customers];
GO
--OUTPUT

Clean Up:

In order to clean up the table, we need to drop it as shown below.

USE DATABASE tempdb
GO

DROP Table [Customers];
GO

Conclusion:

I used GENERATE_SERIES() function to generate the sample table and I noticed that it has reduced a lot of complexity in creating sample table, compared to earlier approach. Do let me know if you have generated sample table and what was the approach.

Read Full Post »

Quite often we need to generate a calendar table in our database for reporting purposes with a specific date range. We may generate it for a month, a quarter or a year depending upon our requirements. Since there was no proper function available to generate calendar table in earlier version of SQL Server (Earlier than 2022), we used DATEADD(), DATEDIFF() to achieve it somehow.

In SQL Server 2022, a new function came called GENERATE_SERIES(), which was a long awaited function. One of the usages of this function is that it can easily generate calendar table between two specific dates without using any additional functions.

Let me show you in the below example, how we can use GENERATE_SERIES() function to generate calendar table in SQL Server 2022.

Compatibility Level:

Your database compatibility level MUST be 160 or higher to use this function. Given below is the query to change your database compatibility level.

ALTER DATABASE tempdb SET COMPATIBILITY_LEVEL = 160

Example :


CREATE TABLE tbl_Calendar
(
  [ID]             INT IDENTITY
, [Date]           DATE
, [Day]            INT
, [DayShortName]   VARCHAR(100)
, [DayName]        VARCHAR(100)
, [Week]           INT
, [MonthShortName] VARCHAR(100)
, [Month]          INT
, [MonthName]      VARCHAR(100)
, [Quarter]        INT
, [QuarterName]    VARCHAR(100)
, [Year]           INT
);
GO

DECLARE @SetStartDate DATE, @Start INT, @Stop INT, @Step INT;

SET @SetStartDate = '2022-01-01' --Start date of the calender;
SET @Start   = 0;
SET @Stop    = 365 -- No of days(one year) ;
SET @Step    = 1;

INSERT INTO tbl_Calendar
( 
  [Date]
, [Day]
, [DayShortName]
, [DayName]
, [Week]
, [MonthShortName]
, [Month]
, [MonthName]
, [Quarter]
, [QuarterName] 
, [Year]
)
SELECT DATEADD(DAY,value,@SetStartDate) AS [Date]
     , DATEPART(DAY,DATEADD(DAY,value,@SetStartDate)) AS [Day]
	 , FORMAT(DATEADD(DAY,value, @SetStartDate) ,'ddd') AS [DayShortName]
	 , DATENAME(WEEKDAY,DATEADD(WEEKDAY,value,@SetStartDate)) AS [DayName]
     , DATEPART(WEEK,DATEADD(DAY,value,@SetStartDate)) AS [Week]
	 , FORMAT(DATEADD(DAY,value, @SetStartDate) ,'MMM') AS [MonthShortName]
	 , MONTH(DATEADD(DAY,value,@SetStartDate)) AS [Month]
     , DATENAME(MONTH,DATEADD(DAY,value,@SetStartDate)) AS [MonthName]
	 , DATEPART(QUARTER,DATEADD(DAY,value,(@SetStartDate))) AS [Quarter]
	 , CONCAT('Quarter - ',DATEPART(QUARTER,DATEADD(DAY,value,(@SetStartDate)))) AS [QuarterName]
     , YEAR(DATEADD(DAY,value,@SetStartDate)) AS [Year]
FROM GENERATE_SERIES(@Start,@Stop,@Step) 
GO

SELECT * FROM tbl_Calendar;
GO

--OUTPUT

Conclusion:

I used GENERATE_SERIES() function to create calendar table and I noticed that it has reduced a lot of complexity in creating the calendar table, if we compare it with earlier approach. Do let me know, if you have generated calendar table and what was the approach.

Read Full Post »

Older Posts »