Resource Governor is one of the best features shipped with SQL Server 2008. We use this feature to handle SQL Server workload and resource allocation. However, if you go into further details of this feature, you will be shocked to see the level of control it gives you to control over CPU, memory on the basis of incoming requests from the application/user etc. But I have been hearing a very common QUESTION since SQL Server 2008 and that is, can we control physical IO using resource governor and the ANSWER is YES, you can do it in SQL SERVER 2014 & Above. But How ?
In SQL Server 2014, we have an additional control in resource governor namely CONTROL PHYSICAL IO. In other words, if you would like to restrict a user/application to use limited physical IO, you can restrict it with this additional control. You can implement this additional control in resource governor by just setting up two options which is MIN_IOPS_PER_VOLUME & MAX_IOPS_PER_VOLUME.
Let me demonstrate how to control physical IO in SQL Server 2014 step by step.
Step 1:
First of all, lets create a pool as usual and restrict its MAX_IOPS_PER_VOLUME limit to 50 ONLY, which means that whatever set of users / applications will be used, this pool cannot exceed 50 Physical IO.
USE master
GO
--DROP RESOURCE POOL Sample_Pool_Restrict_IO;
--GO
CREATE RESOURCE POOL Sample_Pool_Restrict_IO WITH
(
MAX_IOPS_PER_VOLUME = 50,
MIN_IOPS_PER_VOLUME = 1
);
GO
Step 2:
Once we created the pool, lets create the workload group. This is also a usual step while configuring resource governor.
USE master
GO
--DROP WORKLOAD GROUP Sample_Workload_Group_Restrict_IO
--GO
CREATE WORKLOAD GROUP Sample_Workload_Group_Restrict_IO
USING Sample_Pool_Restrict_IO;
GO
Step 3:
Let’s, create a test user, later on I will demonstrate how resource governor will restrict physical IO for this test user.
USE master
GO
CREATE LOGIN dba WITH PASSWORD = 'imran.1234@';
GO
ALTER SERVER ROLE [sysadmin] ADD MEMBER [dba]
GO
Step 4:
Create a classifier function and define if the above created user is the current user. Then classifier will assign the restricted IO workload group to this user. Then each time this user tries to use physical IO, it CAN’T go beyond 50. SQL Server will restrict this user up to 50.
USE MASTER;
GO
--DROP FUNCTION dbo.fnIOClassifier
GO
CREATE FUNCTION dbo.fnIOClassifier()
RETURNS SYSNAME WITH SCHEMABINDING
AS
BEGIN
DECLARE @GroupName SYSNAME
IF SUSER_NAME() = 'dba'
BEGIN
SET @GroupName = 'Sample_Workload_Group_Restrict_IO'
END
ELSE
BEGIN
SET @GroupName = 'default'
END
RETURN @GroupName;
END
GO
Step 5:
Let’s assign the classifier function (created in the above step) to resource governor and reconfigure the resource governor to implement new settings.
USE master;
GO
ALTER RESOURCE GOVERNOR WITH (CLASSIFIER_FUNCTION = dbo.fnIOClassifier);
ALTER RESOURCE GOVERNOR RECONFIGURE;
GO
Step 6:
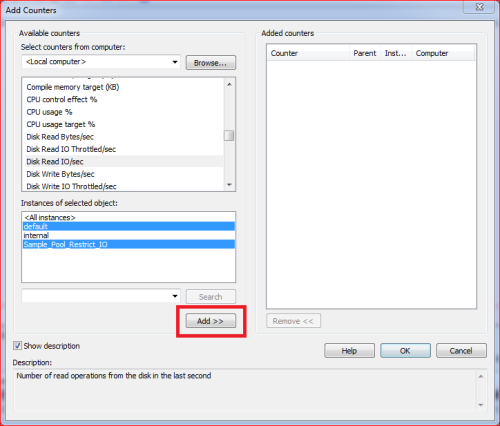
Now, we are ready to test the new feature (Control Physical IO). To test the feature, let’s open performance monitor, add counter and then select resource pool stats object, further select Disk read IO/sec and add default and custom Pool (Sample_Pool_Restrict_IO) created in step 1 and press ADD BUTTON as shown below.
Step 7:
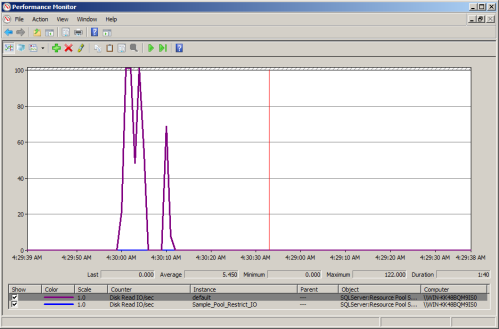
Now, we setup performance monitor to test the physical IO control feature via resource governor. Lets login with any user except the one created in step 3 and run the given below script and view the results in performance monitor. In my case, I logged in with sa and executed the script.
USE AdventureWorks2014
GO
DBCC DROPCLEANBUFFERS
GO
EXEC sp_MSforeachtable 'SELECT * FROM ?'
GO
Note: In the above results, you can easily view that the DISK READ IO/SEC reached the maximum of 122 and it may go far from it as well because we did not restrict DISK READ IO/SEC for sa user.
Step 8:
This time lets login with ‘dba’ user which we created in step 3 and execute the same script which we executed in the above step.
USE AdventureWorks2014
GO
DBCC DROPCLEANBUFFERS
GO
EXEC sp_MSforeachtable 'SELECT * FROM ?'
GO
Note: In the above results, you can easily view that the DISK READ IO/SEC reached the maximum of 50 and why is it not going beyond 50 is because dba user has been restricted by resource governor using physical IO control feature.
Conclusion:
As you can see above that this feature really gives DBA’s more control on physical IO and it would be very handy for the DBA’s where they have serious problems with I/O which can be from users / applications.


