Feeds:
Posts
Comments

Archive for the ‘Tools’ Category

Comparing files is one of the frequent activities, when we want to see the difference between two files. SQL developers face this problem on a day to day basis when they have two versions of the same file and they want to know where they made changes.

Fortunately, SQL Server Management Studio (SSMS) has this toolbar, which you can use to compare two files very easily.

In order to explain it, let me create two scripts as shown below.

Sample:

The below scripts will be saved as Version1.sql & Version2.sql.

  • Version1:

USE Northwind
GO
 
CREATE OR ALTER VIEW [dbo].[OrdersQry] 
AS
   SELECT Orders.OrderID
        , Orders.ShipName AS ShipName
   FROM Customers 
   INNER JOIN Orders 
   ON Customers.CustomerID = Orders.CustomerID;
GO

  • Version2:

USE Northwind
GO
  
CREATE OR ALTER VIEW [dbo].[OrdersQry] 
AS
   SELECT COUNT(Orders.OrderID) AS TotalOrders
        , Orders.ShipName AS ShipName
        , Orders.ShipAddress AS ShipAddress
   FROM Customers 
   INNER JOIN Orders 
   ON Customers.CustomerID = Orders.CustomerID
   GROUP BY Orders.ShipName
          , Orders.ShipAddress;
GO

Now, let’s compare above mentioned both scripts (Version1.sql, Version2.sql) in SQL Server Management Studio (SSMS) as shown in below steps.

Step 1:

Let’s activate Compare Files toolbar by clicking on View menu then click on Toolbars, and in Toolbars, click on Compare Files option as shown below.

The Compare Files toolbar will appear as shown below.

Step 2:

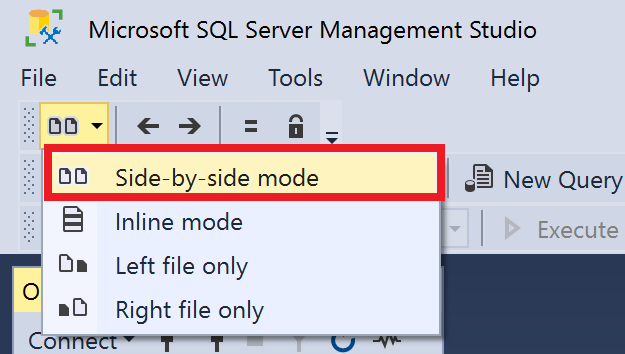
In the toolbar, there is menu button on extreme left hand side which shows the mode of compare. We have 4 types of mode as described below.

  • Side-by-side mode: It compares both files side by side. This is selected by default as shown below.
  • Inline mode: It compares combined scripts.
  • Left file only: It compares the first script.
  • Right file only: It compares the second file only.
Step 3:

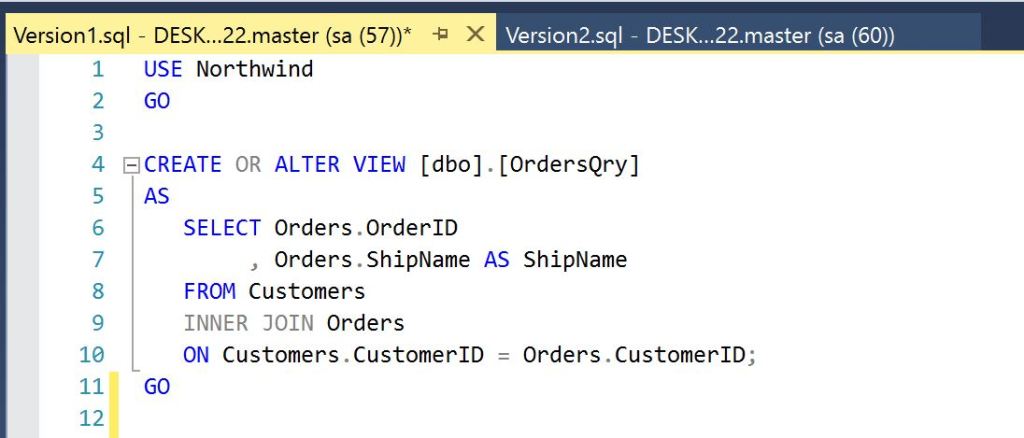
Open File Version1 and Version2 in SQL Server Management Studio (SSMS) as shown below.
Step 4:

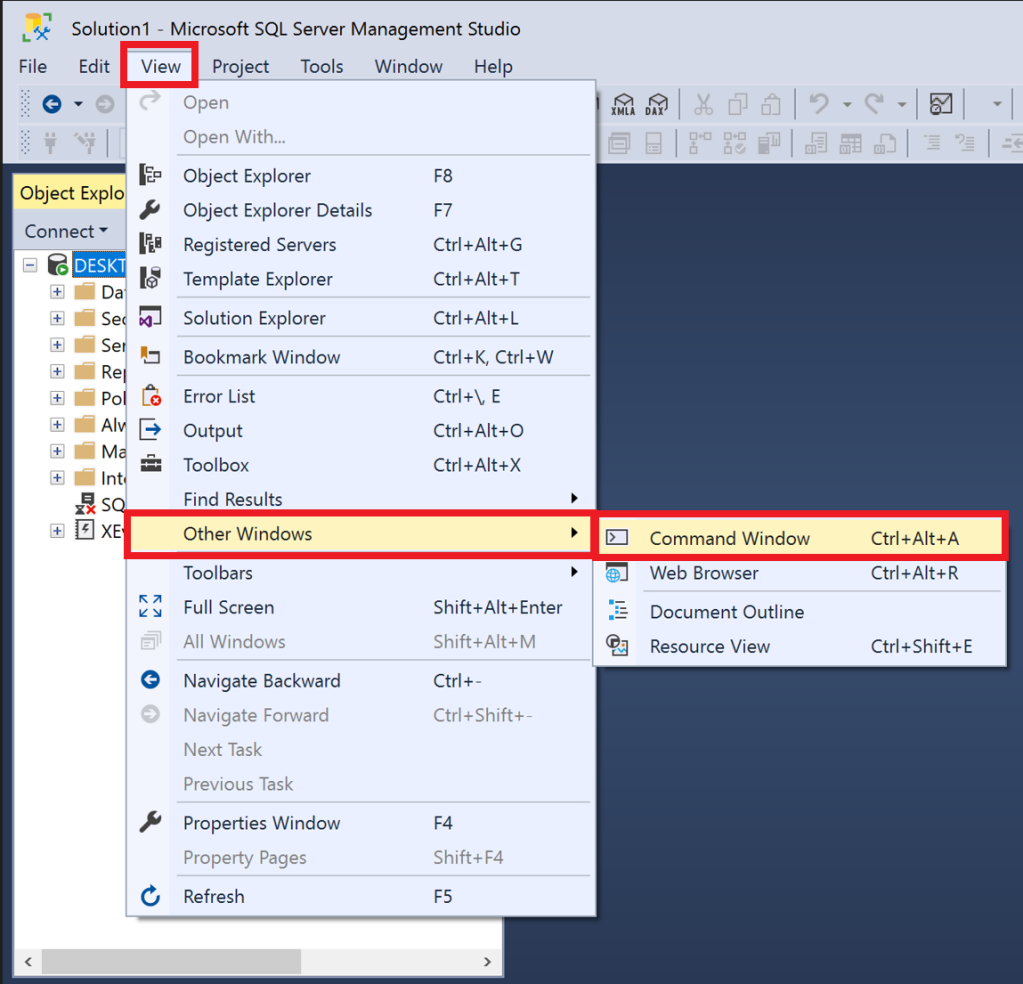
Open Command Widow by clicking on View menu then click on Other Windows then select Command Widow Or use shortcut(Ctrl+Alt+A).
Step 5:

In the Command Window, type Command Tools.DiffFiles and give the file name (Version1.sql, Version2.sql) which needs to be compared and press Enter as shown below.

Tools.DiffFiles Version1.sql Version2.sql

Step 6:

Both files will be compared in side by side mode since it is selected by default and the output will be as shown below.
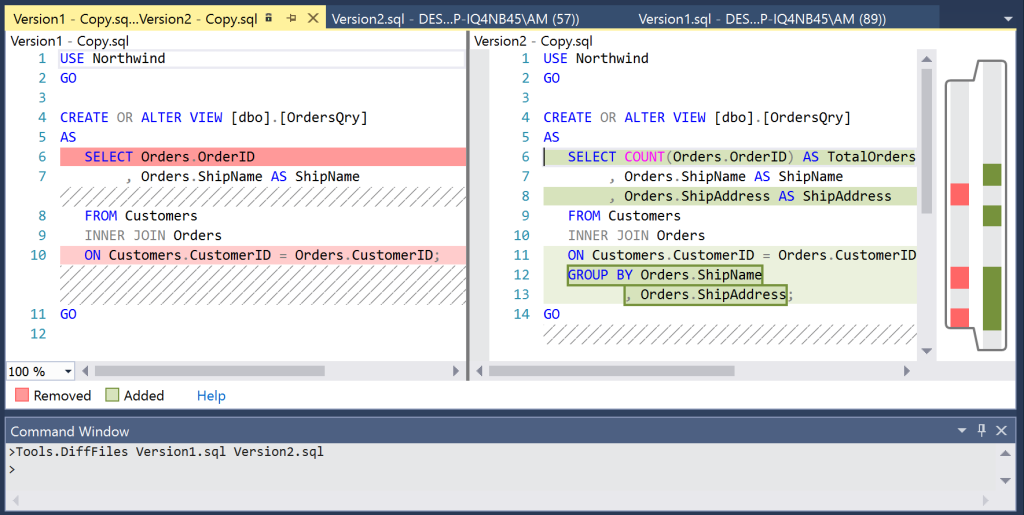
  • Additional scripts in the second file (Version2.sql) are represented in GREEN color.
  • Modified or deleted scripts from first file (Version1.sql) are represented in RED color.
  • Scripts which are NOT changed are represented in NO Background color.

Please note that in case of any changes which are made to these files need to be saved again, we need to run the DiffFiles command again.

Conclusion:

Compare Files toolbar is one of the handy toolbars in SQL Server Management Studio (SSMS). Do let me know if you use it and found it helpful.

Read Full Post »

SQL Server 2012 came up with a lot of new enhancements, breaking changes & behavioral changes. In my earlier article, I had discussed about one of the nice behavior changes in exists function. Today, we will discuss another behavioral change in Sqlcmd Utility when XML mode is on. This utility is one of the handy utilities when you wish to execute transact SQL or any other SQL operations on command prompt.

Given below are sqlcmd utility behavioral changes in earlier version SQL Server vs 2012.

S.No

Behavior in Earlier versions

Behavior in SQL Server 2012

1

If any string data having a single quote will be replaced with the & apos; escape sequence, it will not remain a valid XML and an XML parser will not give the same result.

If any string data having a single quote will not be replaced with & apos; escape sequence, it will remain a valid XML and an XML parser will give the same result.

2

If any column of a table having money data values with no decimal value, it will be converted to integer.

If any column of a table having money data values with no decimal value, it will show the 4 decimal digits.

Let me create an example to demonstrate this behavior changes.

--Create table
CREATE TABLE [dbo].[tbl_Employee]
(
[EmployeeID] [int] IDENTITY(1,1) NOT NULL,
[First Name] [nvarchar](50) NULL,
[Last Name] [nvarchar](50) NULL,
[Salary] [money] NOT NULL
)
GO
--Insert record into table
INSERT INTO dbo.tbl_Employee ([First Name],[Last Name],[Salary])
VALUES ('Reuben','D''sa',5000)
GO
--Browse table
SELECT [Last Name],[Salary] FROM dbo.tbl_Employee
--OUTPUT

Bchange1.1

Lets execute the above query in sqlcmd utility with XML mode on as shown in the given below picture.
Bchange1.3

Reference : MSDN

Read Full Post »

Backup and restore are two major parts of any DBA’s job and this part should be done efficiently. In order to do it efficiently, DBA’s should take backups in such a way that makes their life easier in case of any failure. But we need to remember that we have different types of backup (Full, Differential, Log) and at the time of failure we must use a correct path (Sequence) to restore all data successfully.

Before SQL Server 2012, DBA’s should manually control all these aspects for restore. But in SQL Server 2012, a solution came namely “Recovery Adviser”, which can show you the timeline graphically and advise you how to restore it efficiently and also you can define your own best possible path of restore as well.

Lets discuss Recovery Adviser step by step in detail.

Step 1 :
Lets create table and insert few records in it to test.

use test_db
Go
Create table test
(
[ID] int,
[Name] nvarchar(50)
)
Go
Insert into test Values(1,'Imran')

Step 2 :
Take a full backup of test_db database.

BACKUP DATABASE [Test_DB] TO DISK = N'G:\DBBackup\test_DB_Full'
WITH NOFORMAT, NOINIT, NAME = N'Test_DB-Full Database Backup'
, SKIP, NOREWIND, NOUNLOAD, STATS = 10
GO

Step 3 :
Insert one more record and take a differential backup of test_db database.

use Test_DB
GO
insert into test values(2,'Bob')


BACKUP DATABASE [Test_DB] TO DISK = N'G:\DBBackup\test_DB_Differential'
WITH DIFFERENTIAL , NOFORMAT, NOINIT,
NAME = N'Test_DB-Differential Database Backup'
, SKIP, NOREWIND, NOUNLOAD, STATS = 10

Step 4 :
Insert one more record and take a transaction log backup of test_db database.

use Test_DB
GO
insert into test values(3,'John')


BACKUP LOG [Test_DB] TO DISK = N'G:\DBBackup\test_DB_Log'
WITH NOFORMAT, NOINIT, NAME = N'Test_DB-Transaction Log Backup'
, SKIP, NOREWIND, NOUNLOAD, STATS = 10

Step 5 :
We took three different types (Full, Differential, Transaction) of backup and now we can recover the database in case of any failure but how ? In earlier version we need to keep a track of backups as to which backup we took, at what time, in what sequence etc etc. But SQL Server 2012 “Recovery adviser”, absorbs all such worries and will handle it efficiently. Lets go to restore window to see what is inside this “Recovery adviser”.

In the restore screen, you can find a new button namely “Timeline” and the list of backups that we took earlier in the same sequence with lots of additional information that can help you recover your database.

DRA1.1

Step 6 :
Click on the timeline button and you will be more than impressed to view the new timeline (on the basis of Hour, Six Hour, Day, Week) of backup. In this screen you have two options to restore the backup.

  • Last backup taken
  • Specific date and time

From the first option, you can restore on the basis of last backup. But sometime if you need to recover any particular transaction, you can restore at any point of time from option 2 as well.
DRA1.3

DRA1.2

Conclusion :
Database recovery adviser is a very handy tool shipped with SQL Server 2012. It helps you to restore your backup at any point of time with the graphical representation such as when and what type of backup you took and how can you restore it efficiently in case of any failure. This will resolve a lot of backup handling issues, for example, to maintain a sequence and to restore in a best possible path as well.

Read Full Post »

It is but a common practice to migrate data from Excel to SQL Server; mostly so, when we implement a new system and the initial data is required from the customer.
I mostly use OPENROWSET to migrate data instead of import/export tool to avoid multiple steps.

Given below is the script to migrate data from Excel 2003:

SELECT * FROM  OPENROWSET('Microsoft.Jet.OLEDB.4.0'
,'Excel 4.0;Database=D:\test.xls','SELECT * FROM [sheet1$]')

But, when the same code is used for Excel 2007 & above, it gives the following error:

SELECT * FROM  OPENROWSET('Microsoft.Jet.OLEDB.4.0'
,'Excel 4.0;Database=D:\test.xlsx','SELECT * FROM [sheet1$]')

Msg 7399, Level 16, State 1, Line 1
The OLE DB provider “Microsoft.Jet.OLEDB.4.0” for linked server “(null)” reported an error. The provider did not give any information about the error.
Msg 7303, Level 16, State 1, Line 1
Cannot initialize the data source object of OLE DB provider “Microsoft.Jet.OLEDB.4.0” for linked server “(null)”.

Lets solve this issue step by step.

Step 1 :
Download Microsoft Access Database Engine 2010

Step 2 :
Install Microsoft Access Database Engine 2010 in your machine.

Step 3 :
Open SQL Server Management Studio. (If already open, close and re-open)

Step 4 :
Enable Ad hoc queries.

sp_configure 'show advanced options', 1;
RECONFIGURE;
sp_configure 'Ad Hoc Distributed Queries', 1;
RECONFIGURE;
GO

Step 5 :
Close the excel sheet that you need to import (if open).

Step 6 :
Give the correct path, file name and excel sheet name with $ sign in the script given below and execute the query.
This information must be correct.

SELECT * FROM OPENROWSET ('Microsoft.ACE.OLEDB.12.0',
'Excel 12.0;Database=E:\test.xlsx;HDR=YES;IMEX=1',
'SELECT * FROM [sheet1$]');

If your first row has a column name then “HDR=YES“, else it should be No.

In case you need this query result in temporary tables, given below is the script to insert Excel records into temp table.

SELECT * into Temp FROM OPENROWSET ('Microsoft.ACE.OLEDB.12.0',
'Excel 12.0;Database=E:\test.xlsx;HDR=YES;IMEX=1',
'SELECT * FROM [sheet1$]');

Note : You can use the same technique for Excel 2003 files as well.

Read Full Post »

In my earlier articles, I wrote about SQL Server 2012’s new features & enhancements.

In this article, we will discuss the slight modification made in DBCC CHECKIDENT management command in SQL server 2012. This modification is done in the result set area. If you execute DBCC CHECKIDENT command in earlier version, you get the same result set, whether it is “RESEED” or “NORESEED”.  But in SQL Server 2012, you can feel the difference in result set when it is “RESEED” or “NORESEED”.

Lets create a simple example to demonstrate it.

CREATE TABLE [dbo].[Employee](
[Sno] [int] identity(1,1),
[Employee ID] nvarchar(6) Not NULL ,
[Emplloyee name] [varchar](50) NOT NULL
)
GO
Insert into dbo.[Employee] values ('EMP001','Bob')
Insert into dbo.[Employee] values ('EMP002','Alexander')

Select * from dbo.[Employee]
GO

Lets execute the given below code in earlier versions of SQL Server and in SQL Server 2012 as well.

DBCC CHECKIDENT ('dbo.Employee',NORESEED);
GO
DBCC CHECKIDENT ('dbo.Employee',RESEED,2);
GO

dbcc_checkind1.1

Read Full Post »