Feeds:
Posts
Comments

Archive for the ‘Database’ Category

I presume this will be your first step towards Azure SQL Server and I am sure you will find this article as a guideline to proceed and create SQL Server & database in Azure.
Given below is a step by step approach, demonstrating how to create them using simple steps.

Step 1 : (Create Azure Account)
First of all, you need to create a Microsoft Azure account (it is free for one month ONLY, however it asks the credit card details for verification ONLY).

Free tial account of Azure.1.1

Note : If you already have Azure account, skip this step.

Step 2 : (Select SQL Databases)
Once you create the account and Sign in to Microsoft Azure, you will be in the Microsoft Azure portal as shown below. Here you can see a lot of different exciting features, however, you need to select SQL DATABASES from the left pane. Once selected, you will see sql databases dashboard on the right hand pane. In order to create a NEW SQL SERVER, you need to select SERVERS from top and press + button at the bottom as shown below.

Azure Create SQL Server & Database 1.1

Note : If you already have SQL Server, skip this step.

Step 3 : (Provide SQL Server Info)
Now you are in the SQL database server settings screen. Here you need to select the SUBSCRIPTION (if you have ONLY one then it will be selected by default), LOGIN NAME, PASSWORD and REGION (always select the nearest region which gives you the best performance) and press the CHECK MARK shown below.

Azure Create SQL Server & Database.1.2

Note : If you already have SQL Server, skip this step.

Step 4 : (SQL Server Creation)
Now, your server has been started creating and it generally takes 1-2 minutes.

Azure Create SQL Server & Database.1.3

Your server has been created as shown below.

Azure Create SQL Server & Database.1.4

Note : If you already have SQL Server in Azure account, skip this step.

Step 5 : (Select the Server)
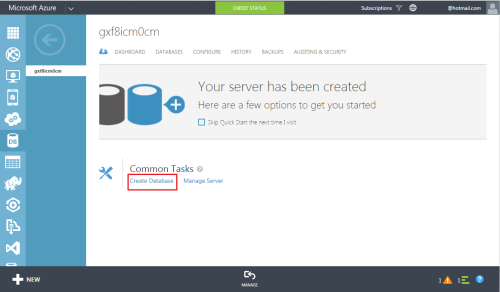
Now, you need to select the SQL Server you just created in the above step. (If you already have a server, you can select it). Once you selected the server, it will take you to the SQL Server dashboard. Here you need to select the Create Database as shown below.

Azure Create SQL Server & Database.1.5

Step 6 : (Create Database)
You are now in the database creation screen, here, you need to specify database settings. You need to enter database name and choose the Service tiers, performance level, collation depending upon your requirement. Once you specify all the settings, you need to press CHECK MARK button as shown below.

Azure Create SQL Server & Database 1.6

Now, your database has been created as shown below.

Azure Create SQL Server & Database 1.7

Azure Create SQL Server & Database 1.8

Let me know if you have created your first SQL Server & database in Azure and your feedback about it.

Read Full Post »

Contained databases are isolated / independent databases from the other databases and from the instance it is hosted on.

Before in SQL Server 2012, SQL server maintained user authentication at server level. So once the user logged in either via Windows or SQL Authentication, user could access server objects.

Currently in SQL Server 2012, we have a concept of “partial contained databases” meaning it allows to access few elements from outside its boundary as well. Now you can directly access the database with the contained database user, you don’t need the server authentication for partial contained databases.

This feature is very handy especially when it comes to database authentication or to avoid server authentication. The administrator can directly assign the user to the contained database.

It is also important for “Always On High Availability” because once an SQL server instance is down the user can easily connect on other instance database as the database is not dependent on instance.

Let’s proceed step by step.

Step 1:
In the first step, we must activate the ‘contained database authentication’ on the instance.

Using Script

sp_configure 'show advanced options', 1
GO
RECONFIGURE
GO
sp_configure 'contained database authentication', 1
GO
RECONFIGURE
GO
sp_configure 'show advanced options', 0
GO
RECONFIGURE
GO

Using SSMS
Right click on Instance \ Properties \ Advance. You can find a property on top namely “Enabled Contained Databases”. By default it is “False” you need to change it to “True”.

Step 2 :

In this step, we need to create or alter a database to make it contained database.

Using Script

ALTER DATABASE [AdventureWorks2012] SET CONTAINMENT = PARTIAL WITH NO_WAIT
--OR
CREATE DATABASE [Contained_DB]
CONTAINMENT = PARTIAL;

After enabling partial contained in the database, we can execute this query to view that it is enabled or not.

Select containment,[containment_desc]   from sys.databases Where [name]='AdventureWorks2012'

Step 3:
In this step, we need to create a user having “contained database” rights (Rights can vary from reader to owner)
Using Script

Use Contained_DB
GO
CREATE USER imran
WITH PASSWORD = 'imran1234';

ALTER ROLE [db_owner] ADD MEMBER [imran]

Using SSMS
Right click on “contained database” \ Security \users\ New User …


Step 4:
Now, we have already created a user inside the “contained database”. In this step, we need to log in from this user.

Once you are in the log in screen, enter the credential but “don’t click on Connect”. Click on Options >> connection properties and select the “Contained_DB” from the “Connect to database” option after that you can click on connect.

Step 5:
Now, you are logged in successfully. Lets try to create one table and access it.

Use Contained_DB
GO
Create Table [Test_Table]
([SNo] int,
[Designation] varchar(50))

GO

Insert into [Test_Table] Values (1,'Director'),(2,'Manager'),(3,'Staff')
GO
Use Contained_DB
Select * from [Test_Table]

And you can create / view the table successfully.

Conclusion :

This is a very handy and important feature from the perspective of database migration, “Always On High Availability”, Server Authentication. But it also doesn’t allow us to do the replication, change data capture and change tracking.

Reference : MSDN

Read Full Post »