Feeds:
Posts
Comments

Archive for July, 2014

Recently, I was developing a report for one of my customers, who migrated their database from SQL Server 2005 to SQL Server 2012 Enterprise Edition. The database belongs to a legacy system , so I found couple of conversion issues, however the major issue I faced in developing the report was the date format. The required date format was Mon-yyyy and the data available in the table was in the format of yyyymm.

Before proceeding with the solution, let me create a sample to demonstrate the problem.

USE tempdb
GO
DROP TABLE tbl_Sample
GO
CREATE TABLE tbl_Sample
(
[ID] INT,
[Date] varchar(6)
)
GO
INSERT INTO tbl_Sample VALUES (1,'201401')
INSERT INTO tbl_Sample VALUES (2,'201402')
INSERT INTO tbl_Sample VALUES (3,'201403')
INSERT INTO tbl_Sample VALUES (4,'201404')
INSERT INTO tbl_Sample VALUES (5,'201405')
INSERT INTO tbl_Sample VALUES (6,'201406')
INSERT INTO tbl_Sample VALUES (7,'201407')
INSERT INTO tbl_Sample VALUES (8,'201408')
INSERT INTO tbl_Sample VALUES (9,'201409')
INSERT INTO tbl_Sample VALUES (10,'201410')
INSERT INTO tbl_Sample VALUES (11,'201411')
INSERT INTO tbl_Sample VALUES (12,'201412')
GO
SELECT * FROM tbl_Sample
GO

Convert YYYYmm 1.1

Solution 1 : Traditional Method
This is the old traditional method, which is compatible with SQL Server 2005 and above. In this method, you need to use many functions (LEFT, DATENAME, CONVERT, YEAR) to convert yyyymm date format to Mon-yyyy. Given below is the script.

USE tempdb
GO
SELECT
LEFT(DATENAME(MM,CONVERT(DATE,[Date]+'01')),3)
+ '-'
+ CONVERT(VARCHAR(4),YEAR(CONVERT(DATE,[Date]+'01'))) As [Mon-Year]
FROM tbl_Sample
GO

Convert YYYYmm 1.2

Solution 2 : New Method
This is the new method, which is compatible with SQL Server 2012 and above. In this script, I will use a newly shipped (in SQL Server 2012) function namely Format to reduce the line of script in order to convert yyyymm to Mon-yyyy. Given below is the script.

USE tempdb
GO
SELECT FORMAT(CONVERT(DATE,[Date]+'01'),'MMM-yyyy') As [Mon-Year]
FROM tbl_Sample
GO

Convert YYYYmm 1.2

Read Full Post »

Conversion of Select statement result set into Insert statement is a very frequent activity that a DBA/Developer needs to create, mostly when they need to migrate small amount of data from one instance to another or from one environment to another. I recently created one of my customer’s new branch database from other branches database and came across this scenario. Fortunately, we do have a solution since SQL Server 2005 but it was very complicated specially when you need to do it for the tables as they have numerous columns. The reason I am writing this solution is that you can do it in few clicks in SQL Server 2012 and above.
Before proceeding with the solution, I would like to create a sample to demonstrate the solution.

Sample :
Given below is a select statement in which I modified the result set to demonstrate.

USE [AdventureWorks2012]
GO
SELECT [DepartmentID]
,[Name] + ' Department' As [Name]
,[GroupName]
,Getdate() As [ModifiedDate]
FROM [HumanResources].[Department]
GO

Convert select.1.1

Given below are the two solutions, one of them is traditional solution and another one you can use it in SQL Server 2012 and above.

Solution 1 : Using String concatenation (Traditional Method)
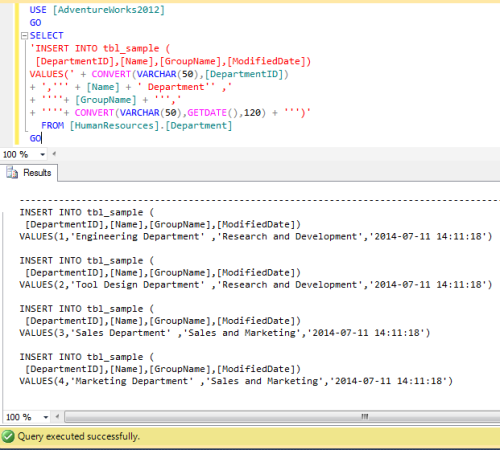
In this solution, you need to concatenate the result set of the Select statement in order to convert into Insert statement (with some modifications in the data). You need to make sure that single quotes(‘) are in proper locations. In addition, if the data in the result set does not belong to string data type you must convert into string data type to concatenate. In case, the table is having identity column, you must pass the column name in the INSERT STATEMENT as well with SET IDENTITY_INSERT. The reason why I DO NOT recommend this solution is because if you have more number of columns in the table, it takes more time for the development and debug as well.

USE [AdventureWorks2012]
GO
SELECT
'INSERT INTO tbl_sample (
[DepartmentID],[Name],[GroupName],[ModifiedDate])
VALUES(' + CONVERT(VARCHAR(50),[DepartmentID])
+ ',''' + [Name] + ' Department'' ,'
+ ''''+ [GroupName] + ''','
+ ''''+ CONVERT(VARCHAR(50),GETDATE(),120) + ''')'
FROM [HumanResources].[Department]
GO

Convert select.1.2

Solution 2 : Using Generate Script (New Method)
This method is applicable to SQL Server 2012 and above and you will find it quite simple. Let me explain this method using two simple steps.

Step 1 :
First of all, you need to develop a select statement like I did it in the sample based on your requirements and INSERT INTO A TABLE as shown below.

USE [AdventureWorks2012]
GO
SELECT [DepartmentID]
,[Name] + ' Department' As [Name]
,[GroupName]
,Getdate() As [ModifiedDate]
INTO [tbl_Department_Sample]  -- Result set inserted in a table
FROM [HumanResources].[Department]
GO

Convert select.1.3

Step 2 :
Your select statement result set has been inserted into the table([tbl_Department_Sample]). Now, you just need to generate the script (data only) of the table ([tbl_Department_Sample]) using Generate Script feature in SQL Server 2012 and above.

Let me know if you come across these scenarios and their solutions.

Read Full Post »

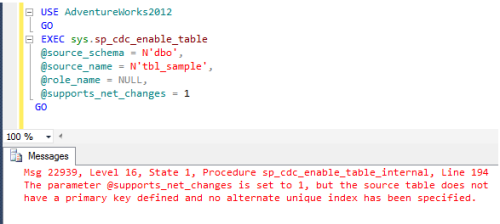
Change Data Capture (CDC) is one of the frequently used features in SQL Server 2008 and above, it records any (CDC enabled) table’s changes and stores in audit tables. Recently, I upgraded one of my client’s database from SQL Server 2005 database to SQL Server 2012 and one of the key reasons to upgrade is to utilize the new features in the upgraded version. Once I started enabling CDC feature in few tables of the database it gave me given below error.

Message Number: 22939

Severity : 16

Error Message: The parameter @supports_net_changes is set to 1, but the source table does not have a primary key defined and no alternate unique index has been specified.

Error Generation:
I presume that CDC has been enabled on this particular database. Let me create a sample table to demonstrate this error.

USE AdventureWorks2012
GO
--Create Sample Table
CREATE TABLE tbl_Sample
(
[ID] INT NOT NULL,
[NAME] VARCHAR(50)
)
GO

-- Enable CDC feature on this table with net changes support parameter.
USE AdventureWorks2012
GO
EXEC sys.sp_cdc_enable_table
@source_schema = N'dbo',
@source_name = N'tbl_sample',
@role_name = NULL,
@supports_net_changes = 1
GO
--OUTPUT

Error Message 22939.1

Msg 22939, Level 16, State 1, Procedure sp_cdc_enable_table_internal, Line 194
The parameter @supports_net_changes is set to 1, but the source table does not have a primary key defined and no alternate unique index has been specified.

Ooopps…… I am NOT able to enable CDC on sample table.

Resolution:
The reason behind this error is that you do not have either primary key or unique index on the sample table and you want to enable net changes support in CDC. Before proceeding with the resolution, you should check whether you can create a Primary Key or Unique Index on the table to avoid such error.
Given below is the simple script to add Primary Key OR Unique Index in the sample table.

--Create Primary Key
USE AdventureWorks2012
GO
ALTER TABLE dbo.tbl_Sample ADD PRIMARY KEY (ID)
GO

-- Create Unique Index
USE AdventureWorks2012
GO
ALTER TABLE tbl_Sample
ADD CONSTRAINT UX_Constraint UNIQUE (ID)
GO
--OUTPUT

You can execute any one of the above scripts and can create Primary Key or Unique Index in the sample table.

Once you executed the above script, you can easily enabled the CDC with supports_net_changes as shown below.

USE AdventureWorks2012
GO
EXEC sys.sp_cdc_enable_table
@source_schema = N'dbo',
@source_name = N'tbl_sample',
@role_name = NULL,
@supports_net_changes = 1
GO
--OUTPUT

Command(s) completed successfully.

Error Message 22939.2

Conclusion :
Remember, whenever you need to enable CDC with supports_net_changes, make sure that the particular table HAS either Primary Key or Unique Index in order to avoid this error.

Read Full Post »

Database mail is one of the best features shipped in SQL Server 2005. It allows us to send mails without writing even a single line of script. However, there is a general perception that you must have your own mail server to configure Database Mail in the SQL Server and frankly speaking, to configure a mail server,  a good amount of expertise is required. Due to the lack of expertise in mail server configuration in new bie of SQL Server, they usually avoid learning, testing and implementing this nice feature.

However, one of the benefits of SQL Server Database mail is that,  it is NOT mandatory that you must have your own mail server, you can easily configure, test and implement it on any FREE mail servers like Gmail, Yahoo & Hotmail etc. and it is just a  matter of few clicks.

In this article, I will demonstrate step by step how to configure & test SQL Server database mail using Gmail, Yahoo & Hotmail accounts.
Before proceeding with the configuration, please make sure that you HAVE a valid email account in any of the FREE mail servers.

STEP 1  – Navigate to Database Mail:
First of all, you need to open SQL Server Management Studio (SSMS) and select Object Explorer followed by Management node and then Database Mail as shown below.

SQL Server Mail.0.1

STEP 2 – Configure Database Mail:
Once you select Database Mail, just right click on it and select Configure Database Mail as shown below.

SQL Server Mail.0.2

STEP 3  – Welcome Screen:
Now, you are in welcome screen. This screen tells you all about Database Mail. However, you can check “skip the page in the future” in order to avoid this screen next time. Just Press NEXT button to proceed as shown below.
SQL Server Mail.1.1

STEP 4 – Configuration Task:
Next step is to create a new profile and then you can add multiple Email accounts in it in the later steps. In order to create a new profile you should select Option 1 (Set up Database Mail by performing the following tasks ) and press NEXT button as shown below.

SQL Server Mail.1.2

STEP 5 – Enable Database Mail Feature:
Once you press Next button in the above step, it may ask you to Enable the Database Mail feature. It happens only when you configure the database mail for the first time. Click Yes and then Press NEXT to proceed.

SQL Server Mail.1.2.1

STEP 6 – Profile Creation:
Once you enable the database mail, it will take you to the profile creation screen, where you can create a new profile as shown below. In this screen you can enter a unique profile name and a description (NOT mandatory), which is just an explanation to your profile. Once you are done with this information, just click Add button in order to add an Email account in the profile.

SQL Server Mail.1.3

STEP 7 – Mail Account Creation:
Now you are in the Email account creation screen as shown below. You should be very careful to enter the data in this screen because your one typo mistake will STOP Database mail to send any email. The most important data that you must enter in this screen is its Server name (Actually SMTP Server name). In addition, you can use the Port No 25 but sometimes this port is blocked in your network. If you come across this situation, you can change the port number from 25 to 587.

Given below are the SMTP addresses of the FREE mail accounts.

  • Yahoo : smtp.mail.yahoo.com
  • Gmail : smtp.gmail.com
  • Hotmail : smtp.live.com

Below are the configurations for each mail account, however, you will use one/all of them. In addition, you need to make sure that your email credentials IS correct.

Yahoo account configuration :

SQL Server Mail.1.5

Gmail account configuration :

SQL Server Mail.1.4

Hotmail account configuration :

SQL Server Mail.1.4.2

STEP 8 – Profile Verification:
Once you are done with the email account press OK button and it will take you back to the profile screen and it adds the email account, you just configured it in STEP 7 in the profile as shown below. Press NEXT button to proceed.

SQL Server Mail.1.6

STEP 9 – Profile Security:
Now you entered into the manager profile security screen, you need to be very careful when configuring profile security. However, for testing purpose you can make it Public and default profile as well, as shown below and Press NEXT button.

SQL Server Mail.1.7
STEP 10 – System Parameters:
This screen will show the configuration of system parameters as shown below, you just need to press NEXT button to proceed.

SQL Server Mail.1.8

STEP 11  – Completion:
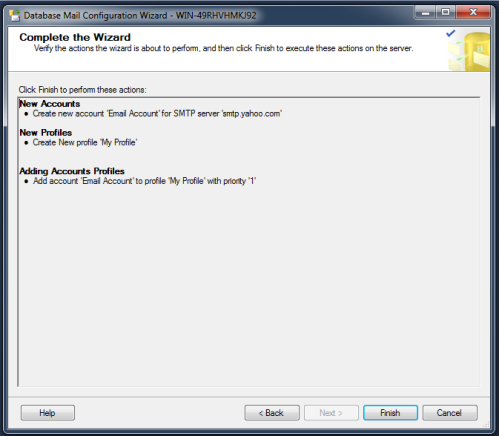
Now, you are in the database Mail complete wizard, this screen will show you a summary of all your configuration, if you find any mistake even in this step, you can press BACK button and correct. However, if each and every configuration is correct, press FINISH button to complete the database mail configurations.
SQL Server Mail.1.9

STEP 12 – Status:
Once you press FINISH button in the above step, it will show you the status of the database mail configuration as shown below. It can be either be a success or a failure.

SQL Server Mail.1.10

STEP 13  – Browse Send Test Email:
Lets test the database mail whether it is working fine or not. You need to again select the Database email and right click on it to further select the Send Test E-Mail.. as shown below.

SQL Server Mail.1.11
STEP 14 – Send Test Email:
Once you select the Send Test E-Mail.., it opens a test email creation screen, where you will find your default profile to be selected. You just need to type any valid email address in the  To where you want to send a test mail. In addition, you can change the subject and body as well and press the Send Test E-Mail button. The moment you press this button, you will receive (Depends upon the server configuration) the test email in that defined email address from your Gmail, Yahoo or Hotmail account whichever you configured above in the selected profile.

SQL Server Mail.1.12

Let me know if you configured Database and faced any particular issue in setting it up.

Read Full Post »