Feeds:
Posts
Comments

Archive for April, 2014

In my earlier article, I have explained how to enable Change Data Capture (CDC) features for any database and its tables in few easy steps. It seems to me that it is very simple and straight forward activity. Just few lines of codes can give you a kick start. The next step is to avail the benefits of CDC, when you perform a series of DML (Data Manipulation Language) statements and CDC records, it automatically?? without a single line of code.

Let me execute INSERT / UPDATE / DELETE statements against the particular tables, which we have enabled for CDC in the earlier article to demonstrate how CDC works.

Please NOTE that before proceeding with CDC you MUST make sure that your SQL SERVER AGENT IS UP AND RUNNING.

  • Impact of INSERT STATEMENT in CDC:

Let me pass an INSERT statement and observe how CDC records its changes in the audit tables as shown below.

--This script is compatible with SQL Server 2008 and above.
USE [AdventureWorks2012]
GO
--Insert a record in [HumanResources].[Department]
INSERT INTO [HumanResources].[Department]
([Name]
,[GroupName]
,[ModifiedDate])
VALUES
('IT'
,'R & D'
,GETDATE())
GO

Once you insert a new record in the table ([HumanResources].[Department]), lets review the table ([HumanResources].[Department]) and its relevant audit table (cdc.HumanResources_Department_CT) respectively.

--This script is compatible with SQL Server 2008 and above.
USE AdventureWorks2012
GO
SELECT * FROM HumanResources.Department
GO
SELECT * FROM cdc.HumanResources_Department_CT
GO
--OUTPUT

Change data capture.2.1_part2

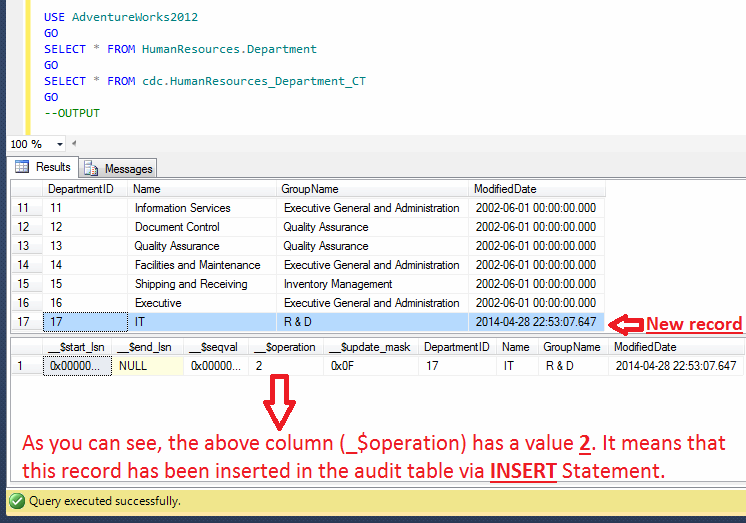
As you can observe from the above result set, it has one new record in [HumanResources].[Department] as usual. In addition, one record has been inserted in the audit table (cdc.HumanResources_Department_CT) as well with some additional fields and ONE of the most important additional fields is _$operation that will explain you which operation inserted this record in the audit table. In the above result set say, _$operation has a value of 2 and it means that it has been inserted by INSERT statement.

  • Impact of UPDATE STATEMENT in CDC:

Let me pass an UPDATE statement and observe how CDC records its changes in the audit tables as shown below.

--This script is compatible with SQL Server 2008 and above.
USE [AdventureWorks2012]
GO
--Update a record in [HumanResources].[Department]
USE [AdventureWorks2012]
GO
UPDATE [HumanResources].[Department]
SET [Name] = 'IT Support'
WHERE [DepartmentID]=17
GO

Once you UPDATE a record in the table ([HumanResources].[Department]), lets review the table ([HumanResources].[Department]) and its relevant audit table (cdc.HumanResources_Department_CT) respectively.

--This script is compatible with SQL Server 2008 and above.
USE AdventureWorks2012
GO
SELECT * FROM HumanResources.Department
GO
SELECT * FROM cdc.HumanResources_Department_CT
GO
--OUTPUT

Change data capture.2.2_part2

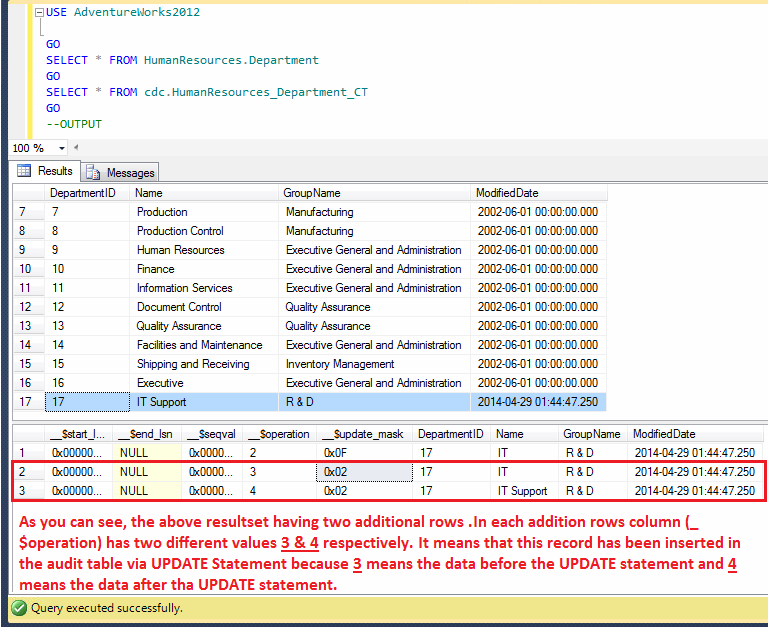
As you can observe from the above result set, it has one updated record in [HumanResources].[Department] as usual. In addition, two records have been inserted in the audit table (cdc.HumanResources_Department_CT) as well with some additional fields and ONE of the most important additional fields is _$operation that will explain you which operation inserted this record in the audit table. In the above result set say, _$operation has a value of 3 & 4 and it means that it has been inserted by UPDATE statement. But what do you mean by 3 & 4. In fact 3 means the data before the update statement and 4 means the data after the update statement.

  • Impact of DELETE STATEMENT in CDC:

Let me pass a DELETE statement and observe how CDC records its changes in the audit tables as shown below.

--This script is compatible with SQL Server 2008 and above.
USE [AdventureWorks2012]
GO
--Update a record in [HumanResources].[Department]
USE [AdventureWorks2012]
GO
DELETE from [HumanResources].[Department] WHERE [DepartmentID]=17
GO

Once you DELETE a record in the table ([HumanResources].[Department]), lets review the table ([HumanResources].[Department]) and its relevant audit table (cdc.HumanResources_Department_CT) respectively.

--This script is compatible with SQL Server 2008 and above.
USE AdventureWorks2012
GO
SELECT * FROM HumanResources.Department
GO
SELECT * FROM cdc.HumanResources_Department_CT
GO
--OUTPUT

Change data capture.2.3_part2

As you can observe from the above result set, it has DELETED one record in [HumanResources].[Department] as usual. In addition, ONE record has been inserted in the audit table (cdc.HumanResources_Department_CT) as well with some additional fields and ONE of the most important additional fields is _$operation that will explain you which operation inserted this record in the audit table. In the above result set say, _$operation has a value of 1 and it means that it has been inserted by DELETE statement.

In my upcoming article, I will write how to DISABLE the CDC feature.

An update of my blog is available at my twitter or you can like my Facebook page or subscribe via email by mentioning your email address in the ‘follow blog’ section.

Read Full Post »

In general, if your application having an audit trial feature (to records any add, edit & delete activity performed by any end user in each table), it would be value addition to your application or it may be the best selling point of your application. However, when it comes to the development of this feature, it really become a nightmare. The reason for being problematic is that you need to integrate this feature everywhere in your application. In addition, you need to develop so many audit tables, stored procedures & triggers in order to achieve it. Sometimes the development and testing of this feature takes long time.
In SQL Server 2008, this problem has been solved by shipping a new feature namely Change data capture. It is one of the biggest and remarkable features in SQL Server 2008. In fact, it records and maintains all the changes in any table (if enabled) with very minimal amount of efforts and the good news is that the developers do not need to write even single a line of code to capture all these changes :).

In this article, I will demonstrate how to enable Change Data Capture (CDC) for any database and tables step by step.

Step 1 :
Before enabling CDC for any database, you must check whether it is already enabled or not. Given below is the script that shows all the databases along with its CDC enabled status.

--This script is compatible with SQL Server 2008 and above.
USE master
GO
SELECT
database_id,
name,
is_cdc_enabled
FROM sys.databases
GO
--OUTPUT

Change data capture.1.1_part1

Step 2 :
In step 1, as you observed that all the is_cdc_enabled columns of sys.database (system view) is 0. It means that none of the databases has been enabled for CDC.
Lets enable CDC for AdventureWorks2012 database in this step. Given below is the script.

--This script is compatible with SQL Server 2008 and above.
--DONOT forget to change the database name below.
USE AdventureWorks2012
GO
EXEC sys.sp_cdc_enable_db
GO

Step 3 :
Once you enabled the CDC, you need to repeat step 1, in order to check whether CDC has been enabled for AdventureWorks2012 database or NOT.
Given below is the same script but the output would be different.

--This script is compatible with SQL Server 2008 and above.
USE master
GO
SELECT
database_id,
name,
is_cdc_enabled
FROM sys.databases
GO
--OUTPUT

Change data capture.1.2_part1

As you can see that is_cdc_enabled column value is 1 for AdventureWorks2012 database and it is a confirmation that CDC is enabled for AdventureWorks2012 database.

Step 4 :
Once you enable the CDC in the database lets enable the CDC in a table in order to capture the changes in that particular table.
But hang on a minute, before activating this feature on any table, you must check whether it is already enabled for that particular table or not. Given below is the script that will list down all the tables available in that particular database along with the CDC status.

--This script is compatible with SQL Server 2008 and above.
USE AdventureWorks2012
GO
SELECT
object_id,
SCHEMA_NAME(Schema_id) As [Schema Name],
name As [Table Name],
is_tracked_by_cdc
FROM sys.tables
GO
--OUTPUT

Change data capture.1.4_part1

Step 5 :
In step 5, as you noticed that all the is_cdc_enabled columns of sys.database (system view) is 0. It means that none of the databases has been enabled for CDC.
Lets enable CDC for table namely HumanResources.Department in AdventureWorks2012 database in this step. Given below is the script.

--This script is compatible with SQL Server 2008 and above.
--DONOT forget to change the database name below.
USE AdventureWorks2012
GO
EXEC sys.sp_cdc_enable_table
@source_schema = N'HumanResources',
@source_name = N'Department',
@role_name = NULL
GO

As you can see above one of the parameters @role_name is NULL. I deliberately made it NULL, so all the users belonging to any role can view the changes in that particular table. However, you can pass any role to restrict the access from other users & roles accordingly.

Step 6 :
In this step, we need to check again if CDC has been enabled for that particular table or not. In order to do it, we need to repeat step 3 and this time the result set would be different. Given below is the same script as Step 4.

--This script is compatible with SQL Server 2008 and above.
USE AdventureWorks2012
GO
SELECT
object_id,
SCHEMA_NAME(Schema_id) As [Schema Name],
name As [Table Name],
is_tracked_by_cdc
FROM sys.tables
GO
--OUTPUT

Change data capture.1.5_part1

Step 7 :
Now, we assured that CDC has been enabled for that particular table, it means that CDC has created an audit table for that particular table (Same way we used to manually create in earlier version of SQL Server to record audit for any table). But where is that particular audit table ? You will find that particular table in CDC schema as shown below.

Change data capture.1.6_part1

In my upcoming article, I will write how to manipulate the CDC feature and how we can view those changes in order to really enjoy the audit trial feature with zero customization.

An update of my blog is available at my twitter or you can like my Facebook page or subscribe via email by mentioning your email address in the ‘follow blog’ section.

Read Full Post »

File table is one of the best features shipped with SQL Server 2012, it is a special type of table which allows us to store files and folders in windows and we can easily access it through windows application & SQL Server without any customization. I have written multiple articles on file table. However, still doing research on this special table. Today, I came across an issue with filetable at the client side once they were doing some activity on it. The issue is when they tried to explore FileTable Directory in a FileTable, the option was disabled as shown below. However I can perform any activity on file table except to explore it.

Explore FileTable Directory.1.1

Now, I cannot explore this file table using explore the filetable directory option. It means that I cannot view the filetable’s files and folder using windows directory. So what is the problem and possible solution ?

Resolution:
I asked the client what activity they did with filetable but they had no clue. So, I started doing my research and finally resolved it by MSDN help. In fact the Filetable’s NON_TRANSACTED_ACCESS has been switched OFF by mistake as shown below.

Explore FileTable Directory.1.2

Wow, I found the problem that has disabled the explore FileTable directory as mentioned above. Now what is the solution ?
Given below is the script that can enable the NON_TRANSACTED_ACCESS that can result in enabling the explore FileTable directory.

--This script is compatible with SQL Server 212 and above.
 ALTER DATABASE SameplDB
    SET FILESTREAM ( NON_TRANSACTED_ACCESS = FULL );
GO

Once you execute the above script, try again to check if the explore FileTable Directory in the FileTable has been enabled or not. This time you will succeed as shown below.

Explore FileTable Directory.1.3

Conclusion:
Whenever, you come across such issue, you must check the NON_TRANSACTED_ACCESS of the particular database in order to fix this issue.

Read Full Post »

In general, upgrading of SQL Server in any latest version is quite complex. However, in my opinion it is NOT at all a rocket science, it is completely based on your planning and understanding about the complexity of your database(s) and its related applications. If you plan and understand it properly, there is no way you cannot make it smooth and up to the mark. In addition, before upgrading it directly on your production database server, you must test it on your test database server like any other application’s deployment and upgrading. But how will I know that is there any problem in my upgrading or NOT ? The solution is one of the best FREE tools that SQL Server provides namely SQL Server Upgrade Advisor. This tool can be downloaded from Microsoft site or it comes with SQL Server 2012 media (Setup files) . The installation of this tool is self explanatory.

SQL Upgrade Advisor

Please note that the database you are planning to upgrade to SQL Server 2012 must have a compatibility of 90 or above. In addition, as much as the gap is between the versions, so is the complexity and problems you can expect. In order to avoid this, it is highly recommended that you should upgrade your SQL Server in a timely manner.  

In this article, I will demonstrate how SQL Server Upgrade Advisor works step by step.

Step 1 : 
Once you install SQL Server 2012 Upgrade Advisor, you will find it in the Start >> Program files as shown below.

upgrade.1.1.1

Step 2 :
Now, it is time to execute the SQL Server Upgrade advisor, it will take you to the first screen, from where you can launch the upgrade Advisor Analysis Wizard. Here you will find the summary about the SQL Server Upgrade Advisor. I strongly recommend that you go through it. Once you review the summary, you need to launch the Upgrade Advsior Analysis Wizard as shown below.

upgrade.1.1

Step 3 :

This is a welcome screen. It will give you the summary of how upgrade Advisor works step by step as shown below. However, you can check mark the Do not show this starting page again in order to avoid this screen recurring, as it is for information ONLY.

upgrade.1.2

Step 4 :

Once you crossed the welcome screen, immediately after that you need to select the components you want to analyse for upgrading. Please make sure that you do NOT  select Notification Services and Data Transformation Services because these two services have been discontinued in the SQL Server 2012. Reporting services you can select if you have installed in that particular server. In my case reporting service was not applicable.

upgrade.1.3

Step 5 :

The next screen will ask you to select the instance and provide the valid credential of that particular instance as shown below.

upgrade.1.4

Step 6 :

The next step is the selection of all or any one databases of the above selected instance that you want to upgrade to SQL Server 2012. Kindly select the appropriate database and press NEXT button.

upgrade.1.5

Step 7 :

Here you need to provide the instance of Analysis services. In addition, you need to provide its credential as well.

upgrade.1.6

Step 8 :

In this step, you need to select the location and the packages of  your integration services. In my case, my SSIS packages are available in the same server so I selected the first option. However, you can select as per your requirement as shown below.

upgrade.1.7

Step 9 :

In this step, SQL upgrade advisor will show you the path of Upgrade advisor report & its log files for your reference.

upgrade.1.8

Step 10 :

Once you press NEXT button, it will start analyzing your selected components on selected databases. It takes 2-30 minutes, depending upon the database size, number of component and performance of your server.

upgrade.1.9

Step 11 :

Once Analysis is done, it will show you a summary report along with the status and a Launch Report button.  Here you need to launch the report, in order to see the results of the SQL Server upgrade analysis for your selected components.

upgrade.1.10

Step 12 :

Once you launch the report, SQL Server Uprade Advisor will show you all the critical issues that you must fix it before or after upgrading. In order to do a smooth migration make sure that you resolve all the given below issues. In my case it is displaying only one issue related to the keyword. In fact I used one word that became a keyword in SQL Server 2012. So I need to replace this keyword.

upgrade.1.12

Step 13 :

Once you select the issue as shown above, it will show where the conflict exactly is. In addition, it will provide all necessary details that you may require at the time of fixing.

upgrade.1.13


Let me know about your experience relating to SQL Server upgrade advisor.

Read Full Post »

Whenever we try to take an exclusive access to a database in order to perform any activity like backup restore, it usually fails if any process is still using the database. I received the given below error from my test database while I was restoring the database on it.

kill process.1.1

Opsssss, fortunately, we do have solution by killing the running process to take a lock and perform any activity using a management command namely KILL & a system view sys.sysprocesses. However, what encourages me to write this solution is that sys.sysprocesses will be removed from the future version of SQL Server. So what is the NEW solution ?

Given below is the script, that I developed using sys.dm_exec_sessions.

USE master
GO
DECLARE @SQL_String VARCHAR(MAX)
DECLARE @Database_id INT

--DO NOT forget to change database name in give below statement
SET @Database_id=DB_ID('AdventureWorks2012')
SET @SQL_String=''

SELECT @SQL_String=@SQL_String + 'KILL '
+ COALESCE(CONVERT(VARCHAR(5),[session_id])+ '; ','')
FROM sys.dm_exec_sessions
WHERE database_id =@Database_id

--PRINT @SQL_String
EXEC (@SQL_String)

The above statement kills all the process running on a specific database. But do not forget to CHANGE the database name.
Once the above statement executed successfully, you can perform any activity.

Read Full Post »