Feeds:
Posts
Comments

Archive for the ‘Solutions’ Category

Today, we will discuss the multiple ways to insert multiple records in the table using one insert statement. We have different ways to achieve it but there are pros and cons in each method that we will discuss later in this article. Lets create a table to demonstrate how it works.

Create Table Test_Table
(
[ID] int,
[Designation] varchar(50)
)

Let me explain this with different methods and simple examples.

Method -1 : Traditional Insert statement (Multiple records with Multiple Statements)

In this Method, we will discuss the usual method to insert multiple records with multiple statements. However, if you need to insert multiple records, you need to write multiple statements. And it is a little bit time consuming as well because you need to write statement on each line.

Insert into Test_Table ([ID],[Designation]) Values(1,'Officer')
Insert into Test_Table ([ID],[Designation]) Values(2,'Manager')
Insert into Test_Table ([ID],[Designation]) Values(3,'Director')

Method-2 : Insert statement – Table Value Constructor – (Multiple records with Single Statement)

In SQL server 2008, a solution came for multiple records insertion with a single statement namely “Table Value Constructor”.  Lets make an example and check how it works.

Insert into Test_Table Values (1,'Officer'),(2,'Manager'),(3,'Director')

Note : We can construct maximum 1000 rows using this method in a single statement. If it exceeds 1000, it will generate an error message.

Method-3 : Insert statement – Union ALL – (Multiple records with Single statement
In this example, we will insert multiple records with a single statement using “Union ALL”.

Insert into Test_Table
Select 1,'Officer'
UNION ALL
Select 2,'Manager'
UNION ALL
Select 3,'Director'

Note : In this method, the performance is inversely proportional to the length of the statement, ie., longer the UNION ALL statement grows, lesser the performance will be.

Conclusion : I discussed various ways to insert multiple records using single statement but before applying any method we need to review the requirement and should keep the pros and cons in mind.

Read Full Post »

I have been asked this question “How to get hour, minute and second from date time?” from a developer last week.

Let me explain it with a simple example.

Declare @DateTime As Datetime
Set @DateTime = Getdate()
Select @DateTime as [DateTime]

Select DatePart(Hour,@Datetime) as [Hour]
Select DatePart(Minute,@Datetime) as [Minutes]
Select DatePart(Second,@Datetime) as [Seconds]

--Result
DateTime
-----------------------
2012-09-25 18:12:45.420

(1 row(s) affected)

Hour
-----------
18

(1 row(s) affected)

Minute
-----------
12

(1 row(s) affected)

Second
-----------
45

(1 row(s) affected)

Read Full Post »

Recently, I wrote an article on “Generating Insert statements, data & schema using SQL Server Publishing Wizard”. It is a very nice tool to generate insert into statement from table data.

In SQL server 2012, the feature of this tool plus additional features are provided. Lets proceed step by step to generate insert into statement from table data in SQL server 2012.

Step 1 :

In the first step, you need to right click on Databases >> Tasks >> Generate Scripts…

Step 2 :

This is the welcome screen. If you don’t need this screen again and again you can check on “Do not show this page again”.

Step 3 :

In this step, you need to generate the script for one object or all objects available in the database. You can further drill down if you need to generate any table. For example :

Setup 4 :

The next step is to define the script location, clip board or in a new window. In the same step, if you click on Advanced button, it will give you further control on scripting.

This is the advance screen, in this screen you can choose whether you need data, schema or data and schema scripts.’

But if you need only Insert into statement from table data, you must select data only. By default it is schema only.

It also allows you to select the SQL version.

Step 5 :

In this step it will display the summary of your selection. If you need you can go back and change the settings.

Step 6 :

In this step, it will display the result.

Read Full Post »

Few months back, I published an article namely How to generate Insert Statements from Table Data using SQL Server. In this article, I have developed a tool that can help you to generate insert into statement from table data.

Today, we will discuss one more tool namely “Microsoft SQL Server Database Publishing Wizard” that will help you not only to generate the insert into statement but also you can generate script for all objects in SQL server. You can download this tool from here

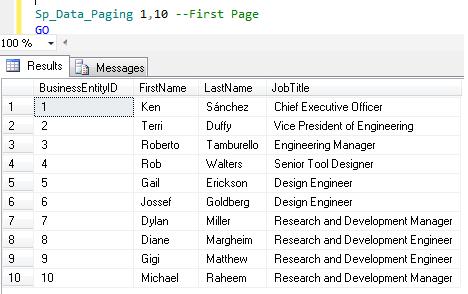
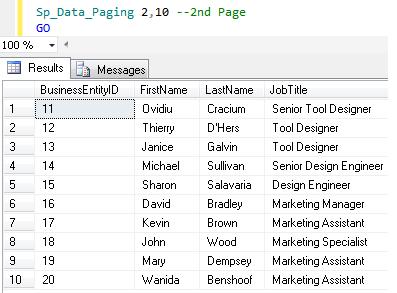
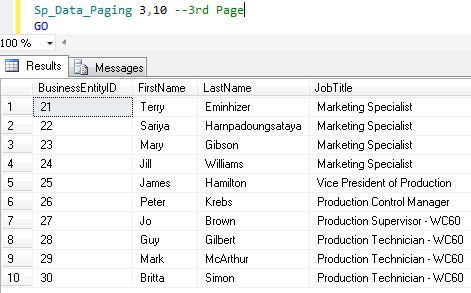
Lets proceed step by step to generate it.

Step 1 :

Run this utility and this will be the welcome screen.

Step 2 :

Once you click on next, you need to give the server name and its credentials. You can also provide it as a connection string.

Step 3 :
In this step you need to select the database. There is no multi selection option, so you need to select one database at a time.
Also, if you check “script all objects in the selected database” then in the next step it will not give you the option to select the objects.

Step 4 :
If you did not check “script all objects in the selected database” then this tool will allow you to select multiple object of the SQL server. ‘Select All’ option is also available.
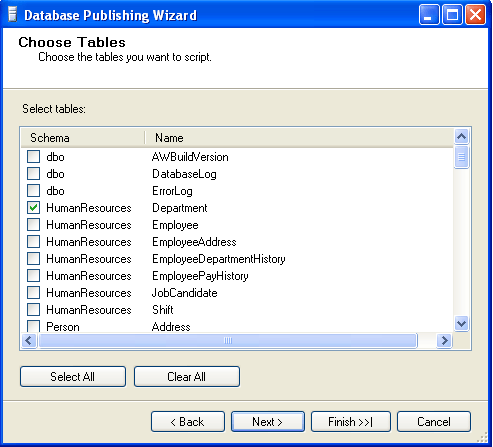
Step 5 :
In the previous step, I selected the ‘Tables’ so in this step, I need to define which table(s) should be scripted.

Step 6 :
In this step , you can define the path where the script should be generated or you can define the server where the script should be deployed.
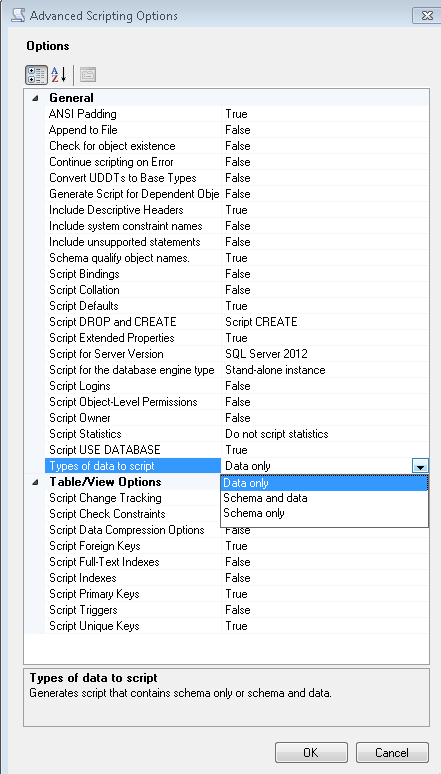
Step 7 :
In this step, you need to define your requirement. Select one of the options ‘Data only’ or ‘Schema only’ or ‘Schema & data’.

Step 8 :
In this step, you can see the summary of your selection. If it is not correct, you can go back and change the selection.

Step 9 :
In this step, you can view the result of process, whether it is executed successfully or not.

Step 10 :
Now, the script has been generated successfully and you can get the file from your defined location.
For Example:

/****** Object:  Table [HumanResources].[Department]    Script Date: 09/24/2012 10:48:11 ******/
DELETE FROM [HumanResources].[Department]
GO
/****** Object:  Table [HumanResources].[Department]    Script Date: 09/24/2012 10:48:11 ******/
SET IDENTITY_INSERT [HumanResources].[Department] ON
INSERT [HumanResources].[Department] ([DepartmentID], [Name], [GroupName], [ModifiedDate])
VALUES (1, N'Engineering', N'Research and Development', CAST(0x00008C6900000000 AS DateTime))

INSERT [HumanResources].[Department] ([DepartmentID], [Name], [GroupName], [ModifiedDate])
VALUES (2, N'Tool Design', N'Research and Development', CAST(0x00008C6900000000 AS DateTime))

INSERT [HumanResources].[Department] ([DepartmentID], [Name], [GroupName], [ModifiedDate])
VALUES (3, N'Sales', N'Sales and Marketing', CAST(0x00008C6900000000 AS DateTime))

INSERT [HumanResources].[Department] ([DepartmentID], [Name], [GroupName], [ModifiedDate])
VALUES (4, N'Marketing', N'Sales and Marketing', CAST(0x00008C6900000000 AS DateTime))

INSERT [HumanResources].[Department] ([DepartmentID], [Name], [GroupName], [ModifiedDate])
VALUES (5, N'Purchasing', N'Inventory Management', CAST(0x00008C6900000000 AS DateTime))

INSERT [HumanResources].[Department] ([DepartmentID], [Name], [GroupName], [ModifiedDate])
VALUES (6, N'Research and Development', N'Research and Development', CAST(0x00008C6900000000 AS DateTime))

INSERT [HumanResources].[Department] ([DepartmentID], [Name], [GroupName], [ModifiedDate])
VALUES (7, N'Production', N'Manufacturing', CAST(0x00008C6900000000 AS DateTime))

INSERT [HumanResources].[Department] ([DepartmentID], [Name], [GroupName], [ModifiedDate])
VALUES (8, N'Production Control', N'Manufacturing', CAST(0x00008C6900000000 AS DateTime))

INSERT [HumanResources].[Department] ([DepartmentID], [Name], [GroupName], [ModifiedDate])
VALUES (9, N'Human Resources', N'Executive General and Administration', CAST(0x00008C6900000000 AS DateTime))

INSERT [HumanResources].[Department] ([DepartmentID], [Name], [GroupName], [ModifiedDate])
VALUES (10, N'Finance', N'Executive General and Administration', CAST(0x00008C6900000000 AS DateTime))

INSERT [HumanResources].[Department] ([DepartmentID], [Name], [GroupName], [ModifiedDate])
VALUES (11, N'Information Services', N'Executive General and Administration', CAST(0x00008C6900000000 AS DateTime))

INSERT [HumanResources].[Department] ([DepartmentID], [Name], [GroupName], [ModifiedDate])
VALUES (12, N'Document Control', N'Quality Assurance', CAST(0x00008C6900000000 AS DateTime))

INSERT [HumanResources].[Department] ([DepartmentID], [Name], [GroupName], [ModifiedDate])
VALUES (13, N'Quality Assurance', N'Quality Assurance', CAST(0x00008C6900000000 AS DateTime))

INSERT [HumanResources].[Department] ([DepartmentID], [Name], [GroupName], [ModifiedDate])
VALUES (14, N'Facilities and Maintenance', N'Executive General and Administration', CAST(0x00008C6900000000 AS DateTime))

INSERT [HumanResources].[Department] ([DepartmentID], [Name], [GroupName], [ModifiedDate])
VALUES (15, N'Shipping and Receiving', N'Inventory Management', CAST(0x00008C6900000000 AS DateTime))

INSERT [HumanResources].[Department] ([DepartmentID], [Name], [GroupName], [ModifiedDate])
VALUES (16, N'Executive', N'Executive General and Administration', CAST(0x00008C6900000000 AS DateTime))

SET IDENTITY_INSERT [HumanResources].[Department] OFF

Read Full Post »

“How to calculate the first date of the current, previous & next month” ? I have seen this question many times in different blogs and there are multiple approaches that we have been following to find it.

For Example

--SQL Server 2005/2008
DECLARE @DATE DATETIME
SET @DATE='2012-09-10'

--First date of the Previous Month
SELECT CONVERT(VARCHAR(10),DATEADD(MONTH, DATEDIFF(MONTH,0,@DATE)-1,0),120) AS [Previous Month]

--First date of the Current Month
SELECT CONVERT(VARCHAR(10),DATEADD(MONTH, DATEDIFF(MONTH,0,@DATE),0),120) AS [Current Month]

--First date of the Next Month
SELECT CONVERT(VARCHAR(10),DATEADD(MONTH, DATEDIFF(MONTH,0,@DATE)+1,0),120) AS [Next Month]

Previous Month
--------------
2012-08-01

(1 row(s) affected)

Current Month
-------------
2012-09-01

(1 row(s) affected)

Next Month
----------
2012-10-01

(1 row(s) affected)

In SQL Server 2012, we can calculate it with the help of a new built in function namely EOMONTH.

Example-1 :
In this example, I calculated the last date of the previous month and later added one more day to it to make the first day of the current month.

Declare @Date as varchar(10) ='2012-09-10'

--First date of the Current Month
Select DateAdd(day,1,EOMONTH(Getdate(),-1)) as [Current Month]

Current Month
-------------
2012-09-01

(1 row(s) affected)

Example-2 : FOMONTH
In this example, we will create a function FOMONTH and will use it same as EOMONTH in SQL server 2012.

CREATE Function [dbo].[FOMONTH]
(@start_date date, @month_to_add int=0)
Returns Date
AS
BEGIN
RETURN DATEADD(DAY,1,EOMONTH(@start_date,@month_to_add-1))
END
GO
--First day of the Previous Month
Select dbo.[FOMONTH] (Getdate(),-1)  AS [Previous Month]

--First day of the Current Month
Select dbo.[FOMONTH] ('2012-09-10',0) AS [Current Month]

--First day of the Next Month
Select dbo.[FOMONTH] (Getdate(),1)  AS [Next Month]

--First day of the Current Month WITH DEFAULT VALUE
Select dbo.[FOMONTH] (Getdate(),DEFAULT)  AS [Current Month]

Previous Month
--------------
2012-08-01

(1 row(s) affected)

Current Month
-------------
2012-09-01

(1 row(s) affected)

Next Month
----------
2012-10-01

(1 row(s) affected)

Current Month
-------------
2012-09-01

(1 row(s) affected)

Read Full Post »

In SQL Server 2012, Microsoft has introduced a lot of new T-SQL features and enhancements and one of the best features is Paging. We have been doing this data paging in previous versions of SQL server by writing a stored procedure or a complex query.
Here is a sample, how we were using data paging in SQL Server 2005/ 2008.

USE AdventureWorks
GO
SELECT *
FROM   (SELECT ROW_NUMBER() OVER(ORDER BY EmployeeID) AS
rownumber, [FirstName], [LastName],[JobTitle] FROM HumanResources.vEmployee) AS Salaries1
WHERE  rownumber >= 10 AND rownumber = 10 AND rownumber 

But, now it is very easy to use and implement paging in SQL Server 2012. We only need to set two keywords (OFFSET, FETCH NEXT) with Order By Clause and we can get our required records.

Lets Proceed first with each keyword.

Order By Offset :

USE AdventureWorks2012
GO
Select BusinessEntityID,[FirstName], [LastName],[JobTitle]
from HumanResources.vEmployee
Order By BusinessEntityID
OFFSET 10 ROWS

If we use offset with order by clause, the query excludes the number of records we mentioned in OFFSET n Rows. In the above example, we used OFFSET 10 ROWS so, SQL will exclude first 10 records from the result and display the rest of all records in the defined order.

Order By Offset With FETCH NEXT :

USE AdventureWorks2012
GO
Select BusinessEntityID,[FirstName], [LastName],[JobTitle]
from HumanResources.vEmployee
Order By BusinessEntityID

OFFSET 10 ROWS
FETCH NEXT 10 ROWS ONLY

If we use offset with fetch next, we can define how many records we need to exclude. Also we can define that after exclusion how many records we need to pick up. In the above example, SQL excludes first 10 records and will pick up 10 records afterwards.
In other words, we can say that whenever we need to do paging we need 2 things. 1st, the page no. and 2nd the no. of records in each page. Here OFFSET is used for page number and FETCH NEXT is the number of records in each page.

Order By Fetch Next Rows Only:
If, we use Fetch Next with order by clause only without Offset, SQL will generate an error. We cannot use Fetch Next without Offset.

USE AdventureWorks2012
go
Select BusinessEntityID,[FirstName], [LastName],[JobTitle]
from HumanResources.vEmployee
Order By BusinessEntityID
--OFFSET 10 ROWS
FETCH NEXT 10 ROWS ONLY

Given below is a simple stored procedure to perform paging in SQL server 2012.

USE AdventureWorks2012
go
Create Procedure dbo.Sp_Data_Paging
@PageNo int,
@RecordsPerPage int
AS

Select BusinessEntityID,[FirstName], [LastName],[JobTitle]
from HumanResources.vEmployee
Order By BusinessEntityID
OFFSET (@PageNo-1)*@RecordsPerPage ROWS
FETCH NEXT @RecordsPerPage ROWS ONLY
GO
Sp_Data_Paging 1,10 --First Page
GO
--Result

Sp_Data_Paging 2,10 --2nd Page
--Result
GO

Sp_Data_Paging 3,10 --3rd Page
--Result
GO

Conclusion :

These two keywords OFFSET and FETCH NEXT clause give boost to data pagination in SQL server 2012.
It also improves performance (because it picks up only certain records from the database) and reduces the number of codes and effort. Now the developers can do the data paging not only from front end (. NET) but also from the back end.

Read Full Post »

Microsoft launched many new features in the SQL server 2012 and one of its best features is SEQUENCE Object.
Let me explain it with a real world example:

It generates a sequence (Auto number) without associating with the table globally. (In earlier versions, we had to generate sequence manually).
The sequence should be of numeric data type (tinyint, smallint, int, bigint, decimal and numeric (scale should be zero)) and it can be generated in an ascending or descending order at a particular interval and we can also define the (cycle) to restart the sequence.

SYNTAX :
CREATE SEQUENCE [schema_name].sequence_name
[ AS [ built_in_integer_type | user-defined_integer_type ] ]
[ START WITH ]
[ INCREMENT BY ]
[ { MINVALUE [ ] } | { NO MINVALUE } ]
[ { MAXVALUE [ ] } | { NO MAXVALUE } ]
[ CYCLE | { NO CYCLE } ]
[ { CACHE [ ] } | { NO CACHE } ]
[ ; ]
But, the question is if we have an identity property, then why do we need sequence? Given below is an example that will demonstrate the importance of sequence object.
Example :
We developed a ticketing system in one of the service industries and the requirement was that we had to create tickets for multiple services.
And the ticket should not be repeated in any service. And once we reach 1000 tickets, we need to restart it from ‘1’.
But, we were maintaining multiple service data in multiple tables. So we need to maintain a global unique auto-number and here it comes to Sequence.

Lets proceed now step by step.

Step 1 :
First, you need to create a sequence object namely “Ticket”

CREATE SEQUENCE [dbo].[Ticket]
AS [int]
START WITH 1
INCREMENT BY 1
MINVALUE 1
MAXVALUE 1000
CYCLE
CACHE
GO

Step 2 :
You need to create two tables to maintain different types of services in different tables.

Create table tbl_Renewal_Application(
[TicketNo] INT NOT NULL,
[App Date] datetime,
[Comments] varchar(max)

Create table tbl_New_Application(
[TicketNo] INT NOT NULL,
[App Date] datetime,
[Comments] varchar(max))

Step 3:
Now, you need to insert the [Ticket No] (Auto Increment) in different tables without duplication and should be consistent.

INSERT tbl_Renewal_Application ([TicketNo], [App Date],[Comments])
VALUES
(NEXT VALUE FOR [Ticket], Getdate(),'Renewal-1')
GO
INSERT tbl_New_Application ([TicketNo], [App Date],[Comments])
VALUES
(NEXT VALUE FOR [Ticket] , Getdate(),'New App-1')
GO
INSERT tbl_Renewal_Application ([TicketNo], [App Date],[Comments])
VALUES
(NEXT VALUE FOR [Ticket] , Getdate(),'Renewal-2')
GO
INSERT tbl_New_Application ([TicketNo], [App Date],[Comments])
VALUES
(NEXT VALUE FOR [Ticket] , Getdate(),'New App-2')

Now, if you browse the data from both tables, you can see the sequence number (Auto Number) available in the same sequence as we inserted into the table.
Here is the result :

Select * from tbl_Renewal_Application
Select * from tbl_New_Application


The beauty of this object is, if you need a new counter, you need not insert value in the table and then get the counter. By simply executing one query you can get the next counter.
Here is the query.

SELECT NEXT VALUE FOR dbo.[ticket]

–Result is 5
Note : At the time of implementation, if you need to start your first counter from 500 then, you need to set the start property of sequence to 500.

Read Full Post »

Sometimes, we have a request to create few hundred users in sql server specially at the time of new deployment.
The first solution is we can create users one by one, but it takes some time to create in the SQL Server.
The second solution is using Microsoft Excel. In this case, we need to enter all the users, its password and related information in excel sheet, and using this script we can create the sql script from this excel sheet.

To create SQL Authentication users in SQL, please enter your data in this excel sheet format (kindly do not change the header name) :
Download excel sheet for SQL.

To create Windows Authentication users in SQL, please enter your data in this excel sheet format (kindly do not change the header name) :
Download excel sheet for Windows.

Given below is the script with examples:

CREATE PROCEDURE CREATE_MULTIPLE_LOGIN_PROC
@Excel_File_Name_Path VARCHAR(MAX),
@Excel_Sheet_Name VARCHAR(MAX),
@Authentication_Type VARCHAR(MAX)
AS

DECLARE @SQL VARCHAR(MAX)

SET @SQL=''
SET @Excel_Sheet_Name =QUOTENAME (@Excel_Sheet_Name + '$' )--Add "$" to the excel sheet name to make it accessable.
SET @Excel_File_Name_Path='''Excel 4.0;Database=' + @Excel_File_Name_Path + ''

CREATE TABLE #temp_Data
(
[SNO]	 INT,
[SCRIPT] NVARCHAR(MAX)
)
IF @Authentication_Type ='SQL' -- If Authentication Type is SQL
Begin
SET @SQL = 'INSERT INTO #temp_Data ' + 'SELECT  [SNO],'+ '''CREATE LOGIN ''
+ QUOTENAME([LOGIN NAME])
+ '' WITH PASSWORD=N''''''+ [PASSWORD] + ''''''
,CHECK_EXPIRATION=''+[CHECK_EXPIRATION]+ ''
,CHECK_POLICY=''+[CHECK_POLICY]+ ''
,DEFAULT_DATABASE=''+QUOTENAME([DEFAULT_DATABASE])+ ''
,DEFAULT_LANGUAGE=''+QUOTENAME([DEFAULT_LANGUAGE])+ '''''
+ ' AS [DATA] FROM OPENROWSET(''Microsoft.Jet.OLEDB.4.0'', ' + @Excel_File_Name_Path + ''', ' +
'''SELECT * FROM '+@Excel_Sheet_Name + ''')'
Print @SQL
EXEC(@SQL)

SET @SQL = ''
SET @SQL = 'INSERT INTO #temp_Data Select [SNO]
,''EXEC sys.sp_addsrvrolemember @loginame =N''''''+ [LOGIN NAME] + ''''''
, @rolename =N''''''+[FieldValue] + ''''''''
FROM (
Select [SNO],
[LOGIN NAME],
CONVERT(NVARCHAR(Max),[SERVER ROLE 1]) as [SERVER ROLE 1]  ,
CONVERT(NVARCHAR(Max),[SERVER ROLE 2]) as [SERVER ROLE 2]  ,
CONVERT(NVARCHAR(Max),[SERVER ROLE 3]) as [SERVER ROLE 3]  ,
CONVERT(NVARCHAR(Max),[SERVER ROLE 4]) as [SERVER ROLE 4]  ,
CONVERT(NVARCHAR(Max),[SERVER ROLE 5]) as [SERVER ROLE 5]  ,
CONVERT(NVARCHAR(Max),[SERVER ROLE 6]) as [SERVER ROLE 6]  ,
CONVERT(NVARCHAR(Max),[SERVER ROLE 7]) as [SERVER ROLE 7]  ,
CONVERT(NVARCHAR(Max),[SERVER ROLE 8]) as [SERVER ROLE 8]  ,
CONVERT(NVARCHAR(Max),[SERVER ROLE 9]) as [SERVER ROLE 9]  ,
CONVERT(NVARCHAR(Max),[SERVER ROLE 10]) as [SERVER ROLE 10]
FROM OPENROWSET(''Microsoft.Jet.OLEDB.4.0'', ' + @Excel_File_Name_Path + ''', ' +
'''SELECT * FROM '+@Excel_Sheet_Name + '''))Main
UNPIVOT(FieldValue  FOR FieldName IN (
[SERVER ROLE 1] ,
[SERVER ROLE 2] ,
[SERVER ROLE 3] ,
[SERVER ROLE 4] ,
[SERVER ROLE 5] ,
[SERVER ROLE 6] ,
[SERVER ROLE 7] ,
[SERVER ROLE 8] ,
[SERVER ROLE 9] ,
[SERVER ROLE 10]
)
)Sup'
Print @SQL
EXEC(@SQL)
END
ELSE IF @Authentication_Type ='Windows'
BEGIN
---Create
SET @SQL = 'INSERT INTO #temp_Data ' + 'SELECT  [SNO],'+ '''CREATE LOGIN ''
+ QUOTENAME([LOGIN NAME]) + ''
FROM WINDOWS WITH DEFAULT_DATABASE=''+QUOTENAME([DEFAULT_DATABASE])+ ''
, DEFAULT_LANGUAGE=''+QUOTENAME([DEFAULT_LANGUAGE])+ '''''
+ ' AS [DATA] FROM OPENROWSET(''Microsoft.Jet.OLEDB.4.0'',
' + @Excel_File_Name_Path + ''', ' +
'''SELECT * FROM '+@Excel_Sheet_Name + ''')'
Print @SQL
EXEC(@SQL)
SET @SQL = ''
END

Select [SCRIPT] from #temp_Data Order By [SNO],[SCRIPT]
GO
--Syntax
--CREATE_MULTIPLE_LOGIN_PROC 'Excel Sheet Path','Sheet Name (By Default it is sheet1)','Authentication Type'
--Example 1 :
CREATE_MULTIPLE_LOGIN_PROC 'E:\login_list-for-sql.xls','Sheet1','SQL' -- To Create SQL users
GO
--Result

--Example 2 :
CREATE_MULTIPLE_LOGIN_PROC 'E:\login_list-for-Windows.xls','Sheet1','Windows' -- To Create Windows users
--Result

I welcome your valuable feedback/input.

Read Full Post »

Here is a solution to convert Iranian Calendar (also known as Persian calendar or the Jalaali Calendar) to Gregorian Calendar & vise versa in SQL server.
To develop this solution, we used Julian calendar as an intermediary to convert it & vise versa.

Here is the source code to convert Iranian Calendar to Gregorian Calendar with example:

--First twe need to convert Persian calendar date to Julian Calendar date
Create FUNCTION [dbo].[UDF_Persian_To_Julian](@iYear int,@iMonth int,@iDay int)
RETURNS bigint
AS
Begin

Declare @PERSIAN_EPOCH  as int
Declare @epbase as bigint
Declare @epyear as bigint
Declare @mdays as bigint
Declare @Jofst  as Numeric(18,2)
Declare @jdn bigint

Set @PERSIAN_EPOCH=1948321
Set @Jofst=2415020.5

If @iYear>=0
Begin
Set @epbase=@iyear-474
End
Else
Begin
Set @epbase = @iYear - 473
End
set @epyear=474 + (@epbase%2820)
If @iMonth<=7
Begin
Set @mdays=(Convert(bigint,(@iMonth) - 1) * 31)
End
Else
Begin
Set @mdays=(Convert(bigint,(@iMonth) - 1) * 30+6)
End
Set @jdn =Convert(int,@iday) + @mdays+ Cast(((@epyear * 682) - 110) / 2816 as int)  + (@epyear - 1) * 365 + Cast(@epbase / 2820 as int) * 1029983 + (@PERSIAN_EPOCH - 1)
RETURN @jdn
End
Go
--Secondly, convert Julian calendar date to Gregorian to achieve the target.
Create FUNCTION [dbo].[UDF_Julian_To_Gregorian] (@jdn bigint)
Returns nvarchar(11)
as
Begin
Declare @Jofst  as Numeric(18,2)
Set @Jofst=2415020.5
Return Convert(nvarchar(11),Convert(datetime,(@jdn- @Jofst),113),110)
End
Go
-- Here is the example
Select dbo.[UDF_Julian_To_Gregorian](dbo.[UDF_Persian_To_Julian](1391,1,30))
--Result is 04-18-2012

Here is the source code to convert Gregorian Calendar to Iranian Calendar with example:

Create Function dbo.[UDF_Gregorian_To_Persian] (@date datetime)
Returns nvarchar(50)
as
Begin
Declare @depoch as bigint
Declare @cycle  as bigint
Declare @cyear  as bigint
Declare @ycycle as bigint
Declare @aux1 as bigint
Declare @aux2 as bigint
Declare @yday as bigint
Declare @Jofst  as Numeric(18,2)
Declare @jdn bigint

Declare @iYear   As Integer
Declare @iMonth  As Integer
Declare @iDay    As Integer

Set @Jofst=2415020.5
Set @jdn=Round(Cast(@date as int)+ @Jofst,0)

Set @depoch = @jdn - [dbo].[UDF_Persian_To_Julian](475, 1, 1)
Set @cycle = Cast(@depoch / 1029983 as int)
Set @cyear = @depoch%1029983

If @cyear = 1029982
Begin
Set @ycycle = 2820
End
Else
Begin
Set @aux1 = Cast(@cyear / 366 as int)
Set @aux2 = @cyear%366
Set @ycycle = Cast(((2134 * @aux1) + (2816 * @aux2) + 2815) / 1028522 as int) + @aux1 + 1
End

Set @iYear = @ycycle + (2820 * @cycle) + 474

If @iYear <= 0
Begin
Set @iYear = @iYear - 1
End
Set @yday = (@jdn - [dbo].[UDF_Persian_To_Julian](@iYear, 1, 1)) + 1
If @yday <= 186
Begin
Set @iMonth = CEILING(Convert(Numeric(18,4),@yday) / 31)
End
Else
Begin
Set @iMonth = CEILING((Convert(Numeric(18,4),@yday) - 6) / 30)
End
Set @iDay = (@jdn - [dbo].[UDF_Persian_To_Julian](@iYear, @iMonth, 1)) + 1

Return Convert(nvarchar(50),@iDay) + '-' +   Convert(nvarchar(50),@iMonth) +'-' + Convert(nvarchar(50),@iYear)
End
GO
-- Here is the example
Select dbo.[UDF_Gregorian_To_Persian]('2012-04-18') as [Persian Date]
--Result is 30-1-1391

Read Full Post »

By default, SQL Server takes the backup in the following location (‘C:\Program Files\Microsoft SQL Server\MSSQL.1\MSSQL\Backup\’). But if you don’t take the backup in this location, each time you need to change the backup path.To avoid this, you can set your default database backup path.

Here is the solution :
You can change the default backup path from the given below script.

DECLARE @HkeyLocal nvarchar(18)
DECLARE @BackupDirectory nvarchar(512)
DECLARE @InstanceRegPath sysname
DECLARE @MSSqlServerRegPath nvarchar(31)
DECLARE @NewPath nvarchar(100)

SET @HkeyLocal=N'HKEY_LOCAL_MACHINE'
SET @MSSqlServerRegPath=N'SOFTWARE\Microsoft\MSSQLServer'
SET @InstanceRegPath=@MSSqlServerRegPath + N'\MSSQLServer'

EXEC xp_instance_regread @HkeyLocal, @InstanceRegPath, N'BackupDirectory', @BackupDirectory OUTPUT
SELECT @BackupDirectory -- Read the default backup directory path

-- Update/Change the default backup directory path to @NewPath
SET @NewPath='D:\DBBackup' -- Change the new default backup folder here
EXEC xp_instance_regwrite @HkeyLocal,@InstanceRegPath, N'BackupDirectory', REG_SZ,@NewPath

Here is screen image of before processing this script :

Here is the screen image after processing this script :

Your feedback is very much appreciated. Please do write.

Read Full Post »

« Newer Posts - Older Posts »