SQL Server 2022 brought some exiting features which will help us in optimising the SQL scripts. Window clause is one of the new features. Also, it helps us to reduce the code complexity when we deal with multiple OVER Clause.
Old Approach (Earlier than SQL Server 2022):
As we can see in the below example that in the OVER Clause, we defined same Partition By & Order By, over and over again, since there was no Window clause available in the earlier edition of SQL Server.
USE Northwind
GO

SELECT [OrderID]
     , [ProductID]
	 , ROW_NUMBER()     OVER (PARTITION BY [ProductID]
	                          ORDER BY     [ProductID]) AS [RowNo]
	 , [UnitPrice]
	 , [Quantity]
     , AVG([UnitPrice]) OVER (PARTITION BY [ProductID]
	                          ORDER BY     [ProductID]) AS [AverageUnitPricePerProduct]
	 , SUM([Quantity])  OVER (PARTITION BY [ProductID]
	                          ORDER BY     [ProductID]) AS [TotalQuantityPerProduct]
FROM   [dbo].[Order Details]
WHERE  [ProductID] IN (9,15);
GO
--OUTPUT
New Approach (SQL Server 2022 & Above):
Compatibility Level:
Your database compatibility level MUST be 160 or higher to use Window clause. Given below is the script to change the database compatibility level.
ALTER DATABASE Northwind SET COMPATIBILITY_LEVEL = 160
In the new approach, you can simply define a Window clause just one time and use it over and over again in your query as shown below. It gives us the same result as mentioned above but with less complexity.
USE Northwind
GO

SELECT [OrderID]
     , [ProductID]
	 , ROW_NUMBER()     OVER Window1 AS [RowNo]
	 , [UnitPrice]
	 , [Quantity]
     , AVG([UnitPrice]) OVER Window1 AS [AverageUnitPricePerProduct]
	 , SUM([Quantity])  OVER Window1 AS [TotalQuantityPerProduct]
FROM [dbo].[Order Details]
WHERE [ProductID] IN (9,15)
WINDOW Window1 AS (PARTITION BY [ProductID]
                   ORDER BY     [ProductID]);
GO
--OUTPUT
Conclusion:
The Window clause is very handy when we have the same Window clause used by multiple aggregate functions. It also reduces the complexity. Do let me know if you used Window clause and found it useful or not.
Sometimes we come across a case where we need to generate a number series in SQL Server between two numbers. For example, if you give a week’s start date and end date and you need to generate whole week’s dates, it was not easy since there was no specific function available to generate series in earlier version of SQL Server (Earlier than SQL Server 2022).
In SQL Server 2022, a new function shipped namely GENERATE_SERIES() which was a long awaited function. This function will allow us to generate series of numbers between two numbers.
Old Approach (Earlier than SQL Server 2022):
Let me demonstrate how we used to struggle to generate number series in earlier versions of SQL Server, we used common table expression, Union All and a lot of other techniques to generate, it as shown below.
DECLARE @StartRange INT = 1;
DECLARE @EndRange   INT = 10;

;WITH CTE AS (
     SELECT @StartRange AS Sno
	 UNION ALL
	 SELECT Sno+1 FROM CTE WHERE Sno+1 <= @EndRange )
SELECT * FROM CTE;
GO
--OUTPUT
New Approach (SQL Server 2022 & Above):
Compatibility Level:
Your database compatibility level MUST be 160 or higher to use this function. Given below is the query to change your database compatibility level.
ALTER DATABASE tempdb SET COMPATIBILITY_LEVEL = 160
Example 1:
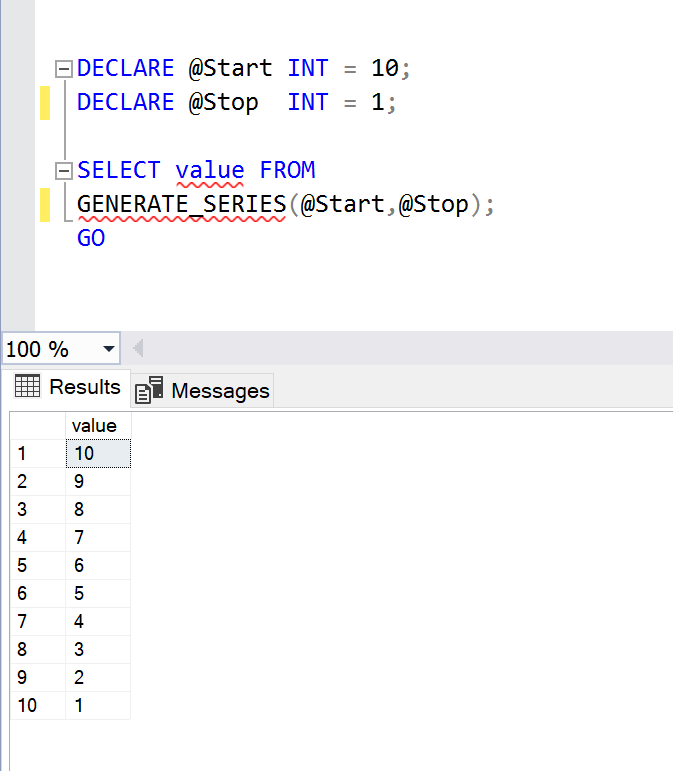
In this example, I will show you how to generate series between two numbers with the newly introduced function GENERATE_SERIES(). This function generates the series of numbers between the start and end numbers and takes the steps needed to jump from start until end.
DECLARE @Start INT = 1;
DECLARE @Stop  INT = 10;
DECLARE @Step  INT = 1;

SELECT value FROM
GENERATE_SERIES(@Start,@Stop,@Step);
GO
--OUTPUT
Default:
By Default, Step value is 1 in such cases, where start number is less than stop number, so we can achieve the same output as mentioned above without passing Step parameter as shown below.
DECLARE @Start INT = 1;
DECLARE @Stop  INT = 10;


SELECT value FROM
GENERATE_SERIES(@Start,@Stop);
GO
--OUTPUT
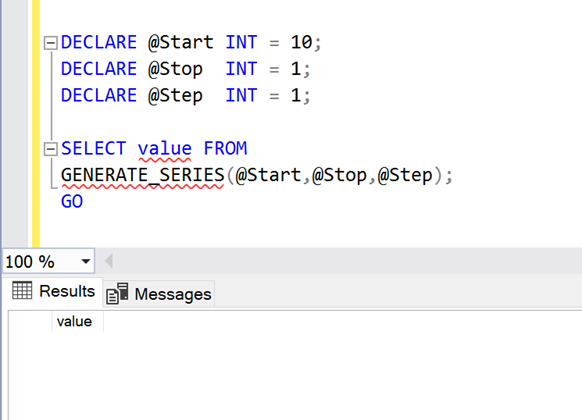
Issue:
When you want to generate series in ascending order then DON’T put NEGATIVE value in Step parameter. Even if you put negative value in Step parameter, it will not generate error but it will not give you any result as shown below.
DECLARE @Start INT = 1;
DECLARE @Stop  INT = 10;
DECLARE @Step  INT = -1;

SELECT value FROM
GENERATE_SERIES(@Start,@Stop,@Step);
GO
--OUTPUT
Example 2:
In this example, I will show you, how to generate number series in descending order using GENERATE_SERIES() function.
DECLARE @Start INT = 10;
DECLARE @Stop  INT = 1;
DECLARE @Step  INT = -1;

SELECT value FROM
GENERATE_SERIES(@Start,@Stop,@Step);
GO

--OUTPUT
Default:
By Default, Step value is -1 in such cases, where stop number is less than start number, so we can achieve the same output as mentioned above without passing Step parameter as shown below.
DECLARE @Start INT = 10;
DECLARE @Stop  INT = 1;

SELECT value FROM
GENERATE_SERIES(@Start,@Stop);
GO
--OUTPUT
Issue:
When you want to generate series in descending order then DON’T put POSITIVE value in Step parameter. Even if you put positive value in Step parameter, it will not generate error but it will not give you any result as shown below.
DECLARE @Start INT = 10;
DECLARE @Stop  INT = 1;
DECLARE @Step  INT = 1;

SELECT value FROM
GENERATE_SERIES(@Start,@Stop,@Step);
GO
--OUTPUT
Example 3:
If we want to generate negative number series using GENERATE_SERIES() function then the query and output will be like this.
DECLARE @Start INT = -1;
DECLARE @Stop  INT = -10;
DECLARE @Step  INT = -1;

SELECT * FROM
GENERATE_SERIES(@Start,@Stop,@Step);
GO
--OUTPUT
Example 4:
In this example, I will show you how to generate Odd numbers series using GENERATE_SERIES() function.
DECLARE @Start INT = 1;
DECLARE @Stop  INT = 10;
DECLARE @Step  INT = 2;

SELECT value FROM
GENERATE_SERIES(@Start,@Stop,@Step);
GO
--OUTPUT
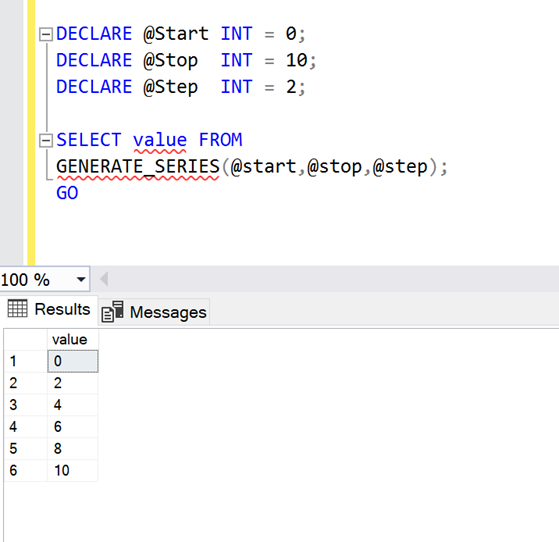
Example 5:
In this example, I will show you how to generate Even numbers series using GENERATE_SERIES() function.
DECLARE @Start INT = 0;
DECLARE @Stop  INT = 10;
DECLARE @Step  INT = 2;

SELECT value FROM
GENERATE_SERIES(@start,@stop,@step);
GO--OUTPUT
Conclusion:
I found GENERATE_SERIES() function very useful. Earlier we used multiple functions to generate the series between two numbers but now we can easily achieve with the help of GENERATE_SERIES() function. Do let me know if you will use this function and how you found it.
TRANSLATE() is one of the handy functions of SQL Server when it comes to replace one or more characters to another set of characters in one go. I have earlier written an article about it in detail.
Recently, I was using TRANSLATE() function and came across an error as mentioned below.
Error :
The second and third arguments of the TRANSLATE built-in function must contain an equal number of characters.
DECLARE @Number AS VARCHAR(15)
SET @Number='+92-3317892345'
SELECT @Number AS PhoneNumber
     , TRANSLATE(@Number,'+','00') AS TranslatedPhoneNumber;

GO
--OUTPUT
Solution:
As per SQL Server documentationtranslations must be the same data type and length as characters. And if you look at our script, the length of both characters (+) and translation (00) is not same.
In such cases, we need to simply apply REPLACE() function since TRANSLATE() function cannot handle such cases as shown below.
DECLARE @Number AS VARCHAR(15)
SET @Number='+92-3317892345'
SELECT @Number AS PhoneNumber
     , REPLACE(@Number,'+','00') AS REPLACEDPhoneNumber;
GO
--OUTPUT
Conclusion:
In case of this error, we should use REPLACE() function instead of TRANSLATE() function.
All of us know that user defined functions may affect the query performance very badly, specially when we are dealing with a huge amount of data. Despite saying this, most of the time we are left with no choice but to use User Defined Function (UDF) and bear the cost of its performance.
In SQL Server 2019, a feature shipped namely Scalar UDF Inlining, which was a long awaited feature. The main goal of this feature is to improve the performance of UDF drastically. Excited ?
Let me create a sample User Defined Function (UDF) to use in my demonstration as shown below.
Sample:
USE WideWorldImporters;
GO

CREATE FUNCTION [dbo].[UDF_customer_Name]
(
 @CustomerID INT
)
RETURNS VARCHAR(250)
AS
BEGIN

  DECLARE @CustomerName VARCHAR(250);

  SELECT  @CustomerName  = [CustomerName]
  FROM    [Sales].[Customers]
  WHERE  [CustomerID] = @CustomerID;

  RETURN  @CustomerName;
END
GO
Let me show you in the below example how we were usingUDF in the earlier version of SQL Server and facing performance issues. Let me call the above created UDF in the below query and show you its performance. In this UDF, I will pass the Customer ID as a parameter and get Customer Name in return.
USE WideWorldImporters;
GO

SET STATISTICS TIME ON;
GO

SELECT [CustomerID]
     , [dbo].[UDF_Customer_Name](CustomerID) AS [CustomerName]
     , [InvoiceID]
     , [TransactionDate]
FROM   [Sales].[CustomerTransactions];
GO

SET STATISTICS TIME OFF;
GO
--OUTPUT
Performance:
As we can see below, I have 97147 records and it takes 5 seconds to execute the query as shown below.
Scalar UDF Inlining Feature:
As we can see in above example, it took time to execute above query even though we have few records, which means that the performance is not good and this was normal. Now let’s try Scalar UDF Inlining feature to see the performance impact.
Compatibility level:
The database compatibility MUST be 150 or higher to use this feature. Given below is the query to set the compatibility level.
ALTER DATABASE WideWorldImporters
SET COMPATIBILITY_LEVEL =150;
GO
--OUTPUT
USE WideWorldImporters;
GO

ALTER DATABASE SCOPED CONFIGURATION
SET TSQL_SCALAR_UDF_INLINING = ON;
GO
Step 2:
Let’s check the inlineable status of my above created UDF by using sys.sql_modules. It MUST be 1 to use this feature as shown below.
USE WideWorldImporters;
GO

SELECT object_id
     , definition
     , is_inlineable
FROM sys.sql_modules
WHERE definition LIKE '%UDF_CUSTOMER%';
GO
Step 3:
Now, let’s execute the same query and check the performance as shown below
USE WideWorldImporters;
GO

SET STATISTICS TIME ON;
GO

SELECT [CustomerID]
     , [dbo].[UDF_Customer_Name](CustomerID) AS [CustomerName]
	 , [InvoiceID]
	 , [TransactionDate]
FROM   [SALES].[CustomerTransactions];
GO
--Output
SET STATISTICS TIME OFF;
GO
Performance:
As we can see below that this feature has increased the performance tremendously and it hardly took 1 second to execute the query.
Clean Up:
Let’s drop the above created User Defined Function.
USE WideWorldImporters;
GO

DROP FUNCTION [dbo].[UDF_customer_Name]
GO
Limitations:
There are certain limitations for this feature, if those conditions are NOT met in your user defined function, then you can’t use this feature, please review it here.
Conclusion:
I found this new feature very useful since it improves the performance of User Defined Function a lot. Do let me know if you use this feature and how helpful you find it.
We all have been using RTRIM() function for ages, it helps us to removes the unwanted space(s) character char(32) from the end of any column(s) \ expression(s) in earlier version of SQL Server.
In SQL Server 2022, an enhancement came in RTRIM() function, which was a long awaited functionality. This enhancement will allow us to remove any specific character(s) from the RIGHT sides along with space(s) character char(32).
Let me show you in the below example, how we were using RTRIM() functions to remove space(s) character char(32) ONLY in the earlier version of SQL Server.
Example 1:
DECLARE @EMAIL VARCHAR(100)
SET @EMAIL = 'KenSanchez@gmail.com   ';
SELECT  @EMAIL   AS [OriginalEmail]
, RTRIM(@EMAIL)  AS [RTrimEmail];
GO
--OUTPUT
Enhancement:
Now, let me demonstrate this enhancement by giving few examples but before demonstrating this enhancement, your database compatibility level MUST be 160 or higher. Given below is the query to change your database compatibility level.
ALTER DATABASE AdventureWorks SET COMPATIBILITY_LEVEL = 160
Example 2:
In this example, I will show you how to pass the newly introduced parameter in RTRIM() function. This parameter removes spaces(s) / character(s) from the RIGHT side of the column(s) / expression(s) which will be defined in single quotes after RTRIM() as shown below.
DECLARE @EMAIL VARCHAR(100)
SET @EMAIL = 'KenSanchez@gmail.com;';
SELECT  @EMAIL       AS [OriginalEmail]
, RTRIM(@EMAIL,'; ')  AS [RTrimEmail];
GO
--OUTPUT
Example 3:
In this example, I will demonstrate that by default RTRIM() function takes spaces(s) as parameter, if you do not pass any parameter as shown in below example :
DECLARE @EMAIL VARCHAR(100)
SET @EMAIL = '     KenSanchez@gmail.com';
SELECT  @EMAIL   AS [OriginalEmail]
, RTRIM(@EMAIL)  AS [RTrimEmail]
, RTRIM(@EMAIL,' ') AS [RTrimEmailWithParameter];
GO
--OUTPUT
Conclusion:
I found the new enhancement of RTRIM() function very useful, earlier we used multiple functions to find and remove any character(s) from the RIGHT side of the column(s) \ expression(s) but now we can easily achieve with the help of RTRIM() function. Do let me know if you use this function and how you find it.
We all have been using LTRIM() function for ages, it helps us to removes the unwanted space(s) character char(32) from the start of any column(s) \ expression(s) in earlier version of SQL Server.
In SQL Server 2022, an enhancement came in LTRIM() function, which was a long awaited functionality. This enhancement will allow us to remove any specific character(s) from the left sides along with space(s) character char(32).
Let me show you in the below example, how we were using LTRIM() functions to remove space(s) character char(32) ONLY in the earlier version of SQL Server.
Example 1:
DECLARE @EMAIL VARCHAR(100)
SET @EMAIL = '     KenSanchez@gmail.com';
SELECT  @EMAIL   AS [OriginalEmail]
, LTRIM(@EMAIL)  AS [LTrimEmail];
GO
--OUTPUT
Enhancement:
Now, let me demonstrate this enhancement by giving few examples but before demonstrating this enhancement, your database compatibility level MUST be 160 or higher. Given below is the query to change your database compatibility level.
ALTER DATABASE AdventureWorks SET COMPATIBILITY_LEVEL = 160
Example 2:
In this example, I will show you how to pass the newly introduced parameter in LTRIM() function. This parameter removes spaces(s) / character(s) from the LEFT side of the column(s) / expression(s) which will be defined in single quotes after LTRIM() as shown below.
DECLARE @EMAIL VARCHAR(100)
SET @EMAIL = '     ;KenSanchez@gmail.com';
SELECT  @EMAIL       AS [OriginalEmail]
, LTRIM(@EMAIL,'; ')  AS [LTrimEmail];
GO
--OUTPUT
Example 3:
In this example, I will demonstrate that by default LTRIM() function takes spaces(s) as parameter, if you do not pass any parameter as shown in below example:
DECLARE @EMAIL VARCHAR(100)
SET @EMAIL = '     KenSanchez@gmail.com';
SELECT  @EMAIL   AS [OriginalEmail]
, LTRIM(@EMAIL)  AS [LTrimEmail]
, LTRIM(@EMAIL,' ') AS [LTrimEmailWithParameter];
GO
--OUTPUT
Conclusion:
I found the new enhancement of LTRIM() function very useful, earlier we used multiple functions to find and remove any character(s) from the LEFT side of the column(s) \ expression(s) but now we can easily achieve with the help of LTRIM() function. Do let me know if you use this function and how you find it.
As we all know, TRIM() function removes the extra space(s) character char(32) from the start & end of any column(s) \ expression(s) in earlier version of SQL Server.
In SQL Server 2022, an enhancement is available in TRIM() function, which was a long awaiting functionality. This enhancement will allow us to remove any specific character(s) from one of the sides (left, right) or both sides of the column(s) \ expression(s) along with space(s) character char(32).
Let me show you in the below example, how we were using TRIM() function to remove space(s) character char(32) ONLY in the earlier version of SQL Server.
DECLARE @EMAIL VARCHAR(100)
SET @EMAIL = '     KenSanchez@gmail.com      ';

SELECT  @EMAIL   AS [OriginalEmail]
, TRIM (@EMAIL)  AS [TrimEmail];
GO
--OUTPUT
Enhancement:
Now, let me demonstrate this enhancement by giving few examples but before demonstrating this enhancement, your database compatibility level MUST be 160 or higher. Given below is the query to change your database compatibility level.
ALTER DATABASE AdventureWorks
SET COMPATIBILITY_LEVEL = 160
The enhancement in TRIM() function provides three new options as shown below.
Leading
Trailing
Both
Let me explain these options in detail.
Leading
I will demonstrate to you how to use LEADING option in TRIM() function. This option removes space(s) / character(s) from the LEFT side of the column(s) / expression(s) which will be defined in single quotes after LEADING option, as shown in given below example.
DECLARE @EMAIL VARCHAR(100)
SET @EMAIL = '  ;KenSanchez@gmail.com';

SELECT @EMAIL  AS [OriginalEmail]
     , TRIM(LEADING' ; ' FROM @EMAIL) AS  [AfterTrimEmail];
GO
--OUTPUT
Trailing
In this example, I will show you how to use TRAILING option in TRIM() function. This option removes space(s) / character(s) from the RIGHT side of the column(s) / expression(s) which will be defined in single quotes after TRAILING option, as shown below.
DECLARE @EMAIL VARCHAR(100)
SET @EMAIL = 'KenSanchez@gmail.com;   ';

SELECT @EMAIL  AS [OriginalEmail]
     , TRIM(TRAILING' ; ' FROM @EMAIL) AS  [AfterTrimEmail];

GO
--OUTPUT
Both
In this example, I will show you how to use BOTH option in TRIM() function. This option removes space(s) / character(s) from BOTH (left & right) sides of the column(s) / expression(s) which will be defined in single quote after BOTH option, as shown below.
DECLARE @EMAIL VARCHAR(100)
SET @EMAIL = '   ;KenSanchez@gmail.com;   ';

SELECT @EMAIL  AS [OriginalEmail]
     , TRIM(BOTH' ; ' FROM @EMAIL) AS  [AfterTrimEmail];

GO
--OUTPUT
DECLARE @EMAIL VARCHAR(100)
SET @EMAIL = '   ;KenSanchez@gmail.com;   ';

SELECT @EMAIL  AS [OriginalEmail]
     , TRIM(' ; ' FROM @EMAIL) AS  [AfterTrimEmail];

GO
--OUTPUT
Note:
If you don’t write any option name (LEADING, TRAILING, BOTH) in the TRIM() function then by default BOTH option will be applied as shown below.
Conclusion:
I found the new enhancement very useful and handy, earlier we used multiple functions to find and remove any character(s) from the start or end of the column(s) \ expression(s) or both sides of the column(s) \ expression(s), now we can achieve it via TRIM() function ONLY. Do let me know if you use this enhancement and how helpful you find it.
We have been using REPLACE() function for ages in SQL Server whenever we need to replace any characters in a string but the problem arises when we need to replace multiple characters with multiple characters. In such cases we had to use REPLACE() function multiple times to achieve it till TRANSLATE() function came in picture in SQL Server 2017.
Compatibility Level:
Your database compatibility level MUST be 140 or higher to use TRANSLATE() function. Given below is the query to change your database compatibility level.
ALTER DATABASE Northwind SET COMPATIBILITY_LEVEL = 140
Let me demonstrate, how we were using REPLACE() function in earlier version of SQL Server:
Example 1: (Old approach using REPLACE() function)
In the given below Example, we used REPLACE() function twice in order to replace multiple characters in a string.
DECLARE @Number VARCHAR(25)
SET @Number='+92-3317892345'
SELECT @Number AS PhoneNumber
     , REPLACE(REPLACE(@Number,'+',' '),'-',' ') AS ReplacedPhoneNumber;

GO

--OUTPUT
Example 2: (New approach using TRANSLATE() function)
In new approach, we can achieve the same output using TRANSLATE() function and we do not need to write function twice.
DECLARE @Number AS VARCHAR(25)
SET @Number='+92-3317892345'
SELECT @Number AS PhoneNumber
     , TRANSLATE(@Number,'+-','  ') AS TranslatedPhoneNumber

GO

--OUTPUT
Now, we know how to use these functions (TRANSLATE() and REPLACE()). Let me show you how we can use it in query having tables.
Example 3: (Old approach using REPLACE() function)
In the given below example, we are going to replace ( , ),- with spaces using REPLACE() function.
USE Northwind
GO

SELECT FirstName
           , LastName
	   , Title
           , HomePhone
	   , REPLACE(REPLACE(REPLACE(HomePhone,'(',''),')',' '),'-',' ') AS ReplacedHomePhone
FROM [dbo].[Employees] ;
GO
--OUTPUT
Example 4: (New approach using TRANSLATE() function)
In the given below example, we are going to replace ( , ),- with spaces using TRANSLATE() function.
USE Northwind
GO

SELECT FirstName
           , LastName
	   , Title
	   , HomePhone
	   , TRANSLATE(HomePhone,'()-','   ') AS TranslatedHomePhone
FROM [dbo].[Employees] ;
GO
--OUTPUT
Conclusion:
I used TRANSLATE() function and found it very handy, the only limitation I can see is that the characters and translations should be the same size. If not it will generate error which we will discuss in upcoming articles. Do let know if you used this function and found it useful.
At times we come across some cases where we need to extract date and time for a certain period of time (year, month, day, hour, minutes, seconds etc.). In earlier version of SQL Server (earlier than 2022), we use multiple functions like DATEADD, DATEDIFF etc. to achieve it.
In SQL Server 2022, a new function namely DATETRUNC()shipped which solved this problem. Now, we can just use DATETRUNC()function to extract date and time till any date and time parts.
In the given below diagram, you can see the different date & time parts which can be easily extracted by DATETRUNC() function.
Example:
Let me demonstrate the functionality of DATETRUNC() function by giving below example.
DECLARE @DateTime DATETIME2
SET @DateTime = '2022-10-27 12:02:31.9033333';
SELECT @DateTime                    AS [Current Date]
      , DATETRUNC(YEAR,@DateTime)   AS [DateTrunc Function]
      ,'Extract Date Till The YEAR' AS [Description]
UNION
SELECT @DateTime                      AS [Current Date]
     , DATETRUNC(QUARTER,@DateTime)   AS [DateTrunc Function]
     ,'Extract Date Till The QUARTER' AS [Description]
UNION
SELECT @DateTime                    AS [Current Date]
     , DATETRUNC(MONTH,@DateTime)   AS [DateTrunc Function]
     ,'Extract Date Till The MONTH' AS [Description]
UNION
SELECT @DateTime                    AS [Current Date]
     , DATETRUNC(WEEK,@DateTime)    AS [DateTrunc Function]
     ,'Extract Date Till The WEEK'  AS [Description]
UNION
SELECT @DateTime                    AS [Current Date]
     , DATETRUNC(DAY,@DateTime)     AS [DateTrunc Function]
     , 'Extract Date Till The DAY'  AS [Description]
UNION
SELECT @DateTime                    AS [Current Date]
     , DATETRUNC(HOUR,@DateTime)    AS [DateTrunc  Function]
     , 'Extract Date Till The HOUR' AS [Description]
UNION
SELECT @DateTime                      AS [Current Date]
      , DATETRUNC(MINUTE,@DateTime)   AS [DateTrunc  Function]
      , 'Extract Date Till The MINUTE'AS [Description]
UNION
SELECT @DateTime                       AS [Current Date]
      , DATETRUNC(SECOND,@DateTime)    AS [DateTrunc  Function]
      , 'Extract Date Till The SECOND' AS [Description]
UNION
SELECT @DateTime                            AS [Current Date]
      , DATETRUNC(MILLISECOND,@DateTime)    AS [DateTrunc  Function]
      , 'Extract Date Till The MILLISECOND' AS [Description]
UNION
SELECT @DateTime                            AS [Current Date]
      , DATETRUNC(MICROSECOND,@DateTime)    AS [DateTrunc  Function]
      , 'Extract Date Till The MICROSECOND' AS [Description];
GO
--OUTPUT
Conclusion:
I found the DATETRUNC() function very useful; earlier we used multiple functions to extract date and time till whichever time period we needed, but now we can achieve it with the help of this function.
History of query becomes very important when you really need the earlier version of your query, in case you do not have backups or you want to know which queries have been executed earlier in your respective database.
In SQL Server Management Studio, you can achieve it by running given below query but as per SQL Server documentation, the lifetime of the given below rows are tied to the plan itself. When a plan is removed from the cache, the corresponding rows are eliminated from this view and you cannot find the query in the history. Also, if your administrator restarts the server, you will lose the entire history. There is also a limitation that you can only get the queries executed successfully; failed queries will not be there in the history.
Query History in SQL Server Management Studio
USE AdventureWorks2019
GO

SELECT last_execution_time
     , text
FROM sys.dm_exec_query_stats stats
CROSS APPLY sys.dm_exec_sql_text(sql_handle)
ORDER BY
       last_execution_time DESC
GO
--OUTPUT
Query History in Azure Data Studio
Fortunately, there is an extension available in Azure Data Studio to get the history of query and there is no limitation like I mentioned above.
Query History Extension Installation:
Let’s install the extension step by step.
Step 1: First of all, please click on View menu which is on the left top of the screen, then click on Extensions as shown below. You can also use the shortcut Ctrl+Shift+X to open Extensions window.
Step 2: Extensions window is now open. Let’s search the Query History extension as shown below and click on Install button.
Step 3: As you can see the Query History extension is installed as shown below.
Query History Extension Application:
Since, we have installed query history extension successfully, let’s use it step by step.
Step 1: Next step is to view the Output window, let’s go to View menu and then click on Output menu as shown below. Or you can also use the shortcut Ctrl+Shift+U.
Step 2: Output window has appeared as shown below.
Step 3: Now, let’s open a New Query window to run some queries and see the query history. To do this you need to go to File menu and then click on New Query, or you can use shortcut Ctrl+N.
Step 4: New Query window is opened as shown below. Please connect the respective database to run queries.
Step 5: Now, we need to execute some queries on Azure Data Studio to see the query history, as shown in the Query History window.
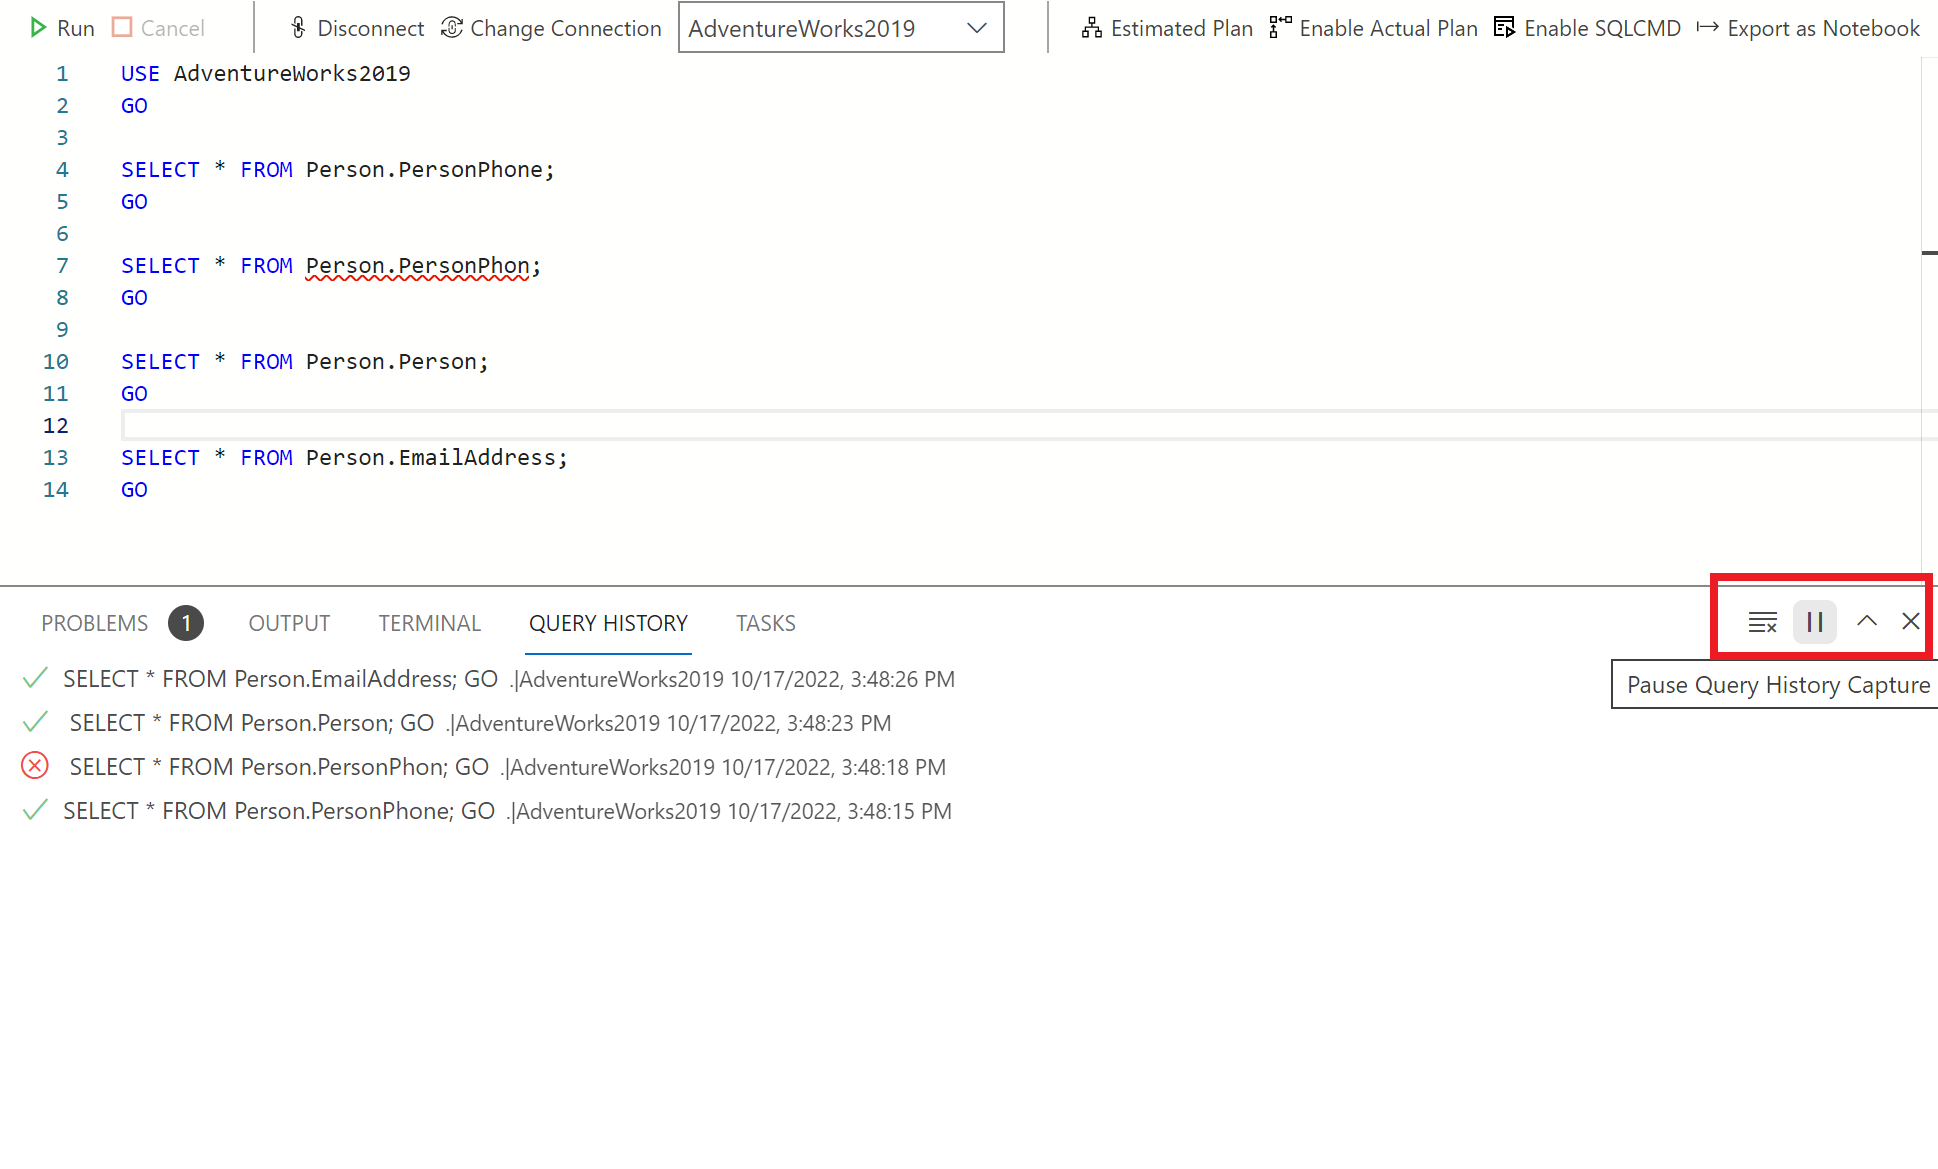
Sections of Query History window:
There are four sections in query history as shown below.
Status icon: This section shows the status of query. If a query has executed successfully, we can see a green tick on it. If a query has error, we can see a cross sign in red which shows that the query has failed.
Query Text: This section shows the actual query.
Connection Info: This section shows the conection info like Server and Database name.
TimeStamp: This section shows the timestamp when you executed the query.
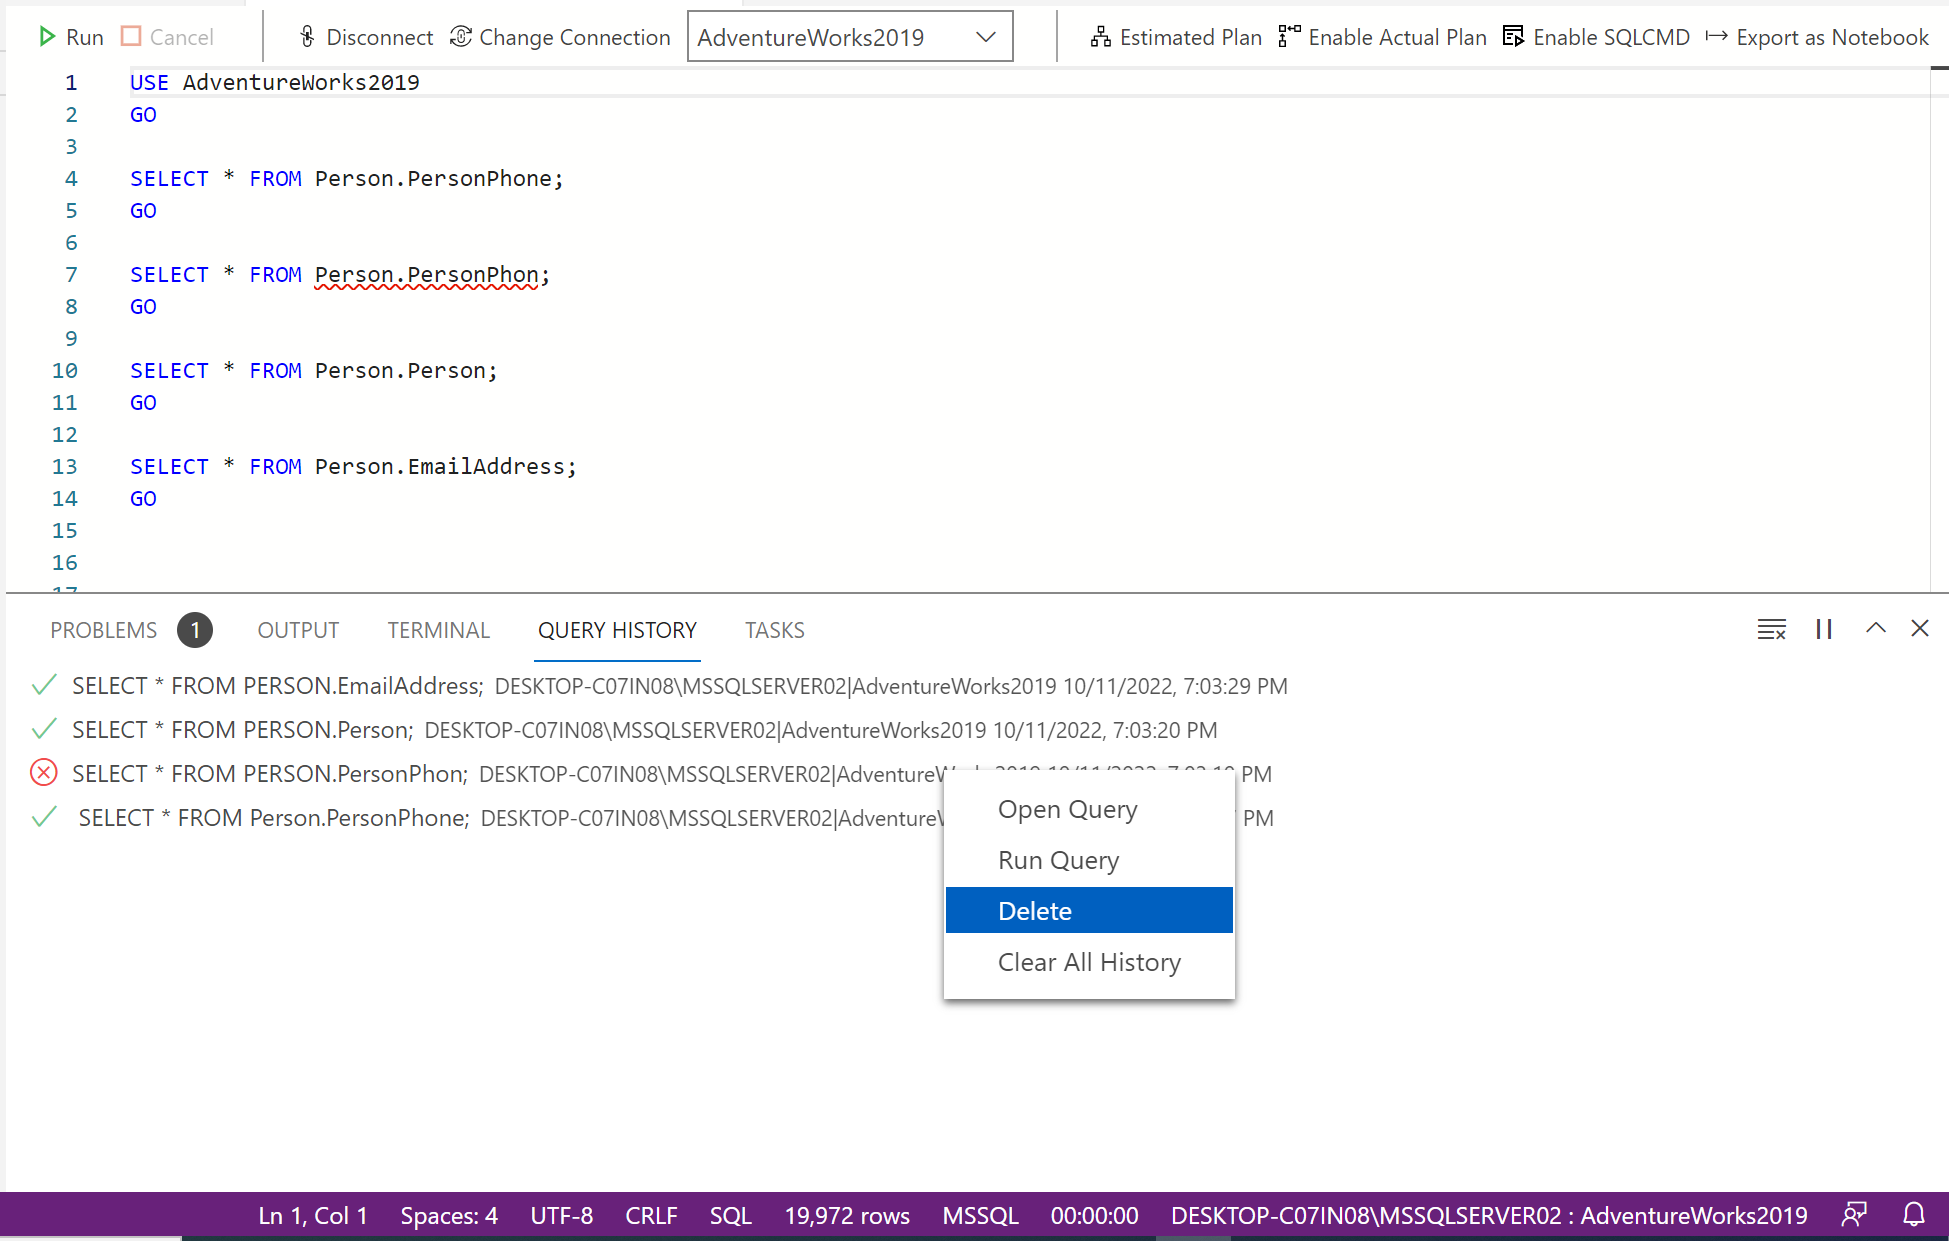
Options in Query History:
Query history provides multiple options when you right-click on the query. You get the following options on the context menu:
Open Query.
Run Query.
Delete.
Clear History.
Let’s discuss these options in detail.
Open Query:
The Open Query option opens the selected query from query history in a new query widow using the same connection as shown below.
Run Query:
The Run Query option opens the selected query from query history in a new query widow using the same connection and execute it immediately as shown below.
Delete:
The Delete option permanently deletes the selected row from query history.
Clear History:
The Clear History option clears the entire query history.
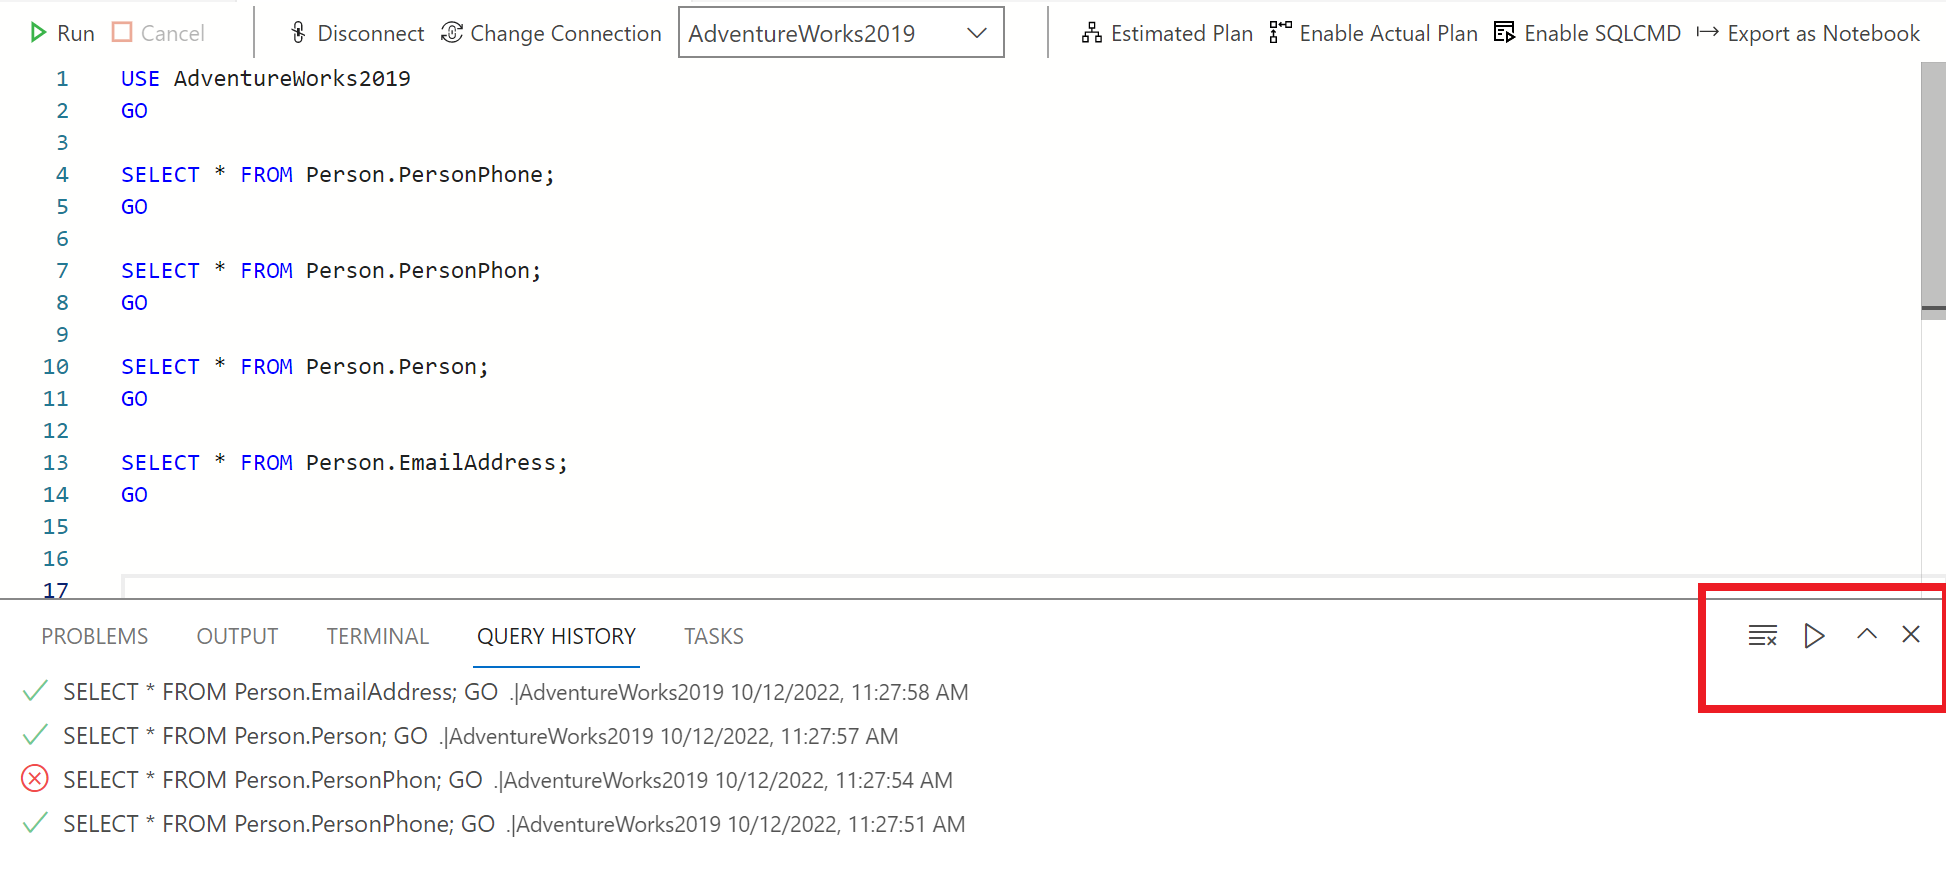
Query Window: Play / Pause options:
On the right top of the Query window, you can see a play / pause button. This feature gives us the flexibity to stop or start recording query history.
Conclusion:
Query History extension is very useful; you can view query history without much effort in Azure Data Studio.
Let me know if you use this extension and how user friendly you found it.
This blog/website is a personal blog/website and all articles, postings and opinions contained herein are my own. The contents of this blog/website are not intended to defame, purge or humiliate anyone should they decide to act upon or reuse any information provided by me. Comments left by any independent reader are the sole responsibility of that person. Should you identify any content that is harmful, malicious, sensitive or unnecessary, please contact me via email (imran@raresql.com) so I may rectify the problem.