Problem :
There is a common problem in SQL Server, when you give access of any table to any USER then the USER can view the entire table data and after giving access to the table if you would like to restrict this user NOT to view some critical data in that table, out of the box it is not possible in SQL Server, however there are some workarounds but those workarounds can make your life difficult as DBA. The GOOD NEWS is that it is POSSIBLE in SQL Server 2016 as out of the box solution and the name of this feature is Row Level Security (RLS). In this article, I will demonstrate how to implement RLS in your database environment step by step.
Before proceeding to the solution, I would like to create a sample.
Sample :
I will create two branches (Branch A & B) data in the sample table and later on restrict branch Administrator to view their own branch data and ONLY db_owner (or you can select any other role to give full access to the above table) can view all the data in the table.
CREATE DATABASE Sample_DB
GO
USE Sample_DB
GO
--DROP TABLE tbl_Sample
GO
CREATE TABLE tbl_Sample
(
[ID] int,
[Name] varchar(50),
[BranchName] varchar(50)
)
GO
INSERT INTO tbl_Sample VALUES (1,'Ken','Branch A')
INSERT INTO tbl_Sample VALUES (2,'Selena','Branch A')
INSERT INTO tbl_Sample VALUES (3,'Mae','Branch B')
INSERT INTO tbl_Sample VALUES (4,'Tom','Branch B')
INSERT INTO tbl_Sample VALUES (5,'Thomas','Branch B')
GO
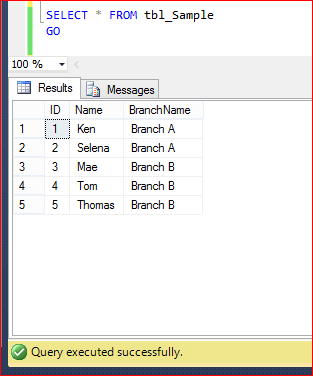
SELECT * FROM tbl_Sample
GO
Solution :
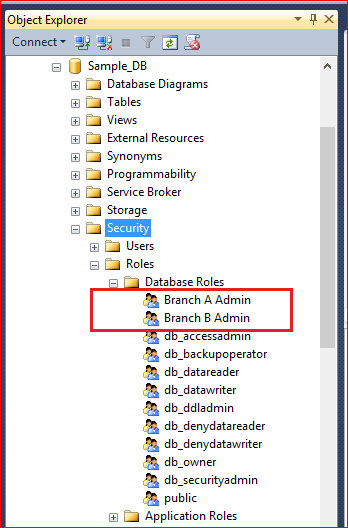
Step 1 :
Let me create the Branch A and Branch B administrator role in the respective databases. Given below is the script.
USE Sample_DB
GO
EXEC sp_addrole 'Branch A Admin'
GO
EXEC sp_addrole 'Branch B Admin'
GO
Step 2 :
In the above step, I created the role for branches A & B, now let me create two users for respective branches, who can view only respective branch data in the table. Given below is the script.
USE Sample_DB
GO
CREATE USER USER_A WITHOUT LOGIN; -- Branch A Admin
GO
CREATE USER USER_B WITHOUT LOGIN; -- Branch B Admin
GO

Step 3 :
Lets add User A & B (created in step 2) as a member in the respective roles (created in step 1). Given below is the script.
USE Sample_DB
GO
EXEC sp_addrolemember 'Branch A Admin', 'USER_A'
GO
EXEC sp_addrolemember 'Branch B Admin', 'USER_B'
GO
Step 4:
Grant the SELECT access of table (tbl_Sample) to the users (User_A & User_B). After granting the Select access they (USER_A, USER_B) can view the entire data in the table (tbl_Sample). Given below is the script.
USE Sample_DB
GO
GRANT SELECT ON tbl_Sample TO USER_A;
GO
GRANT SELECT ON tbl_Sample TO USER_B;
GO
Step 5:
Lets find out the member principal ID. This is a unique ID corresponding to each member of the role. Using member principal ID, we will allow users to view the respective data ONLY in the table, later in the article. Given below is the script.
USE Sample_DB
GO
SELECT role_principal_id,
USER_NAME(role_principal_id) As [Role],
member_principal_id,
USER_NAME(member_principal_id) As [Member]
FROM sys.database_role_members
WHERE USER_NAME(role_principal_id)
IN ('Branch A Admin','Branch B Admin')
GO

Step 6:
Lets create a user defined table where we must enter the receptive Branch Name and member Principal ID which we found in the previous step (Step 5). Actually, now we are trying to assign each branch access to respective users using Database Principal ID (Member Principal ID). Given below is the script.
USE Sample_DB
GO
DROP TABLE dbo.tbl_user
GO
CREATE TABLE dbo.tbl_user
(
[ID] int,
[Name] varchar(50),
[BranchName] varchar(50),
[DatabasePrincipalID] int
)
GO
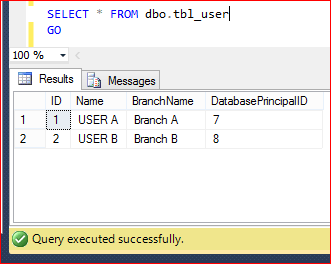
INSERT INTO dbo.tbl_user VALUES (1,'USER A','Branch A',7)
INSERT INTO dbo.tbl_user VALUES (2,'USER B','Branch B',8)
GO
SELECT * FROM dbo.tbl_user
GO
Step 7:
Lets create a separate scheme (Security) which we will use to create RLS object (predicate function & security object) later in this article. Note : It is a best practice to create RLS object in a separate scheme. Given below is the script.
USE Sample_DB
GO
CREATE SCHEMA Security;
GO
Step 8:
Now, it is time to create a predicate function (inline table valued function) to make restricted access for each branch data & for each user. However, db_owner will have full access on the table. Given below is the script.
USE Sample_DB
GO
--DROP FUNCTION [Security].fn_securitypredicate
--GO
CREATE FUNCTION [Security].fn_securitypredicate(@BranchName varchar(50))
RETURNS TABLE
WITH SCHEMABINDING
AS
RETURN SELECT 1 AS fn_securitypredicate_result
FROM dbo.tbl_user a Where  (a.DatabasePrincipalID = DATABASE_PRINCIPAL_ID()
And a.BranchName = @BranchName) OR IS_MEMBER('db_owner')=1
GO
Step 9:
Once predicate function (inline table valued function) has been created, lets create a security policy and add the predicate function (created in the above step) as a filter predicate. Please make sure that the STATE must be ON. Given below is the script.
USE Sample_DB
GO
--DROP SECURITY POLICY [Security].[BranchSecurityPolicy]
--GO
CREATE SECURITY POLICY [Security].[BranchSecurityPolicy]
ADD FILTER PREDICATE [Security].fn_securitypredicate([BranchName])
ON [dbo].[tbl_Sample]
WITH (STATE= ON);
GO
Step 10:
Now, we are done with the setup. Lets test the access of each user on the table (tbl_Sample). Given below is the script.
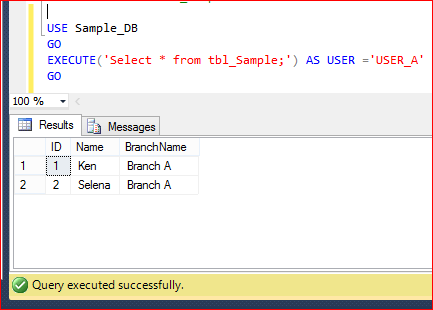
- USER_A can view ONLY Branch A data as shown below.
USE Sample_DB
GO
EXECUTE('Select * from tbl_Sample;') AS USER ='USER_A'
GO
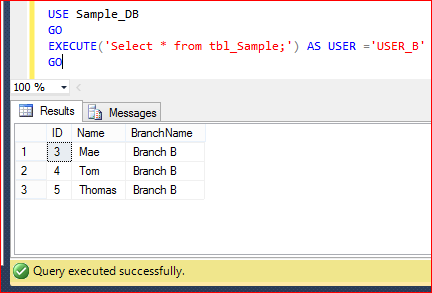
- USER_B can view ONLY Branch B data as shown below.
USE Sample_DB
GO
EXECUTE('Select * from tbl_Sample;') AS USER ='USER_B'
GO

- Admin, whose is member of db_owner can view Entire Table data as shown below.
USE Sample_DB
GO
EXECUTE('Select * from tbl_Sample;') AS USER ='Admin'
GO

Conclusion :
As you can see above by creating few RLS objects we can restrict each user access at the row level even though the user has Select access on the respective table.
Reference : MSDN
Read Full Post »