Feeds:
Posts
Comments

Bit (Boolean) data type keeps result in 1 or 0 form in the SQL Server database. But most of the time we need to display 0 as FALSE and 1 as TRUE in front end applications. Given below is the shortest possible solution using IIF function in SQL Server 2012.

You can also convert it using CASE statement but the syntax will be longer.

Given below are the two methods you can use to convert Boolean(bit) data type into string.

Method 1:
In this method, we will use IIF function to convert boolean(bit) to string. IIF function is a new logical function shipped with SQL Server 2012.

--This script is compatible with SQL Server 2012 and above.
USE AdventureWorks2012
GO
SELECT
[BusinessEntityID]
, [Name]
, [ActiveFlag]
, IIF([ActiveFlag]=1,'TRUE','FALSE') AS [ActiveFlag As String]
FROM [Purchasing].[Vendor]
GO
--OUTPUT

boolean_to_string1.1

Method 2:
In this method, we will use CASE statement to convert boolean(bit) to string.

--This script is compatible with SQL Server 2005 and above.
USE AdventureWorks2012
GO
SELECT
[BusinessEntityID]
, [Name]
, [ActiveFlag]
, CASE WHEN [ActiveFlag]=1 THEN 'TRUE'
WHEN [ActiveFlag]=0 THEN 'FALSE'
END AS  [ActiveFlag As String]
FROM [Purchasing].[Vendor]
GO
--OUTPUT

boolean_to_string1.2

Conclusion :
The only difference between the above two methods is the Syntax. Apart from this, each and every activity, including the performance, will be the same. As per MSDN, IIF is a shorthand form for writing a CASE expression.

In my earlier article, I wrote about the new feature of SQL Server 2012 namely Insert Snippet. This is quite a handy feature which can save a lot of your time. This feature is shipped with a lot of standard objects snippet with the customization options.

But there were two big questions in front of me. 1) Why do we need to customize it? 2) How can this save our time ?
Answer :The reason for customization is that, each and every company follows some standards to create standard object (Table, view etc.) of SQL Server. For example the name of the table should start with tbl_ or there might be some additional fixed column with some default values in each table etc etc. Therefore, once you customize the snippet as per your requirements, then you can use it every time.

Prerequisite: How to insert the Snippet in SQL Server 2012.

Solution :
Let me explain, how to customize the standard object table snippet Step by Step :

Step 1 :

First of all, I will take you to the path where snippet of the standard objects resides in the SQL Server 2012.

To find the path you need to go to Tools and select Code Snippets Manager as shown in the picture below.

customizesnippet1.1

Once you open the Code Snippets Manager, select the appropriate object and you can see the path of that particular object as shown in the picture below.
customizesnippet1.2

Step 2 :
As you can see the path of table snippet in the above picture, the next step is to browse the table path and find the standard table snippet namely Create Table.snippet.

customizesnippet1.3.1

Step 3 :

Now, you are in the standard table snippet folder,  so you need to make a copy of the standard table object namely “Create Table.snippet” and rename it to “Create Sample Table.snippet”  as shown in the picture below.

customizesnippet1.3.2

Step 4 :

Open the newly created file Create Sample Table.snippet, first and foremost, change the title as highlighted in the given below picture.

customizesnippet1.4

Step 5 :

Once you change the title copy the selected area as shown in the picture below and paste twice after <Literal> because we need to add two additional columns of the table in the snippet.

customizesnippet1.5

Step 6 :

Lets rename the column name and data type of the columns ([Creation_Datetime] & [Created_By] having data type datetime and nvarchar(50) respectively as shown in the picture below.

 customizesnippet1.6

Step 7 :

Once you create the additional column, do not close the file, just scroll down a little bit in the same file and copy the selected area ($Column2$ $datatpe2$) and paste it twice and then rename it to $column3$ & 4$ and $datatype 3$ & 4$ respectively as shown in the picture below.

customizesnippet1.7

Step 8 :

Once all the changes are done in Create Sample Table.snippet save and close the file and open SQL Server Management Studio.

Step 9 :

Lets insert the customized table snippet in Query window as shown below.

customizesnippet1.8

customizesnippet1.9


In my earlier article, I discussed that if you need to use result set with any stored procedure then you cannot insert the result set into a table. It generates the error no 102,  Incorrect syntax near ‘SETS’. After I posted this article, I kept looking for the solution, because it is a very handy feature of SQL Server 2012. At last, I found the solution. The details of this feature are available here.

Let me discuss the Solution step by step.

Step 1 :
In Step 1, we need to create a table and stored procedure to explain the problem and solution.

USE AdventureWorks2012
GO
CREATE TABLE #temp
(
[DepartmentID] int,
[Name] varchar(50)
)
GO

CREATE PROCEDURE SP_ResultSet_Example1
AS
SELECT [DepartmentID]
,[Name]
FROM [HumanResources].[Department]
ORDER BY DepartmentID
GO

Step 2 :
In Step 2, I will show you the error if you try to execute the stored procedure (SP_ResultSet_Example1) using result set and insert the result set into the table (#temp).
Given below is the script.

USE AdventureWorks2012
GO
INSERT INTO #temp
EXEC SP_ResultSet_Example1
WITH RESULT SETS
(
([Department ID] INT NOT NULL,
[Department name] NAME NOT NULL));
GO
--OUTPUT

Msg 102, Level 15, State 1, Line 3
Incorrect syntax near ‘SETS’.

Ooopps…… I am unable to execute it.

Step 3 :
In Step 3, I will try to execute the stored procedure (SP_ResultSet_Example1) using result set and insert the result set into the table (#temp) successfully.
Given below is the script.

USE AdventureWorks2012
GO
DECLARE @Sql AS NVARCHAR(200)
SET @Sql='
EXEC SP_ResultSet_Example1
WITH RESULT SETS
(
([Department ID] INT NOT NULL,
[Department name] NAME NOT NULL));'

INSERT INTO #temp EXEC (@Sql)
GO
SELECT * FROM #temp
GO
--OUTPUT

insertintowithresultset1.1

In my earlier articles, I wrote about new enhancement of FORCESEEK table hint. It is a very handy feature when you have more than one index on the table and you want to select not only the index but also the column name of the index in FORCESEEK table hint. But you should be very careful about the syntax and parameters of this table hint. Recently, I came across a new error message related to FORCESEEK table hint.

Let me explain this error in detail :

Message Number: 365

Severity : 16

Error Message: The query processor could not produce a query plan because the FORCESEEK hint on table or view ‘%.*ls’ specified more seek columns than the number of key columns in index ‘%.*ls’.

Error Generation:

Let me create a NONCLUSTERED INDEX to demonstrate this error.

USE [AdventureWorks2012]
GO
CREATE NONCLUSTERED INDEX [IX_PurchaseOrderDetail_Sample]
ON Purchasing.[PurchaseOrderDetail]
([PurchaseOrderID]
,[ProductID] ASC)
WITH (DROP_EXISTING = OFF) ON [PRIMARY]

Once you create the index, lets write a query using the above index and forceseek table hint.

USE [AdventureWorks2012]
GO
SELECT * FROM Purchasing.PurchaseOrderHeader AS H
INNER JOIN Purchasing.PurchaseOrderDetail AS D
WITH (FORCESEEK
(IX_PurchaseOrderDetail_Sample
(PurchaseOrderID
,ProductID
,OrderQty
)))
ON H.PurchaseOrderID =D.PurchaseOrderID
WHERE
D.ProductID>100
AND D.PurchaseOrderID>10
AND D.OrderQty>0

Msg 365, Level 16, State 1, Line 1
The query processor could not produce a query plan because the FORCESEEK hint on table or view ‘PurchaseOrderDetail’ specified more seek columns than the number of key columns in index ‘IX_PurchaseOrderDetail_Sample’.

Ooopps…… I am unable to execute it.

Resolution:

If you look at the above query, you will realize that there are two key columns ([PurchaseOrderID], [ProductID]) available in IX_PurchaseOrderDetail_Sample index. But what you are trying to do in the above query is that you included an additional column [OrderQty] that is not part of the index.

Lets remove the Order Qty (line # 7) column from the FORCESEEK table hint and execute the query again.

USE [AdventureWorks2012]
GO
SELECT * FROM Purchasing.PurchaseOrderHeader AS H
INNER JOIN Purchasing.PurchaseOrderDetail AS D
WITH (FORCESEEK
(IX_PurchaseOrderDetail_Sample
(PurchaseOrderID
,ProductID

)))
ON H.PurchaseOrderID =D.PurchaseOrderID
WHERE
D.ProductID>100
AND D.PurchaseOrderID>10
AND D.OrderQty>0
--OUTPUT

erromessage365.1.1

Conclusion :

Remember, whenever you use FORCESEEK hint on a table and define the index name and column name as well, the column name must be part of the Index key columns.

How to convert Gregorian date format to simple Hijri date format? Doesn’t it sound a very simple question? Yes,  because in the earlier versions of SQL Server you could convert Gregorian dates to simple Hijri date format (dd mon yyyy hh:mi:ss:mmmAM). But if you need to convert Gregorian dates to any specific Hijri date format, then comes the problem. Basically, the earlier version of SQL Server supports very limited type of Hijri date formats but in SQL Server 2012, you can convert Gregorian dates to ANY Hijri date format using FORMAT function.

Let me convert it using different methods :

Method 1 : Using Convert Function

--This script is compatible with SQL Server 2005 and above.
--This Method can convert into very limited format of Hijri dates.
DECLARE @DateTime AS DATETIME
SET @DateTime=GETDATE()
SELECT @DateTime AS [Gregorian Date]
, CONVERT(VARCHAR(11),@DateTime,131) AS [Gregorian date to Hijri date]
GO
--OUTPUT

gregorian dates1.0

Method 2 : Using Format Function

--This script is compatible with SQL Server 2012 and above.
DECLARE @DateTime AS DATETIME
SET @DateTime=GETDATE()

SELECT @DateTime AS [Gregorian Date]
,FORMAT(@DateTime,'dd-MM-yyyy','ar')
AS [Gregorian date to Hijri date]

UNION ALL

SELECT @DateTime AS [Gregorian Date]
,FORMAT(@DateTime,'dd/MM/yyyy','ar')
AS [Gregorian date to Hijri date]

UNION ALL

SELECT @DateTime AS [Gregorian Date]
,FORMAT(@DateTime,'yyyy-MM-dd','ar')
AS [Gregorian date to Hijri date]

UNION ALL

SELECT @DateTime AS [Gregorian Date]
,FORMAT(@DateTime,'dddd/MMMM/yyyy','ar')
AS [Gregorian date to Hijri date]

UNION ALL

SELECT @DateTime AS [Gregorian Date]
,FORMAT(@DateTime,'dd-MM-yyyy','ar')
AS [Gregorian date to Hijri date]
GO
--OUTPUT

gregorian dates1.1

Let me know if you know any better way.

“How to find outdated Statistics ?” is an old topic being discussed on different forums but what encourages me to write this article is the way we usually find outdated statistics using sys.sysindexes will be obsolete soon.
As per MSDN sys.sysindexes will be removed in the future version of Microsoft SQL Server. Avoid using this feature in new development work.

Given below are both approaches.

Old Approach using sys.sysindexes :
Given below is an old approach using sys.sysindexes to find the outdated statistics of tables.
In the given below script, I filtered all the statistics those are updated the previous day or the day before and their actual data is being modified.

--This script is compatible with SQL Server 2005 and above.
SELECT
id			        AS [Table ID]
, OBJECT_NAME(id)		AS [Table Name]
, name			        AS [Index Name]
, STATS_DATE(id, indid)	AS [LastUpdated]
, rowmodctr				AS [Rows Modified]
FROM sys.sysindexes
WHERE STATS_DATE(id, indid)<=DATEADD(DAY,-1,GETDATE())
AND rowmodctr>0 AND (OBJECTPROPERTY(id,'IsUserTable'))=1
GO
--OUTPUT

outdatedstats1.1

New Approach Using sys.dm_db_stats_properties :
Given below is the new approach using sys.dm_db_stats_properties and sys.stats to find the outdated statistics of tables.
In the given below script, I filtered all the statistics those are updated the previous day or the day before  and their actual data is being modified.

--This script is compatible with SQL Server 2008 R2 and above.
USE AdventureWorks2012
GO
SELECT
st.object_id				            AS [Table ID]
, OBJECT_NAME(st.object_id)	            AS [Table Name]
, st.name		                        AS [Index Name]
, STATS_DATE(st.object_id, st.stats_id) AS [LastUpdated]
, modification_counter			        AS [Rows Modified]
FROM
sys.stats st
CROSS APPLY
sys.dm_db_stats_properties(st.object_id, st.stats_id) AS sp
WHERE
STATS_DATE(st.object_id, st.stats_id)<=DATEADD(DAY,-1,GETDATE())
AND modification_counter > 0
AND OBJECTPROPERTY(st.object_id,'IsUserTable')=1
GO
--OUTPUT

outdatedstats1.2

Conclusion :
As you can see that both approaches give the same result but Old approach will be removed from the future version of SQL Server. So, it is recommended to use the new approach.

Reference: MSDN

In Part 1 of Semantic Search Implementation that I published yesterday, I wrote about how to install and configure semantic search in SQL Server 2012. Today in Part 2, we will learn how to implement semantic search and will demonstrate how beneficial it is.

Prerequisite :

Given below are the two articles that you should read to have clear understanding about Semantic Search Implementation.

  1. Install & Configure Semantic Search
  2. File Table

Lets Implement it step by step.

Step 1: Create database

USE master
GO
CREATE DATABASE [SampleDB]
ON PRIMARY
( NAME = N'SampleDB',
FILENAME = N'C:\DATA\SampleDB.mdf'
),
FILEGROUP SampleFileGroup CONTAINS FILESTREAM
(NAME = SampleFileTableFS,
FILENAME='C:\Data\SampleFileTable'
)
LOG ON
( NAME = N'SampleDB_log',
FILENAME = N'C:\DATA\SampleDB_log.ldf'
)
WITH FILESTREAM
( NON_TRANSACTED_ACCESS = FULL,
DIRECTORY_NAME = N'SampleFileTableDB'
)
GO

Step 2: Create FileTable

USE SampleDB
GO
CREATE TABLE CVBank AS FileTable
WITH
(
FileTable_Directory = 'CVFileTable_Dir'
);
GO

Step 3: Populate data into FileTable
In this step, we will insert few Cvs in the file table.

USE SampleDB
GO
INSERT INTO [dbo].[CVBank] ([name],[file_stream])
SELECT'Muhammad Imran -CV.doc',
* FROM OPENROWSET
(
BULK N'C:\Cv\Muhammad Imran -CV.doc', SINGLE_BLOB
) AS FileData
GO

INSERT INTO [dbo].[CVBank] ([name],[file_stream])
SELECT 'Salman Tahir -CV.doc',
* FROM OPENROWSET
(
BULK N'C:\Cv\Salman Tahir -CV.doc', SINGLE_BLOB
) AS FileData
GO

INSERT INTO [dbo].[CVBank] ([name],[file_stream])
SELECT 'Syed Kamran Ali -CV.doc',
* FROM OPENROWSET
(
BULK N'C:\Cv\Syed Kamran Ali -CV.doc', SINGLE_BLOB
) AS FileData
GO

Step 4: Create full text search on FileTable

Right click on the file table point to full-Text index then select Define Full-Text Index… Further details to create Full Text Index is available here
semantic_search_part2.1.1

Now, we are prepared to use semantic search. Lets create few examples.

Example 1: Search Sharepoint Developer CVs
As I mentioned above that, I populated some CVs in the file table, now it is time to search Cvs with certain criteria using semantic search.
In this example, I will search candidates having knowledge of sharepoint.

USE SampleDB
GO
SELECT
D.name
,KEYP_TBL.score
,KEYP_TBL.Keyphrase
FROM dbo.CVBank D
INNER JOIN SEMANTICKEYPHRASETABLE
(
dbo.CVBank,(name,file_stream)
) AS KEYP_TBL
ON D.path_locator = KEYP_TBL.document_key
WHERE KEYP_TBL.keyphrase like '%sharepoint%'
ORDER BY KEYP_TBL.score DESC
--OUTPUT

semantic_search_part2.1.2

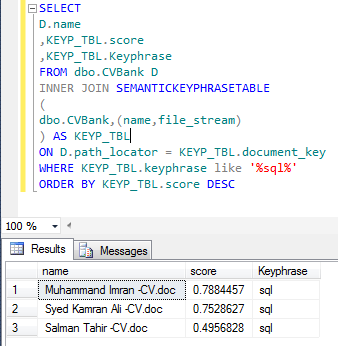
Example 2: Search SQL Developer CVs
In this example, I will search candidates having knowledge of SQL.

USE SampleDB
GO
SELECT
D.name
,KEYP_TBL.score
,KEYP_TBL.Keyphrase
FROM dbo.CVBank D
INNER JOIN SEMANTICKEYPHRASETABLE
(
dbo.CVBank,(name,file_stream)
) AS KEYP_TBL
ON D.path_locator = KEYP_TBL.document_key
WHERE KEYP_TBL.keyphrase like '%sql%'
ORDER BY KEYP_TBL.score DESC
--OUTPUT

semantic_search_part2.1.3
Conclusion :
Semantic Search is very handy if you need to develop some solution on the basis of unstructured document. Shall post another nice feature of semantic search in my upcoming post.

In the earlier versions of SQL Server, it was very difficult to view the unstructured documents placed in the SQL Server. But in SQL Server 2012, with the solution shipped namely Semantic Search not only can you easily look inside in the unstructured documents but also you can create phrase table to find key phrases, similar documents, related documents as well. This feature gave boost to another newly introduced feature namely File Table in SQL Server 2012. You must install and configure Semantic Search before you use it.
Let’s install / configure it Step by Step.

Step 1:
In order to install Semantic Search, first of all you need to check whether FULL TEXT SEARCH feature is installed in your SQL Server or not. Because Semantic search feature is based on Full text search feature.
Given below is the script to check this.

USE master
GO
SELECT SERVERPROPERTY('IsFullTextInstalled') AS [Result]
GO
--OUTPUT

Result
1

(1 row(s) affected)

Step 2:
If result of step 1 is 1 then you should not do anything in Step 2. But if the result is 0, you must run the SQL Server setup again, go to Feature Selection option, select Full-Text and Semantic Extractions for search and install this feature (as shown in the picture below).

Install Semantic 1.2

Step 3:
Once you install the Full-Text and Semantic Extractions for search feature, you need to check whether Semantic Language Statistics Database (One of the core dependency of Semantic searches) is installed or not. Given below is the script to check.

USE master
GO
SELECT * FROM
sys.fulltext_semantic_language_statistics_database
GO
--OUTPUT

Install Semantic 1.3

Ooooppss……… as you can see, the output says blank; it means semantic language statistics database is not yet installed. So you need to install it.

Step 4:

To install semantic language statistics database, you need to go to SQL Server installation media and browse the given below folder and run SemanticLanguageDatabase.msi

• For x86 : …\x86\Setup\SemanticLanguageDatabase.msi
• For x64 : …\x64\Setup\SemanticLanguageDatabase.msi

Given below is the screen image.

Install Semantic 1.4

Step 5:

Once you execute the above SemanticLanguageDatabase.msi and install it properly, it will give you two database files (semanticsDB, semanticsdb_log) in a location (C:\Program Files\Microsoft Semantic Language Database), in case you install it in the default location. Now you have database files, just attach these files in your SQL Server.

Install Semantic 1.5

Step 6:
Once you attach these database files in your SQL Server, then you have to register semantic language database. Given below is the script.

EXEC sp_fulltext_semantic_register_language_statistics_db
@dbname = N'semanticsdb'
GO

Step 7:
Again, you need to check whether the semantic language statistics database is installed or not. Given below is the script.

SELECT * FROM
sys.fulltext_semantic_language_statistics_database
GO
--OUTPUT

Install Semantic 1.6

Now, you can see that the semantic language statistics database is installed.

In my next article, I will discuss how to implement semantic search on file tables and make your life easier.

Reference : MSDN

SQL Server 2012 came up with many new features and enhancements. Insert Snippet is one of the new features introduced in it. This feature reduces the development time and increases productivity. How ? It basically generates the code snippet for the most frequently used objects in SQL Server instantly (with few clicks or key strokes).  But it is not limited to the frequently used objects, custom code snippet template can also be added in it and can generate it at any point of time, to make life easier. How to create custom code snippet will be demonstrated in my up coming article.

Given below are the object’s code snippet available in SQL Server as a standard template :

  • Function 
  • Index
  • Login
  • Role
  • Schema
  • Stored Procedure
  • Synonym
  • Table
  • Trigger
  • User
  • User Defined Data Type
  • User Defined Table Type
  • User Defined Type
  • View

Let me insert a Create Table code snippet step by step using Insert snippet .

Step 1:

Open a new query window in the Database Engine and place the cursor where the code snippet has to be inserted.

Step 2:

In this step, launch snippet picker to insert Snippet. It can be done using three different methods. Given below are the details of these methods.

Method 1:

Press CTRL+K, CTRL+X to launch snippet picker.

 Method 2:

Go to the Edit Menu then point to IntelliSense and then select Insert Snippet to launch snippet picker as shown in the picture below .

insertsnippet1.1

Method 3:

Right click and select Insert Snippet to launch snippet picker as shown in the picture below.

insertsnippet1.2

Step 3:

Once the snippet picker is launched, select table from the list as shown in the picture below.

insertsnippet1.3

Step 4:

After selecting the Table press TAB or Enter key to proceed as shown in the picture below.

insertsnippet1.4

Step 5:

After selecting the Create Table script as show in the above picture then again press TAB or Enter key to generate the code snippet as shown below.

insertsnippet1.5

Step 6:

Notice that the create table code snippet in the above image has been generated. Now just change the highlighted area to create desired customized table.  Additional columns as well can be added.

insertsnippet1.6

Conclusion :

Insert Snippet is a very nice feature introduced in SQL Server 2012. Time saving tool. The example discussed above took less than 10 seconds to create it. Also it is not limited to create table code snippet alone, any object code snippet can be created in less than 10 seconds.

Will post how to create the customized code snippet in my upcoming post.