Taking & maintaining back up is one of the core responsibilities of any Database Administrator. However, I came across some DBA’s that usually take the backup but not on a regular basis because it is a manual process. I strongly recommend that you start taking the backup even from day one after your deployment at the client site. Today, I handed over a SQL Server to the client after installation and immediately scheduled an automated backup as well. So thought of sharing this solution.
Let me schedule an automated backup to demonstrate step by step.
STEP 1 :
First of all, open the SQL Server Management Studio (SSMS) and check if SQL Server Agent is running or not. In my case it is not running due to this, it is showing red color sign in the icon of SQL Server Agent. Just right click on SQL Server Agent and select Start as shown in the image below.

Once you start, SQL Server Agent icon will be changed to green as shown below.

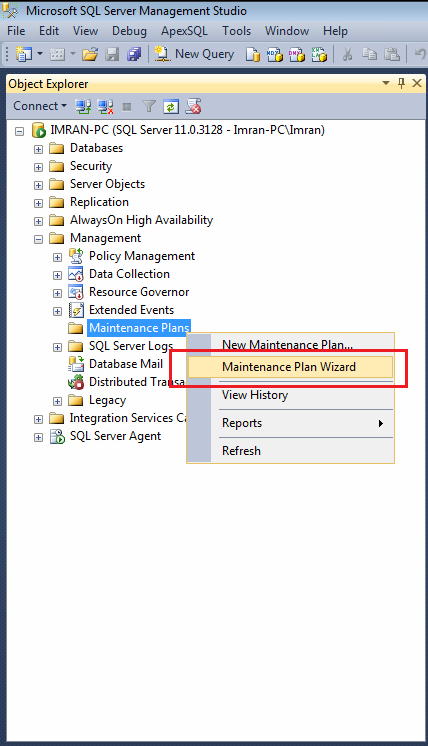
STEP 2 :
Remain in the SSMS, drill down Management and select Maintenance Plans, further right click on Maintenance Plans and select Maintenance Plan Wizard as shown in the image below.
STEP 3 :
Once you click on Maintenance Plan Wizard, it will pop up an information dialogue box. Click Next Button as shown below.

STEP 4 :
Once you click on Next Button, Plan Properties screen will open as shown below. Enter the maintenance plan name and press Change Button as shown in the image below.

STEP 5 :
Once you press Change Button, it will open a New Job Schedule Window, where you need to define the frequency, schedule date/ time & start date/ end date (no end date) as shown in the image below. Once you are done with the job schedule window press OK button and Next Button respectively.
Note : Always select the off peak time (after office working hours) for scheduler.

STEP 6 :
Now, you are at maintenance task window, here you need to select what type of maintenance you need to do. In our case we need to schedule a FULL database backup. Select the Back Up Database (Full) and press Next button as shown in the image below.

STEP 7 :
It is task order screen but you only select one task (Back Up Database (Full)). There is no need to do any thing in this screen. Just press Next button as shown below.

STEP 8 :
In this step you need to define the parameters of back up; mainly selection of database, location of database & verify integrity of database and press Next button as shown below.

STEP 9 :
Now, you are at report option that you probably need to view the results of this scheduler. This option is very helpful when it comes to debugging as shown below. Press Next Button.

STEP 10 :
Once you press Next button, the summary window will pop up and displays the summary of all configurations as shown below.

Once you press Finish Button, it will process your maintenance plan and will give you the status as shown below.

In addition to this, you can find your maintenance plan on your left hand side as shown below.

STEP 11 :
It seems that your maintenance plan has been done. Only one last step and that is, you need to rename the job. Just select SQL Server Agent and browse jobs, you will find one Backup.Maintenance.Subplan_1, right click on it and select properties as shown below.

STEP 12 :
You are in the job property window, you just need to rename your job name and press OK button as shown below.

Once you are done with all 12 steps you will find a daily backup at the defined time in a dedicated folder. In fact, it took me 5 minutes to configure but eventually it will make my life easier. Let me know how you guys are handling back ups.

[…] How to schedule automated back up […]