Feeds:
Posts
Comments

Posts Tagged ‘SQL Server 2014’

Policy Based Management (PBM) is one of the greatest features shipped with SQL Server 2008. It made DBA’s life easier when it comes to implementation, compliance as well as changing any database/ server properties, especially when you need to implement /check some database / server settings across the databases/ servers. Recently, we have implemented Delayed durability database setting to Forced in one of our clients’ databases using Policy Based Management across the databases. Delayed durability is actually one of the best features shipped with SQL Server 2014. What made it best actually is its handling vs performance. You can just enable with a single statement and you get a huge performance boast.

 Note: Delayed durability is disabled by default. 

In this article, I will show you step by step, how to implement any database / server settings across the databases / servers using few clicks with the help of Policy Based Management.

Step 1:
Open SQL Server Management Studio (SSMS) and Select Management >>Policy Management >>Conditions and right click on it to Select New Condition… as shown below.

PBM - Delayed Durability 1.0

Step 2:
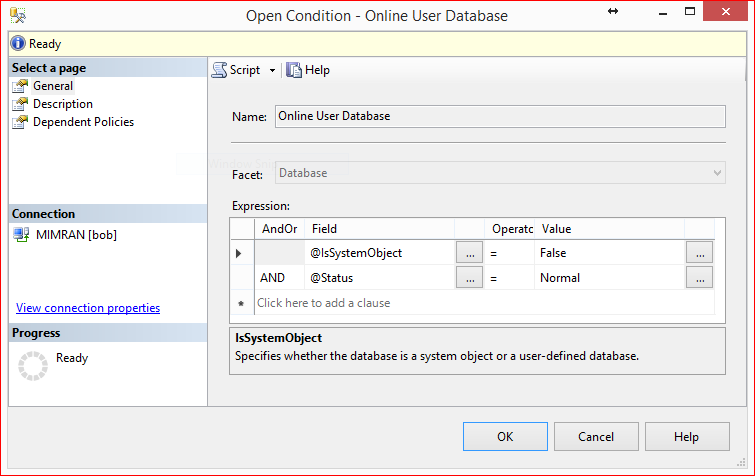
Now, we are in condition building screen, so lets build the 1st condition and that is to check delayed durability in all user databases which is online ONLY. Given below is the configuration. Do not forget to give a proper name to this condition.

PBM - Delayed Durability 1.1

Step 3:
Lets repeat Step 1 and open the condition creation screen. This time we will create the condition to check database setting which is delayed durability=FORCED. Given below is the configuration.

PBM - Delayed Durability 1.2

Step 4:
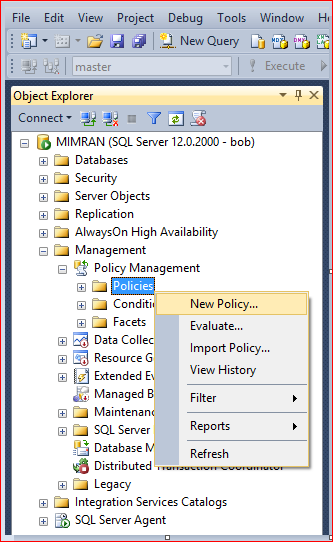
Now we are done with the conditions, so the next step is to build the Policy. In order to build the policy you need to Select Management >>Policy Management >> Policies and right click on it to select New Policy… as shown below.

PBM - Delayed Durability 1.4

Step 5:
Now, we are in policy creation screen, here we need to give a proper Policy Name and then select the conditions created in Step 2 and Step 3 shown below in red and blue color border respectively.  In  other words, we are trying to make policy which checks the delayed durability is forced or NOT in all user databases which is online.

PBM - Delayed Durability 1.6

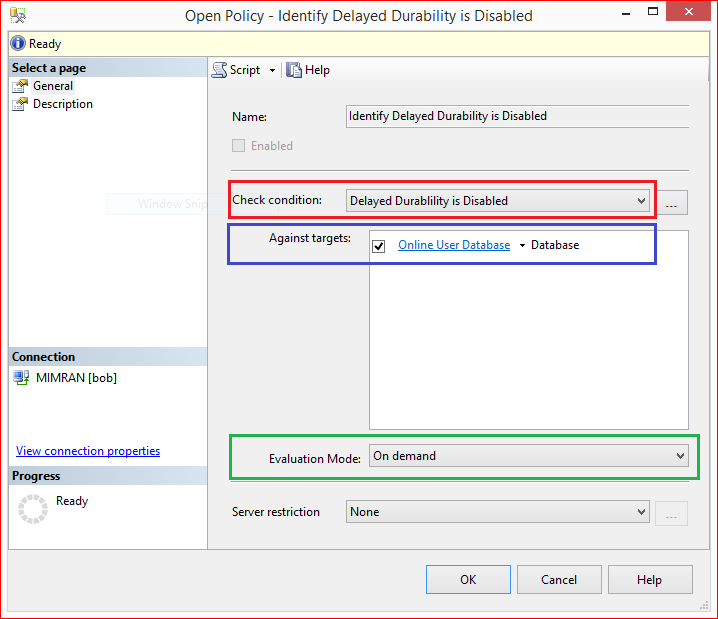
Usually I choose the Evaluation Mode to “On Demand” showing above because it is the easiest way to evaluate and fix any discrepancy across the databases / servers, however, you can select On Schedule as well and Press OK.

Step 6:
Now, the policy has been created and you can see it under policies as shown below. Just right click on and select Evaluate to evaluate the policy as shown below.

PBM - Delayed Durability 1.7

Step 7:
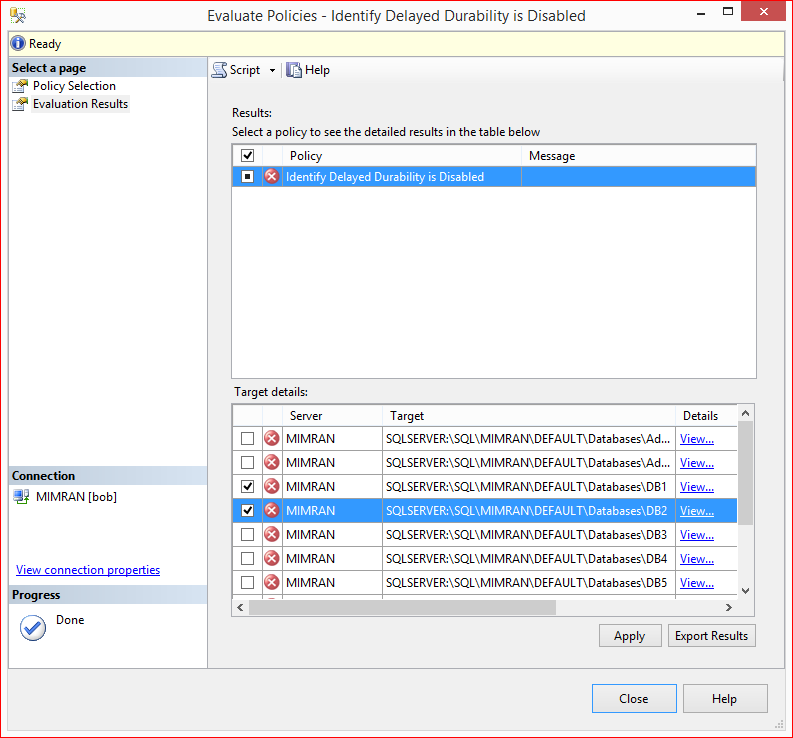
You are in evaluation screen and you can see all the user databases shows in red color because none of them is having database settings to delayed durability= force.

PBM - Delayed Durability 1.8

Step 8:
Lets click on View Details to see the difference in database settings as shown below. You can see that Policy is expecting the Delayed durability = force but the actual value is disabled.

PBM - Delayed Durability 1.9

Step 9:
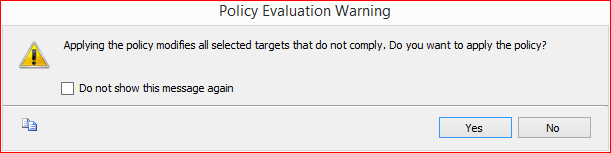
Lets select the databases where you want to change the database settings of delayed durability to FORCE and press Apply button. It gives the given below messages. Press YES button.

PBM - Delayed Durability 1.10

Step 10:
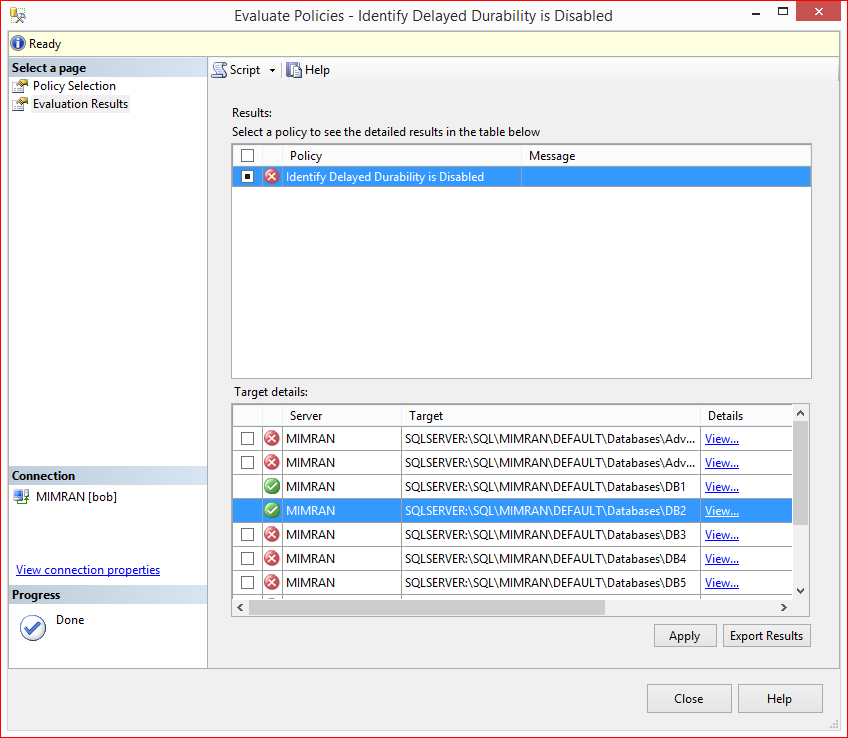
Once the policy has been implemented, policy based management will automatically evaluate the policy again and shows as green color icon as shown below.

PBM - Delayed Durability 1.11

Let me know if you have implemented any databases / servers settings using Policy Based Management.

Read Full Post »

Resource Governor is one of the best features shipped with SQL Server 2008. We use this feature to handle SQL Server workload and resource allocation. However, if you go into further details of this feature, you will be shocked to see the level of control it gives you to control over CPU, memory on the basis of incoming requests from the application/user etc. But I have been hearing a very common QUESTION since SQL Server 2008 and that is, can we control physical IO using resource governor and the ANSWER is YES, you can do it in SQL SERVER 2014 & Above. But How ?

In SQL Server 2014, we have an additional control in resource governor namely CONTROL PHYSICAL IO. In other words, if you would like to restrict a user/application to use limited physical IO, you can restrict it with this additional control. You can implement this additional control in resource governor by just setting up two options which is MIN_IOPS_PER_VOLUME & MAX_IOPS_PER_VOLUME.

Let me demonstrate how to control physical IO in SQL Server 2014 step by step.

Step 1:
First of all, lets create a pool as usual and restrict its MAX_IOPS_PER_VOLUME limit to 50 ONLY, which means that whatever set of users / applications will be used, this pool cannot exceed 50 Physical IO.

USE master
GO
--DROP RESOURCE POOL Sample_Pool_Restrict_IO;
--GO
CREATE RESOURCE POOL Sample_Pool_Restrict_IO WITH
(
MAX_IOPS_PER_VOLUME = 50,
MIN_IOPS_PER_VOLUME = 1
);
GO

Step 2:
Once we created the pool, lets create the workload group. This is also a usual step while configuring resource governor.

USE master
GO
--DROP WORKLOAD GROUP Sample_Workload_Group_Restrict_IO
--GO
CREATE WORKLOAD GROUP Sample_Workload_Group_Restrict_IO
USING Sample_Pool_Restrict_IO;
GO

Step 3:
Let’s, create a test user, later on I will demonstrate how resource governor will restrict physical IO for this test user.

USE master
GO
CREATE LOGIN dba WITH PASSWORD = 'imran.1234@';
GO
ALTER SERVER ROLE [sysadmin] ADD MEMBER [dba]
GO

Step 4:
Create a classifier function and define if the above created user is the current user. Then classifier will assign the restricted IO workload group to this user. Then each time this user tries to use physical IO, it  CAN’T go beyond 50. SQL Server will restrict this user up to 50.

USE MASTER;
GO
--DROP FUNCTION dbo.fnIOClassifier
GO
CREATE FUNCTION dbo.fnIOClassifier()
RETURNS SYSNAME WITH SCHEMABINDING
AS
BEGIN
DECLARE @GroupName SYSNAME
IF SUSER_NAME() = 'dba'
BEGIN
SET @GroupName = 'Sample_Workload_Group_Restrict_IO'
END
ELSE
BEGIN
SET @GroupName = 'default'
END
RETURN @GroupName;
END
GO

Step 5:
Let’s assign the classifier function (created in the above step) to resource governor and reconfigure the resource governor to implement new settings.

USE master;
GO
ALTER RESOURCE GOVERNOR WITH (CLASSIFIER_FUNCTION = dbo.fnIOClassifier);
ALTER RESOURCE GOVERNOR RECONFIGURE;
GO

Step 6:
Now, we are ready to test the new feature (Control Physical IO). To test the feature, let’s open performance monitor, add counter and then select resource pool stats object, further select Disk read IO/sec and add default and custom Pool (Sample_Pool_Restrict_IO) created in step 1 and press ADD BUTTON as shown below.

Resource Governor 1.0

Step 7:
Now, we setup performance monitor to test the physical IO control feature via resource governor. Lets login with any user except the one created in step 3 and run the given below script and view the results in performance monitor. In my case, I logged in with sa and executed the script.

USE AdventureWorks2014
GO
DBCC DROPCLEANBUFFERS
GO
EXEC sp_MSforeachtable 'SELECT * FROM ?'
GO

Resource Governor 1.1

Note: In the above results, you can easily view that the DISK READ IO/SEC reached the maximum of 122 and it may go far from it as well because we did not restrict DISK READ IO/SEC for sa user.

Step 8:
This time lets login with ‘dba’ user which we created in step 3 and execute the same script which we executed in the above step.

USE AdventureWorks2014
GO
DBCC DROPCLEANBUFFERS
GO
EXEC sp_MSforeachtable 'SELECT * FROM ?'
GO

Resource Governor 1.2

Note: In the above results, you can easily view that the DISK READ IO/SEC reached the maximum of 50 and why is it not going beyond 50 is because dba user has been restricted by resource governor using physical IO control feature.

Conclusion:
As you can see above that this feature really gives DBA’s more control on physical IO and it would be very handy for the DBA’s where they have serious problems with I/O which can be from users / applications.

Read Full Post »

SQL Server 2014 is shipped with lots of exciting features and enhancements, which I usually share with you in my blog from time to time. Today, I will discuss a new enhancement that will minimize your code. This enhancement is actually in the CREATE TABLE (Transact-SQL). Now you can actually create NONCLUSTERED index within the create statement and you do not need to alter table to add NONCLUSTERED index anymore. However, if you want to follow the old method, you can continue doing it. The old method has NOT been discontinued.

Given below are both methods, demonstrating the enhancement.

NEW Method : (Create NONCLUSTERED index within the create table statement)
In this method, we will create NONCLUSTERED index within create table statement. This script is compatible with SQL SERVER 2014 and above.

USE AdventureWorks2014
GO
--DROP TABLE Employee
--GO
CREATE TABLE Employee
(
[Emp_ID] int NOT NULL,
[LastName] varchar(255) NOT NULL,
[FirstName] varchar(255),
[Address] varchar(255),
[City] varchar(255),
[PostalCode] nvarchar(15),
CONSTRAINT pk_Emp_ID PRIMARY KEY ([Emp_ID]),
INDEX IX_Employee_PostalCode NONCLUSTERED (PostalCode)
);

GO
--OUTPUT

How to create a nonclustered index within the create table.1.1

OLD Method : (Create NONCLUSTERED index after creation of the table)
In this method, we will create NONCLUSTERED index AFTER table creation. This script is compatible with SQL SERVER 2005 and above.

USE AdventureWorks2012
GO
--DROP TABLE Employee
--GO
CREATE TABLE Employee
(
[Emp_ID] int NOT NULL,
[LastName] varchar(255) NOT NULL,
[FirstName] varchar(255),
[Address] varchar(255),
[City] varchar(255),
[PostalCode] nvarchar(15),
CONSTRAINT pk_Emp_ID PRIMARY KEY ([Emp_ID])
)
GO

CREATE NONCLUSTERED INDEX IX_Employee_PostalCode
ON dbo.Employee (PostalCode)
GO

How to create a nonclustered index within the create table.1.1

Conclusion
As you can see above, both methods will give you the same output, however, new method will reduce the line of code. Let me know your feedback about new enhancement.

Read Full Post »

HASH index (NONCLUSTERED) is a new type of index introduced in SQL Server 2014. It is only supported by memory optimized table. Recently, I was working on a memory optimized table and I came across in a situation where I had to find all the hash indexes available in the database. As usual I got it from a system view (sys.indexes). It is nothing new but the story did not end here because I found a shorter way to get the list of non-clustered hash indexes.
Given below is script that can give you the list of all hash indexes available in any particular database.

USE hkNorthwind
GO
SELECT
object_schema_name([object_id]) As [Schema Name]
, object_name([object_id]) As [Table Name]
, [name] As [Index Name]
, [type_desc] As [Index Description]
FROM
sys.hash_indexes
--OUTPUT

list of hash indexes.1.1

Read Full Post »

Recently, I was working on SQL Server 2014 CTP 1 and doing my usual research, and came across the new system objects shipped with CTP 1.

Given below is the list of new system objects :

S.No

 Object Name

Object Type

1

 sp_set_cardinality_estimation_model_110

EXTENDED STORED PROCEDURE

2

 plan_persist_query_text

INTERNAL TABLE

3

 plan_persist_query

INTERNAL TABLE

4

 plan_persist_plan

INTERNAL TABLE

5

 plan_persist_runtime_stats

INTERNAL TABLE

6

 plan_persist_runtime_stats_interval

INTERNAL TABLE

7

 plan_persist_context_settings

INTERNAL TABLE

8

 fn_dump_dblog_xtp

INLINE TABLE VALUED FUNCTION

9

 fn_dblog_xtp

INLINE TABLE VALUED FUNCTION

10

 fn_hadr_is_primary_replica

SCALAR FUNCTION

11

 sp_MSalreadyhavegeneration

STORED PROCEDURE

12

 sp_xtp_merge_checkpoint_files

STORED PROCEDURE

13

 sp_db_enable_clustered_columnstores

STORED PROCEDURE

14

 sp_cci_tuple_mover

STORED PROCEDURE

15

 syscsrowgroups

SYSTEM TABLE

16

 dm_resource_governor_resource_pool_volumes

VIEW

17

 dm_xtp_transaction_stats

VIEW

18

 dm_xe_database_session_event_actions

VIEW

19

 dm_xtp_gc_stats

VIEW

20

 dm_db_xtp_index_stats

VIEW

21

 dm_xe_database_session_object_columns

VIEW

22

 dm_os_buffer_pool_extension_configuration

VIEW

23

 dm_db_xtp_object_stats

VIEW

24

 dm_db_xtp_table_memory_stats

VIEW

25

 dm_xtp_consumer_memory_usage

VIEW

26

 dm_io_cluster_shared_volumes

VIEW

27

 dm_db_xtp_memory_consumers

VIEW

28

 dm_db_xtp_checkpoint

VIEW

29

 dm_xtp_threads

VIEW

30

 dm_db_merge_requests

VIEW

31

 dm_xtp_transaction_recent_rows

VIEW

32

 dm_db_xtp_checkpoint_files

VIEW

33

 dm_xtp_system_memory_consumers

VIEW

34

 dm_xe_database_session_events

VIEW

35

 dm_xtp_memory_stats

VIEW

36

 dm_db_xtp_hash_index_stats

VIEW

37

 dm_xe_database_sessions

VIEW

38

 dm_xe_database_session_targets

VIEW

39

 dm_db_xtp_gc_cycle_stats

VIEW

40

 dm_xtp_gc_queue_stats

VIEW

41

 dm_db_xtp_transactions

VIEW

42

 column_store_row_groups

VIEW

43

 hash_indexes

VIEW

44

 event_sessions

VIEW

45

 event_session_targets

VIEW

46

 event_session_fields

VIEW

47

 event_session_events

VIEW

48

 event_session_actions

VIEW

Read Full Post »

Columnstore index is one of the nice features introduced in SQL Server 2012. It improves the performance more times than the normal query but on the other hand it has some limitations as well, and one of the limitation is that you cannot create a CLUSTERED Columnstore index.

Let me demonstrate it in SQL Server 2012.

USE tempdb
GO
CREATE TABLE tbl_Product_Master
(
[Product ID] INT,
[Product Name] NVARCHAR(100),
[Model] INT
)
GO
CREATE CLUSTERED COLUMNSTORE INDEX
[IX_tbl_Product_Master_ColumnStore]
ON [tbl_Product_Master] ([Product ID])
GO
--OUTPUT

Msg 35338, Level 15, State 1, Line 3
Clustered columnstore index is not supported.

Ooopps…… I am unable to create it in SQL Server 2012.

The above limitation has been eliminated in SQL Server 2014 and you can add the CLUSTERED COLUMNSTORE INDEX in the table.

Let me demonstrate the same example in SQL Server 2014.


USE tempdb
GO
CREATE TABLE tbl_Product_Master
(
[Product ID] INT,
[Product Name] NVARCHAR(100),
[Model] INT
)
GO

CREATE CLUSTERED COLUMNSTORE INDEX
[IX_tbl_Product_Master_ColumnStore]
ON [tbl_Product_Master]
GO
--OUTPUT

Command(s) completed successfully.

Lets check whether the index has been created successfully or not.

columnstoreindexcusteredindex1.1

The result is evident above, in SQL 2014.

Let me know if you explore the other nice enhancements of SQL Server 2014.

Read Full Post »