Feeds:
Posts
Comments

Posts Tagged ‘raresql’

In my earlier article, I wrote about how to generate a serial number by using the sequence object for a result set . However, sometimes you need to generate a negative serial number for any result set and you can easily achieve it by adjusting few properties in the sequence object.

Let me explain it step by step to demonstrate the solution.

Step 1 :
First of all, you need to create a sequence object along with some specific negative parameters as shown below.

USE AdventureWorks2012
GO
--DROP SEQUENCE dbo.Seq_Sample
--GO
CREATE SEQUENCE dbo.Seq_Sample
AS int
START WITH -1
INCREMENT BY -1
MINVALUE -3000
MAXVALUE -1
CYCLE ;
GO
--OUTPUT

Step 2 :
In this step, you are ready to use the above sequence object to generate a negative serial number as shown below.

USE AdventureWorks2012
GO
SELECT
NEXT VALUE FOR Seq_Sample AS [Sno], Name
FROM sys.all_objects ;
GO
--OUTPUT

Negative serial number - Sequence.1.1

Step 3 :
In this step, you need to reset the sequence number in order to start the sequence number from -1 each time. Given below is the script.

USE AdventureWorks2012
GO
ALTER SEQUENCE dbo.Seq_Sample
RESTART WITH -1 ;
GO
--OUTPUT

Let me know if you came across this situation and how you fixed it.

Read Full Post »

How to alter an existing computed column in a table is usually a trouble making statement because in computed column case we also try to implement a normal alter statement as shown below and end up with the error message. However, it is a usual perception that you can alter any computed column with the help of SQL Server management Studio (SSMS) without dropping it.

ALTER TABLE dbo.Products
ALTER COLUMN InventoryValue As (QtyAvailable * UnitPrice)
--OUTPUT

Msg 156, Level 15, State 1, Line 2
Incorrect syntax near the keyword ‘As’.

Frankly speaking there is no way you can alter any computed column without dropping it. Given below are the two methods to alter the computer column. In addition to this, I will discuss, why you do not need to drop computed column if you alter it through SSMS. Before I embark on the solution, I would like to create a sample to demonstrate the solution.

Sample :

USE tempdb
GO
DROP TABLE dbo.Products
GO
CREATE TABLE dbo.Products
(
ProductID int IDENTITY (1,1) NOT NULL
, QtyAvailable smallint
, UnitPrice money
, InventoryValue AS QtyAvailable --* UnitPrice
);

-- Insert values into the table.
INSERT INTO dbo.Products (QtyAvailable, UnitPrice)
VALUES (25, 2.00), (10, 1.5);

-- Display the rows in the table.
SELECT ProductID, QtyAvailable, UnitPrice, InventoryValue
FROM dbo.Products;

--OUTPUT

alter computed column.1.1
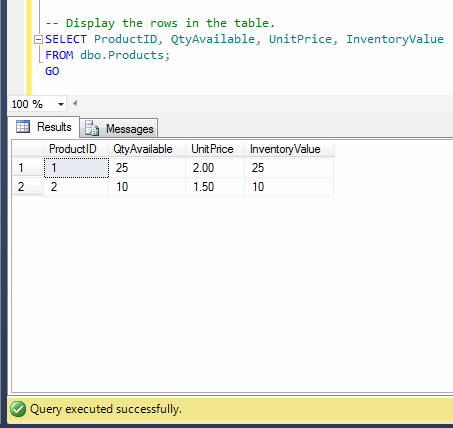
As you can see, I deliberately made a mistake in the formula of computed column. Lets correct it using given below methods.

METHOD 1 : USING T-SQL
In this method, we need to first drop the computed column and then add it as a new column to accommodate the altered computed column in any table. Given below is the script.

USE tempdb
GO
ALTER TABLE dbo.Products
DROP COLUMN InventoryValue

ALTER TABLE dbo.Products
ADD InventoryValue AS QtyAvailable * UnitPrice

Once you drop and recreate the computed column, lets browse and check it again.

USE tempdb
GO
-- Display the rows in the table.
SELECT ProductID, QtyAvailable, UnitPrice, InventoryValue
FROM dbo.Products;
--OUTPUT

alter computed column.1.2

METHOD 2 : USING SQL SERVER MANAGEMENT STUDIO
As I mentioned above, it is a general perception that if you alter computed column from SSMS, you do not need to drop it, it alters computed column automatically. In this article, I will show you how it works, step by step.

Step 1 :
Browse the table and select the computed column you need to modify using SSMS and right click on it and further select modify as shown below.
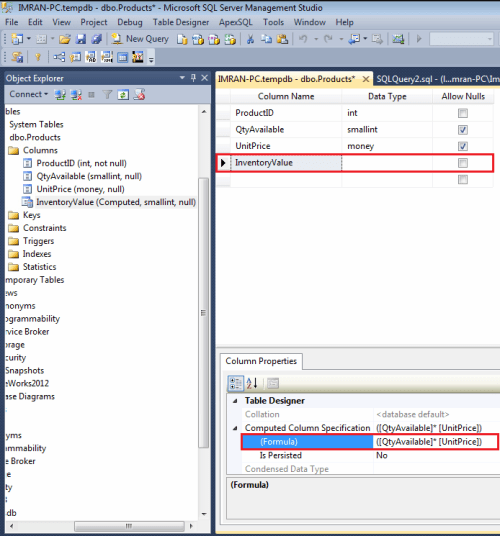
alter computed column.1.3

Step 2 :
Once you select modify, SSMS will open the table in the design view. Now you need to go to the column properties (that will be available at the bottom right) and edit the formula as shown below.

alter computed column.1.4

Step 3 :
Now, it seems that we just need to press the save button and SSMS will alter the computed column without dropping it. But hang on a second, instead of pressing the save button, press the generate script button to see what changes SSMS will implement in case of pressing save button. However, once you press generate script button it will pop up save change script window to show you the changes as shown below.

alter computed column.1.5

Given below is the complete script I copied from the generate script window for your reference that will be implemented once you press the save button. As you can see, SSMS  will create a temporary table with the correct computed column formula, then migrate all the data and drop the old table and rename the temporary table to the old table name. And in this case, it drops the computed column and table as well.

/* To prevent any potential data loss issues, you should review this script in detail before running it outside the context of the database designer.*/
BEGIN TRANSACTION
SET QUOTED_IDENTIFIER ON
SET ARITHABORT ON
SET NUMERIC_ROUNDABORT OFF
SET CONCAT_NULL_YIELDS_NULL ON
SET ANSI_NULLS ON
SET ANSI_PADDING ON
SET ANSI_WARNINGS ON
COMMIT
BEGIN TRANSACTION
GO
CREATE TABLE dbo.Tmp_Products
(
ProductID int NOT NULL IDENTITY (1, 1),
QtyAvailable smallint NULL,
UnitPrice money NULL,
InventoryValue  AS ([QtyAvailable]* [UnitPrice])
)  ON [PRIMARY]
GO
ALTER TABLE dbo.Tmp_Products SET (LOCK_ESCALATION = TABLE)
GO
SET IDENTITY_INSERT dbo.Tmp_Products ON
GO
IF EXISTS(SELECT * FROM dbo.Products)
EXEC('INSERT INTO dbo.Tmp_Products (ProductID, QtyAvailable, UnitPrice)
SELECT ProductID, QtyAvailable, UnitPrice FROM dbo.Products WITH (HOLDLOCK TABLOCKX)')
GO
SET IDENTITY_INSERT dbo.Tmp_Products OFF
GO
DROP TABLE dbo.Products
GO
EXECUTE sp_rename N'dbo.Tmp_Products', N'Products', 'OBJECT'
GO
COMMIT

Conclusion :
As you can see in both methods, you need to drop and recreate the computed column in order to alter it. In addition to this, the perception that “if you alter the computed column via SSMS, it alters it without dropping it” was proved wrong.

Read Full Post »

It is a very common scenario when you need to match a source table and a target table to find the missing (mismatch) rows across the result sets. We usually do it for multiple purposes specially at the time of audit or data migration etc.

Problem :
We usually use logical operators (NOT IN, Exists) to find the difference between two result sets. However, if you need to match each row by each row & each column by each column, it would be very difficult to achieve it via above mentioned logical operators.

Sample :
Let me create a sample to demonstrate the problem and solution.

--This script is compatible with SQL Server 2005
USE [AdventureWorks2012]
GO
--Create a sample table
CREATE TABLE [HumanResources].[Department_Sample](
[DepartmentID] [smallint] NOT NULL,
[Name] [dbo].[Name] NOT NULL,
[GroupName] [dbo].[Name] NOT NULL,
[ModifiedDate] [datetime] NOT NULL,
) ON [PRIMARY]
GO

--Insert records into the sample table from actual table
INSERT INTO [HumanResources].[Department_Sample]
SELECT * FROM [HumanResources].[Department]
GO

--Update a single record in the sample table
--to differentiate it from actual
UPDATE [HumanResources].[Department_Sample]
SET [Name] = 'Business Development'
WHERE DepartmentID=2

--Insert a record in the original table
INSERT INTO [HumanResources].[Department]
([Name]
,[GroupName]
,[ModifiedDate])
VALUES
('IT'
,'Executive General and Administration'
,GETDATE())
GO
--Delete a record from the sample table
DELETE FROM [HumanResources].[Department_Sample]
WHERE [DepartmentID]=11
GO
SELECT * FROM [HumanResources].[Department]
GO
--OUTPUT

find missing result set.1.1

Solution :
As mentioned above, I created a sample table, copied data from original table in it and then modified & inserted the data in the sample table & original table respectively. Now, in order to find the the missing (mismatched) records across the result set, we need to use EXCEPT operator. Given below is the script that will ONLY show the missing rows in the sample table (Target Table).

--This script is compatible with SQL Server 2005
USE AdventureWorks2012
GO
--Source Table
SELECT * FROM [HumanResources].[Department]
EXCEPT
--Target table
SELECT * FROM [HumanResources].[Department_Sample]
GO
--OUTPUT

find missing result set.1.2

Conclusion :
Whenever you need to find the missing (mismatch) row across the result sets, always use EXCEPT operator to make your life easier.

Read Full Post »

Change Data Capture (CDC) is one of the best features shipped with SQL Server 2008. We usually use CDC to record the change of the tables using DML operations for audit purpose. Today, I configured CDC for one of my clients. In order to configure the CDC, first of all, you need to enable it. However, once I tried enabling it but it gave me an error.

Let me explain the error and its solution in detail.

Message Number: 22830

Severity : 16

Error Message: Could not update the metadata that indicates database %s is enabled for Change Data Capture. The failure occurred when executing the command ‘%s’. The error returned was %d: ‘%s’. Use the action and error to determine the cause of the failure and resubmit the request.

Error Generation:
Let me enable the CDC to generate the error.

USE AdventureWorks2012
GO
EXEC sys.sp_cdc_enable_db
GO
--OUTPUT

Msg 22830, Level 16, State 1, Procedure sp_cdc_enable_db_internal, Line 193
Could not update the metadata that indicates database AdventureWorks2012 is enabled for Change Data Capture. The failure occurred when executing the command ‘SetCDCTracked(Value = 1)’. The error returned was 15517: ‘Cannot execute as the database principal because the principal “dbo” does not exist, this type of principal cannot be impersonated, or you do not have permission.’. Use the action and error to determine the cause of the failure and resubmit the request.

Ooopps…… I am unable to enable the CDC. What is the solution ? Let me explain the solution.

Resolution:
If you look at the error message, you will find two error numbers 22830 & 15517. In fact the actual error is 15517 and the reason behind this is, you do not have a valid log in for the database owner of the selected database. The solution I found is from Microsoft support site. Given below is the script.

USE AdventureWorks2012 -- Change the database name
GO
sp_changedbowner 'sa' --Change the valid login name
GO

Once you execute the above statement, you can easily enable the CDC and enjoy the benefit of CDC.

Conclusion:
To conclude, whenever you come across this error, you should change the database owner of the selected database to a valid SQL Server log in.

Read Full Post »

Sequence object is one of the handy objects when we need to maintain one serial number across the tables. I have written few articles on Sequence object earlier in my post.

PROBLEM :
Today, I will share an issue that I came across while dropping sequence object. I created few tables and made a single sequence object as a default serial number in one of the columns in these tables. But once I drop this sequence object it gave me error due to dependency. It seems that I need to go one by one and search each dependency of this sequence object and drop all of them before dropping Sequence Object.

Let me create an example to demonstrate the solution.

-- This script is compatibile with SQL Server 2012 and above.
-- CREATE TABLE
USE tempdb
GO
CREATE TABLE dbo.tbl_sample
( [ID] VARCHAR(8) ,
[Product Name] varchar(50)
)
GO

--CREATE SEQUENCE
USE tempdb
GO
CREATE SEQUENCE dbo.Sample_Seq AS
INT START WITH 1
INCREMENT BY 1 ;
GO

-- CREATE DEFAULT VALUE OF SEQUENCE
USE tempdb
GO
ALTER TABLE dbo.tbl_sample
ADD CONSTRAINT Const_Sample_Seq
DEFAULT (NEXT VALUE FOR dbo.Sample_Seq) FOR [ID];
GO
--TRY TO DROP SEQUENCE OBJECT
DROP SEQUENCE Sample_Seq
GO
--OUTPUT

Msg 3729, Level 16, State 1, Line 1
Cannot DROP SEQUENCE ‘Sample_Seq’ because it is being referenced by object ‘Const_Sample_Seq’.

SOLUTION :
As mentioned above, I created a default constraint to a table using sequence object. The problem started when I tried to drop the sequence. Due to dependency, if one sequence object has been used in multiple tables as a default value, then you need to search each dependency of that sequence object and as usual drop all dependent objects before dropping the sequence object.
You can do it, one finding and dropping one object by one object, simple but hectic solution.
Alternative, you can use give below solution. This solution will prepare script to drop all dependent objects of the any sequence object.

-- This script is compatibile with SQL Server 2012 and above.
USE tempdb
GO
SELECT
'ALTER TABLE '
+ object_name(parent_object_id)
+ ' DROP CONSTRAINT '
+ referencing_entity_name AS [Text]
FROM sys.dm_sql_referencing_entities ('dbo.Sample_Seq', 'OBJECT') re
INNER JOIN sys.default_constraints dc
ON re.referencing_id=dc.object_id
GO
--OUTPUT

drop contraint.1.1

Just copy the above result set and execute it as mentioned below and it will drop all your dependent objects related to sequence object. Given below is the script.

-- This script is compatibile with SQL Server 2012 and above.
USE tempdb
GO
ALTER TABLE tbl_sample DROP CONSTRAINT Const_Sample_Seq
GO
--OUTPUT

Once you drop the constraint, you can easily drop the sequence, you will not get the above error.

-- This script is compatibile with SQL Server 2012 and above.
DROP SEQUENCE Sample_Seq
--OUTPUT

Command(s) completed successfully.

Let me know if you came across such issues and its solutions.

Read Full Post »

Last day of the last year, I came across a situation where I was stuck for a while even though we had backups. However later on found a solution and felt so excited ;).
Note : Please do not use this script for any negative purpose.

Problem :
As I mentioned earlier that last year on 31st Dec 2013, we were busy helping our client for yearend closing and suddenly we got an error from year closing procedure. Given below are the details.
Msg 208, Level 16, State 1, Line 1
Invalid object name ‘tbl_Yeartodate_Value’.

Now, the problem is this table gets updated every evening and we do not why it is not available in the database. We do have each and everyday backup. However, we do not know when it was dropped and who dropped it. We started looking for the solution because it is not possible to restore all backups and check one by one.

Solution :
Some of our support engineers proposed the third party solution to recover the table directly because we do not know in which backup this table exists. I bought some time from the client and started doing my development for recovery and after few hours, I developed a script that could give the dropped object name along with the dropped date and dropped by name as well. However, I made sure that the client will not take any action against the person who dropped it.

Let me create few objects and drop it to demonstrate the solution.

--This script is compatible with SQL Server 2005 and above.
USE tempdb
GO
--Create Schema
CREATE SCHEMA HumanResources
GO

--Create Table
CREATE TABLE HumanResources.[tbl_Employee](
[Sno] [int] NOT NULL,
[ID] nvarchar(6) Not NULL ,
[name] [varchar](50) NOT NULL,
[Date of Birth]  datetime not null,
[Weight] [int] NULL)

GO

--Create View
Create View HumanResources.[vw_Employee]
as
Select * from HumanResources.[tbl_Employee]
GO

--Create Procedure
Create Procedure HumanResources.[usp_Employee]
@EmployeeID nvarchar(6)
as
Select * from HumanResources.[tbl_Employee] Where [ID] =@EmployeeID
GO

--Create function
Create FUNCTION HumanResources.[fn_Employee](@EmployeeID nvarchar(6))
RETURNS int
AS
Begin
Declare @Weight int
Select  @Weight = [Weight]
from HumanResources.[tbl_Employee] Where ID =@EmployeeID
Return  @Weight
End
GO

--Create Trigger
CREATE TRIGGER HumanResources.trg_Employee
ON [tbl_Employee]
FOR INSERT
AS RAISERROR (50009, 16, 10)
GO

--Drop all objects
DROP TRIGGER HumanResources.trg_Employee
DROP VIEW HumanResources.[vw_Employee]
DROP PROCEDURE HumanResources.[usp_Employee]
DROP FUNCTION HumanResources.[Fn_Employee]
DROP TABLE HumanResources.[tbl_Employee]
GO

Once you dropped all object, you need to create the given below script to recover who dropped what object at what time.

--This script is compatible with SQL Server 2005 and above.
USE tempdb
GO
--DROP PROCEDURE Recover_Dropped_Objects_Detail_Proc
--GO
CREATE PROCEDURE Recover_Dropped_Objects_Detail_Proc
@Date_From DATETIME='1900/01/01',
@Date_To DATETIME ='9999/12/31'
AS

;WITH CTE AS (Select B.name AS [Schema Name]
,REPLACE(SUBSTRING(A.[RowLog Contents 0],14,LEN(A.[RowLog Contents 0])),0x00,0x) AS [Object Name]
,[Transaction ID]
,A.[RowLog Contents 0]
FROM fn_dblog(NULL,NULL) A
LEFT JOIN sys.schemas B
ON CONVERT(INT,SUBSTRING([RowLog Contents 0],2,2))= B.schema_id
WHERE A.[AllocUnitName] ='sys.sysschobjs.nc1'AND
A.[Transaction ID] IN (
SELECT DISTINCT [TRANSACTION ID] FROM  sys.fn_dblog(NULL, NULL)
WHERE Context IN ('LCX_NULL') AND Operation IN ('LOP_BEGIN_XACT')
AND [Transaction Name] LIKE '%DROP%'
AND CONVERT(NVARCHAR(11),[Begin Time]) BETWEEN @Date_From AND @Date_To))

SELECT
[Schema Name]
,[Object Name]
,B.[Begin Time]  AS [Dropped Date & Time]
,C.[name] AS [Dropped By User Name]
FROM CTE A
INNER JOIN fn_dblog(NULL,NULL) B
ON A.[Transaction ID] =B.[Transaction ID]
AND Context IN ('LCX_NULL') AND Operation IN ('LOP_BEGIN_XACT')
AND [Transaction Name]LIKE '%DROP%'
INNER JOIN sys.sysusers  C ON B.[Transaction SID]=C.[Sid]
GO

Once you created the above stored procedure, lets execute it and get all the object names dropped during a particular interval, along with its dropped date and dropped by name.
Example :

--This script is compatible with SQL Server 2005 and above.
USE tempdb
GO
EXEC Recover_Dropped_Objects_Detail_Proc  '2014/02/26','2014/02/26'
GO
--OUTPUT

who_dropped_what_object_at_what_time.1.1

Let me know if you came across this issue and its solution as well.

Read Full Post »

Sometimes lack of knowledge about the product irritates us. No matter, what product we are dealing with.
IntelliSence is one of the marvelous tools, that has been with us Since SQL Server 2008. It really helps us to speed up the development. However, sometimes it irritate as well ;). In SQL Server 2012, IntelliSence came up with two different modes inside to make our life more easier. Given below are the details.

  • Completion Mode
  • Suggestion Mode

Before proceeding with the explanation of these modes, I would like to enable Text Editor Toolbar to toggle between these two modes. Please note that it is not mandatory to enable text editor toolbar for toggling between modes but it is preferable to add because it helps us to see which mode we are in. Let me enable it step by step.

Step 1 :
First of all, you need to open SQL Server Management Studio (SSMS) and select Tools and Customize…  option as shown in the image below.

toggle suggestion and completion mode.2.1

Step 2 :
Once you select Customize… option, it will pop up Customize screen. You need to select Text Editor toolbar in it and press Close as shown below.

toggle suggestion and completion mode.2.2

Step 3 :
In this step, you can see that Text editor toolbar is available in SSMS and Toggles between suggestion and standard completion modes and mode button is highlighted as shown below.

toggle suggestion and completion mode.2.3

Once you enable the Text editor toolbar, let me explain what happens with each mode, with examples.

  • Completion mode : All of us are aware of completion mode because in earlier days completion mode was selected by default in IntelliSence. However, the problem with this mode is, if the object names are symmetrical in database (not necessary) and we search for desired object and by mistake if the criteria matches the other object name (not required), it will select the other object automatically and if this activity is continuous, it irritates us. Please note that, this mode is enabled by default in SQL Server. Given below is the screen image of completion mode in which Toggles between suggestion and standard completion modes button is switched OFF and it means that we are in completion mode.

toggle suggestion and completion mode.1.1

  • Suggestion Mode : This mode is good for the developers if they are working on symmetrical object name database, and this mode of intelliSence just suggest the object name for us, it does not select it automatically like completion mode. You can Press CTRL + ATL + Space bar to switch in Suggestion mode. Given below is the screen image of suggestion mode in which Toggles between suggestion and standard completion modes button is switched ON and it means you are in suggestion mode.

toggle suggestion and completion mode.1.2

Let me know if you used it in the real world examples and how it helped you.

Read Full Post »

Filetable is one of the new features shipped with SQL Server 2012. I have discussed its core functionality earlier in my articles. Today, I was trying to open one of the filetables using Explorer File Table Directory and it gave me given below error message.

file location cannot be opened.1.1

Let me explain the error and its solution in detail.

Error Message: The File location cannot be opened. Either access is not enabled or you do not have permissions for the same.

Solution:
If you look at the error description, it seems that either your access to this filetable is not enabled by the administrator or you do not have the permission to access this filetable. And I am a bit surprised because I logged in as an administrator, what next then ?

Let me explain the solution step by step.

Step 1 :
Click on the Start >>All Programs >>Microsoft SQL Server 2012 >>Configuration Tools >> SQL Server Configuration Manager, as shown in the image below.

filestream_disabled.1.1

Step 2 :
Once you click on SQL Server configuration manager, it will open SQL Server configuration manager options. It has two panes. Now you need to select SQL Server Services from the left hand pane and select the SQL Server Instance, right click on it and select Properties as shown in the image below.

filestream_disabled.1.2

Step 3 :
Once you select the Properties, it will open SQL Server Properties dialogue box. Now you need to find FILESTREAM Tab and select it.
Once you select it, you will find given below options as shown in the image.

    1. Enable FILESTREAM for Transact-SQL access.
    2. Enable FILESTREAM for file I/O access. 
    3. Allow remote clients to have streaming access to FILESTREAM data. 

file location cannot be opened.1.2

As you can see, the 2nd option (Enable FILESTREAM for file I/O access) has NOT been ENABLED and due to this reason, you cannot access filtable from SQL Server Management Studio (SSMS). Just enable this option and click Apply as shown in the picture below.

file location cannot be opened.1.3

Step 4 : 
Once you are done with SQL Server Configuration Manager, open SQL Server Management Studio and go to the same filetable and open it using Explorer FileTable Directory. This time it will not give you this error.

file location cannot be opened.1.4

Read Full Post »

Taking & maintaining back up is one of the core responsibilities of any Database Administrator. However, I came across some DBA’s that usually take the backup but not on a regular basis because it is a manual process. I strongly recommend that you start taking the backup even from day one after your deployment at the client site. Today, I handed over a SQL Server to the client after installation and immediately scheduled an automated backup as well. So thought of sharing this solution.

Let me schedule an automated backup to demonstrate step by step.

STEP 1 :
First of all, open the SQL Server Management Studio (SSMS) and check if SQL Server Agent is running or not. In my case it is not running due to this, it is showing red color sign in the icon of SQL Server Agent. Just right click on SQL Server Agent and select Start as shown in the image below.

schedule autobackup.1.1

Once you start, SQL Server Agent icon will be changed to green as shown below.

schedule autobackup.1.2

STEP 2 :
Remain in the SSMS, drill down Management and select Maintenance Plans, further right click on Maintenance Plans and select Maintenance Plan Wizard as shown in the image below.

schedule autobackup.1.3

STEP 3 :
Once you click on Maintenance Plan Wizard, it will pop up an information dialogue box. Click Next Button as shown below.

schedule autobackup.1.4

STEP 4 :
Once you click on Next Button, Plan Properties screen will open as shown below. Enter the maintenance plan name and press Change Button as shown in the image below.

schedule autobackup.1.5

STEP 5 :
Once you press Change Button, it will open a New Job Schedule Window, where you need to define the frequency, schedule date/ time & start date/ end date (no end date) as shown in the image below. Once you are done with the job schedule window press OK button and Next Button respectively.
Note : Always select the off peak time (after office working hours) for scheduler.

schedule autobackup.1.6

STEP 6 :
Now, you are at maintenance task window, here you need to select what type of maintenance you need to do. In our case we need to schedule a FULL database backup. Select the Back Up Database (Full) and press Next button as shown in the image below.

schedule autobackup.1.7

STEP 7 :
It is task order screen but you only select one task (Back Up Database (Full)). There is no need to do any thing in this screen. Just press Next button as shown below.

schedule autobackup.1.8

STEP 8 :
In this step you need to define the parameters of back up; mainly selection of database, location of database & verify integrity of database and press Next button as shown below.

schedule autobackup.1.9

STEP 9 :
Now, you are at report option that you probably need to view the results of this scheduler. This option is very helpful when it comes to debugging as shown below. Press Next Button.

schedule autobackup.1.10

STEP 10 :
Once you press Next button, the summary window will pop up and displays the summary of all configurations as shown below.

schedule autobackup.1.11

Once you press Finish Button, it will process your maintenance plan and will give you the status as shown below.

schedule autobackup.1.12

In addition to this, you can find your maintenance plan on your left hand side as shown below.

schedule autobackup.1.13

STEP 11 :
It seems that your maintenance plan has been done. Only one last step and that is, you need to rename the job. Just select SQL Server Agent and browse jobs, you will find one Backup.Maintenance.Subplan_1, right click on it and select properties as shown below.

schedule autobackup.1.14

STEP 12 :
You are in the job property window, you just need to rename your job name and press OK button as shown below.

schedule autobackup.1.15

Once you are done with all 12 steps you will find a daily backup at the defined time in a dedicated folder. In fact, it took me 5 minutes to configure but eventually it will make my life easier. Let me know how you guys are handling back ups.

Read Full Post »

« Newer Posts - Older Posts »