Feeds:
Posts
Comments

Posts Tagged ‘SQL’

We all have been using RTRIM() function for ages, it helps us to removes the unwanted space(s) character char(32) from the end of any column(s) \ expression(s) in earlier version of SQL Server.

In SQL Server 2022, an enhancement came in RTRIM() function, which was a long awaited functionality. This enhancement will allow us to remove any specific character(s) from the RIGHT sides along with space(s) character char(32).

Let me show you in the below example, how we were using RTRIM() functions to remove space(s) character char(32) ONLY in the earlier version of SQL Server.

Example 1:

DECLARE @EMAIL VARCHAR(100) 
SET @EMAIL = 'KenSanchez@gmail.com   ';
SELECT  @EMAIL   AS [OriginalEmail]
, RTRIM(@EMAIL)  AS [RTrimEmail];
GO
--OUTPUT

Enhancement:

Now, let me demonstrate this enhancement by giving few examples but before demonstrating this enhancement, your database compatibility level MUST be 160 or higher. Given below is the query to change your database compatibility level.

 ALTER DATABASE AdventureWorks SET COMPATIBILITY_LEVEL = 160 

Example 2:

In this example, I will show you how to pass the newly introduced parameter in RTRIM() function. This parameter removes spaces(s) / character(s) from the RIGHT side of the column(s) / expression(s) which will be defined in single quotes after RTRIM() as shown below.

DECLARE @EMAIL VARCHAR(100) 
SET @EMAIL = 'KenSanchez@gmail.com;';
SELECT  @EMAIL       AS [OriginalEmail]
, RTRIM(@EMAIL,'; ')  AS [RTrimEmail];
GO
--OUTPUT

Example 3:

In this example, I will demonstrate that by default RTRIM() function takes spaces(s) as parameter, if you do not pass any parameter as shown in below example :

DECLARE @EMAIL VARCHAR(100) 
SET @EMAIL = '     KenSanchez@gmail.com';
SELECT  @EMAIL   AS [OriginalEmail]
, RTRIM(@EMAIL)  AS [RTrimEmail]
, RTRIM(@EMAIL,' ') AS [RTrimEmailWithParameter];
GO
--OUTPUT

Conclusion:

I found the new enhancement of RTRIM() function very useful, earlier we used multiple functions to find and remove any character(s) from the RIGHT side of the column(s) \ expression(s) but now we can easily achieve with the help of RTRIM() function. Do let me know if you use this function and how you find it.

Read Full Post »

We all have been using LTRIM() function for ages, it helps us to removes the unwanted space(s) character char(32) from the start of any column(s) \ expression(s) in earlier version of SQL Server.

In SQL Server 2022, an enhancement came in LTRIM() function, which was a long awaited functionality. This enhancement will allow us to remove any specific character(s) from the left sides along with space(s) character char(32).

Let me show you in the below example, how we were using LTRIM() functions to remove space(s) character char(32) ONLY in the earlier version of SQL Server.

Example 1:

DECLARE @EMAIL VARCHAR(100) 
SET @EMAIL = '     KenSanchez@gmail.com';
SELECT  @EMAIL   AS [OriginalEmail]
, LTRIM(@EMAIL)  AS [LTrimEmail];
GO
--OUTPUT

Enhancement:

Now, let me demonstrate this enhancement by giving few examples but before demonstrating this enhancement, your database compatibility level MUST be 160 or higher. Given below is the query to change your database compatibility level.

 ALTER DATABASE AdventureWorks SET COMPATIBILITY_LEVEL = 160 

Example 2:

In this example, I will show you how to pass the newly introduced parameter in LTRIM() function. This parameter removes spaces(s) / character(s) from the LEFT side of the column(s) / expression(s) which will be defined in single quotes after LTRIM() as shown below.

DECLARE @EMAIL VARCHAR(100) 
SET @EMAIL = '     ;KenSanchez@gmail.com';
SELECT  @EMAIL       AS [OriginalEmail]
, LTRIM(@EMAIL,'; ')  AS [LTrimEmail];
GO
--OUTPUT

Example 3:

In this example, I will demonstrate that by default LTRIM() function takes spaces(s) as parameter, if you do not pass any parameter as shown in below example:

DECLARE @EMAIL VARCHAR(100) 
SET @EMAIL = '     KenSanchez@gmail.com';
SELECT  @EMAIL   AS [OriginalEmail]
, LTRIM(@EMAIL)  AS [LTrimEmail]
, LTRIM(@EMAIL,' ') AS [LTrimEmailWithParameter];
GO
--OUTPUT

Conclusion:

I found the new enhancement of LTRIM() function very useful, earlier we used multiple functions to find and remove any character(s) from the LEFT side of the column(s) \ expression(s) but now we can easily achieve with the help of LTRIM() function. Do let me know if you use this function and how you find it.

Read Full Post »

As we all know, TRIM() function removes the extra space(s) character char(32) from the start & end of any column(s) \ expression(s) in earlier version of SQL Server.

In SQL Server 2022, an enhancement is available in TRIM() function, which was a long awaiting functionality. This enhancement will allow us to remove any specific character(s) from one of the sides (left, right) or both sides of the column(s) \ expression(s) along with space(s) character char(32).

Let me show you in the below example, how we were using TRIM() function to remove space(s) character char(32) ONLY in the earlier version of SQL Server.

DECLARE @EMAIL VARCHAR(100) 
SET @EMAIL = '     KenSanchez@gmail.com      ';

SELECT  @EMAIL   AS [OriginalEmail]
, TRIM (@EMAIL)  AS [TrimEmail];
GO
--OUTPUT

Enhancement:

Now, let me demonstrate this enhancement by giving few examples but before demonstrating this enhancement, your database compatibility level MUST be 160 or higher. Given below is the query to change your database compatibility level.


ALTER DATABASE AdventureWorks
SET COMPATIBILITY_LEVEL = 160 

The enhancement in TRIM() function provides three new options as shown below.

  • Leading
  • Trailing
  • Both

Let me explain these options in detail.

  • Leading

I will demonstrate to you how to use LEADING option in TRIM() function. This option removes space(s) / character(s) from the LEFT side of the column(s) / expression(s) which will be defined in single quotes after LEADING option, as shown in given below example.


DECLARE @EMAIL VARCHAR(100) 
SET @EMAIL = '  ;KenSanchez@gmail.com';

SELECT @EMAIL  AS [OriginalEmail]
     , TRIM(LEADING' ; ' FROM @EMAIL) AS  [AfterTrimEmail];
GO
--OUTPUT

  • Trailing

In this example, I will show you how to use TRAILING option in TRIM() function. This option removes space(s) / character(s) from the RIGHT side of the column(s) / expression(s) which will be defined in single quotes after TRAILING option, as shown below.


DECLARE @EMAIL VARCHAR(100) 
SET @EMAIL = 'KenSanchez@gmail.com;   ';

SELECT @EMAIL  AS [OriginalEmail]
     , TRIM(TRAILING' ; ' FROM @EMAIL) AS  [AfterTrimEmail];

GO
--OUTPUT

  • Both

In this example, I will show you how to use BOTH option in TRIM() function. This option removes space(s) / character(s) from BOTH (left & right) sides of the column(s) / expression(s) which will be defined in single quote after BOTH option, as shown below.


DECLARE @EMAIL VARCHAR(100) 
SET @EMAIL = '   ;KenSanchez@gmail.com;   ';

SELECT @EMAIL  AS [OriginalEmail]
     , TRIM(BOTH' ; ' FROM @EMAIL) AS  [AfterTrimEmail];

GO
--OUTPUT


DECLARE @EMAIL VARCHAR(100) 
SET @EMAIL = '   ;KenSanchez@gmail.com;   ';

SELECT @EMAIL  AS [OriginalEmail]
     , TRIM(' ; ' FROM @EMAIL) AS  [AfterTrimEmail];

GO
--OUTPUT

  • Note:

If you don’t write any option name (LEADING, TRAILING, BOTH) in the TRIM() function then by default BOTH option will be applied as shown below.

Conclusion:

I found the new enhancement very useful and handy, earlier we used multiple functions to find and remove any character(s) from the start or end of the column(s) \ expression(s) or both sides of the column(s) \ expression(s), now we can achieve it via TRIM() function ONLY. Do let me know if you use this enhancement and how helpful you find it.

Read Full Post »

We have been using REPLACE() function for ages in SQL Server whenever we need to replace any characters in a string but the problem arises when we need to replace multiple characters with multiple characters. In such cases we had to use REPLACE() function multiple times to achieve it till TRANSLATE() function came in picture in SQL Server 2017.

Compatibility Level:

Your database compatibility level MUST be 140 or higher to use TRANSLATE() function. Given below is the query to change your database compatibility level.

 ALTER DATABASE Northwind SET COMPATIBILITY_LEVEL = 140 

Let me demonstrate, how we were using REPLACE() function in earlier version of SQL Server:

Example 1: (Old approach using REPLACE() function)

In the given below Example, we used REPLACE() function twice in order to replace multiple characters in a string.


DECLARE @Number VARCHAR(25)
SET @Number='+92-3317892345'
SELECT @Number AS PhoneNumber
     , REPLACE(REPLACE(@Number,'+',' '),'-',' ') AS ReplacedPhoneNumber;

GO

--OUTPUT

Example 2: (New approach using TRANSLATE() function)

In new approach, we can achieve the same output using TRANSLATE() function and we do not need to write function twice.


DECLARE @Number AS VARCHAR(25)
SET @Number='+92-3317892345'
SELECT @Number AS PhoneNumber
     , TRANSLATE(@Number,'+-','  ') AS TranslatedPhoneNumber

GO

--OUTPUT

Now, we know how to use these functions (TRANSLATE() and REPLACE()). Let me show you how we can use it in query having tables.

Example 3: (Old approach using REPLACE() function)

In the given below example, we are going to replace ( , ),- with spaces using REPLACE() function.


USE Northwind
GO

SELECT FirstName
           , LastName
	   , Title
           , HomePhone
	   , REPLACE(REPLACE(REPLACE(HomePhone,'(',''),')',' '),'-',' ') AS ReplacedHomePhone
FROM [dbo].[Employees] ;
GO
--OUTPUT

Example 4: (New approach using TRANSLATE() function)

In the given below example, we are going to replace ( , ),- with spaces using TRANSLATE() function.


USE Northwind
GO

SELECT FirstName
           , LastName
	   , Title 
	   , HomePhone
	   , TRANSLATE(HomePhone,'()-','   ') AS TranslatedHomePhone  
FROM [dbo].[Employees] ;
GO
--OUTPUT

This image has an empty alt attribute; its file name is translate-ver-1.4.png

Conclusion:

I used TRANSLATE() function and found it very handy, the only limitation I can see is that the characters and translations should be the same size. If not it will generate error which we will discuss in upcoming articles. Do let know if you used this function and found it useful.

Read Full Post »

At times we come across some cases where we need to extract date and time for a certain period of time (year, month, day, hour, minutes, seconds etc.). In earlier version of SQL Server (earlier than 2022), we use multiple functions like DATEADD, DATEDIFF etc. to achieve it.

In SQL Server 2022, a new function namely DATETRUNC() shipped which solved this problem. Now, we can just use DATETRUNC() function to extract date and time till any date and time parts.

In the given below diagram, you can see the different date & time parts which can be easily extracted by DATETRUNC() function.

Example:

Let me demonstrate the functionality of DATETRUNC() function by giving below example.

DECLARE @DateTime DATETIME2
SET @DateTime = '2022-10-27 12:02:31.9033333';
SELECT @DateTime                    AS [Current Date]
      , DATETRUNC(YEAR,@DateTime)   AS [DateTrunc Function]
      ,'Extract Date Till The YEAR' AS [Description]
UNION
SELECT @DateTime                      AS [Current Date]
     , DATETRUNC(QUARTER,@DateTime)   AS [DateTrunc Function]
     ,'Extract Date Till The QUARTER' AS [Description]
UNION
SELECT @DateTime                    AS [Current Date]
     , DATETRUNC(MONTH,@DateTime)   AS [DateTrunc Function]
     ,'Extract Date Till The MONTH' AS [Description]
UNION
SELECT @DateTime                    AS [Current Date]
     , DATETRUNC(WEEK,@DateTime)    AS [DateTrunc Function]
     ,'Extract Date Till The WEEK'  AS [Description]
UNION
SELECT @DateTime                    AS [Current Date]
     , DATETRUNC(DAY,@DateTime)     AS [DateTrunc Function]
     , 'Extract Date Till The DAY'  AS [Description]
UNION
SELECT @DateTime                    AS [Current Date]
     , DATETRUNC(HOUR,@DateTime)    AS [DateTrunc  Function]
     , 'Extract Date Till The HOUR' AS [Description]
UNION
SELECT @DateTime                      AS [Current Date]
      , DATETRUNC(MINUTE,@DateTime)   AS [DateTrunc  Function]
      , 'Extract Date Till The MINUTE'AS [Description]
UNION 
SELECT @DateTime                       AS [Current Date]
      , DATETRUNC(SECOND,@DateTime)    AS [DateTrunc  Function]
      , 'Extract Date Till The SECOND' AS [Description]
UNION
SELECT @DateTime                            AS [Current Date]
      , DATETRUNC(MILLISECOND,@DateTime)    AS [DateTrunc  Function]
      , 'Extract Date Till The MILLISECOND' AS [Description]
UNION
SELECT @DateTime                            AS [Current Date]
      , DATETRUNC(MICROSECOND,@DateTime)    AS [DateTrunc  Function]
      , 'Extract Date Till The MICROSECOND' AS [Description];
GO
--OUTPUT

Conclusion:

I found the DATETRUNC() function very useful; earlier we used multiple functions to extract date and time till whichever time period we needed, but now we can achieve it with the help of this function.

Read Full Post »

SQL Server 2016 shipped with a lot of TSQL Enhancements and one of them is DROP IF EXISTS. It actually minimizes the size of the script which you can use to drop any object (AGGREGATE, ASSEMBLY, COLUMN, CONSTRAINT, DATABASE, DEFAULT, FUNCTION, INDEX, PROCEDURE, ROLE, RULE, SCHEMA, SECURITY POLICY, SEQUENCE, SYNONYM, TABLE, TRIGGER, TYPE, USER, and VIEW). In other words, you DO NOT need to write long IF EXISTS Statements anymore to drop any object.
The beauty of this TSQL is that if it fails (in case, if object does not exist), it DOES NOT give you error message.

Lets me create a sample table to demonstrate how it works but as I mentioned earlier you can use this script to drop any object.

SAMPLE:


USE tempdb
GO
--Create Sample table
CREATE TABLE dbo.tbl_Sample
(
[ID] INT,
[Name] NVARCHAR(50)
)
GO

OLD METHOD:
Given below methods are compatible with SQL Server 2005 and above.

--Method 1
USE tempdb
GO
IF OBJECT_ID('dbo.tbl_Sample', 'U') IS NOT NULL
DROP TABLE dbo.tbl_Sample
GO

--Method 2
USE tempdb
GO
IF EXISTS (SELECT * FROM sys.tables WHERE name = 'tbl_Sample')
DROP TABLE dbo.tbl_Sample
GO

NEW METHOD:
Given below method is compatible with SQL Server 2016 and above.

USE tempdb
GO
DROP TABLE IF EXISTS tbl_Sample;
GO

Reference : MSDN

Read Full Post »

EXECUTE statement failed because its WITH RESULT SETS clause specified a non-nullable type for column #%d in result set #%d, and the corresponding value sent at run time was null is one of the new error messages noticed in SQL Server 2012 and above. This error message is due to the invalid use of new feature EXEC WITH RESULT SETS shipped with SQL Server 2012.

Lets discuss this in detail:
Message Number: 11553

Severity : 16

Error Message: EXECUTE statement failed because its WITH RESULT SETS clause specified a non-nullable type for column #%d in result set #%d, and the corresponding value sent at run time was null.

Error Generation:
Let me create a sample stored procedure to generate this error.

Use AdventureWorks2014
GO
--DROP PROCEDURE usp_Sample
--GO
CREATE PROCEDURE usp_Sample
AS
SELECT  
  [BusinessEntityID]
, [FirstName]
, [MiddleName]
, [LastName]
FROM [HumanResources].vEmployee ORDER BY BusinessEntityID 
GO
EXEC usp_Sample
GO

Error number 11553.1.1

You can see that the above stored procedure is executed successfully and it has ONE result set.

Lets try to execute it using WITH RESULT SETS clause.

USE AdventureWorks2014 
GO
EXEC usp_Sample
WITH RESULT SETS
(
( [BusinessEntityID] int NOT NULL,
  [First Name] Name NOT NULL,
  [MiddleName] Name NOT NULL,
  [LastName] Name NOT NULL
));
GO
--OUTPUT
Msg 11553, Level 16, State 1, Procedure usp_Sample, Line 22
EXECUTE statement failed because its WITH RESULT SETS clause specified a non-nullable type for column #3 in result set #1, and the corresponding value sent at run time was null.

Ooops…… I am unable to execute it properly. It returned the error message.

Error number 11553.1.2

Resolution:
Why this error ? Because, I specifically mentioned in the RESULT SETS that none of the columns should return NULL and I did not realize that stored procedures return some NULL values in the middle name column and due to this I got this error. So, when you mention any column as a NOT NULL in RESULT SETS, please make sure that the stored procedure must NOT return NULL VALUE for that particular column. Lets re-write the RESULT SET and this time we need to mention, middle name column is NULL as shown below.

USE AdventureWorks2014 
GO
EXEC usp_Sample
WITH RESULT SETS
(
( [BusinessEntityID] int NOT NULL,
  [First Name] Name NOT NULL,
  [MiddleName] Name NULL,
  [LastName] Name NOT NULL
));
GO
--OUTPUT

Error number 11553.1.3

Conclusion :
Remember, whenever you use any stored procedure using WITH RESULT SETS clause, along with the nullable type, make sure that the data that comes from stored procedure should match with the nullable type. In other words, if you define any column in RESULT SETS clause as NOT NULL column then make sure that stored procedure MUST NOT return NULL value in that particular column to avoid such errors.

Read Full Post »

Resource Governor is one of the best features shipped with SQL Server 2008. We use this feature to handle SQL Server workload and resource allocation. However, if you go into further details of this feature, you will be shocked to see the level of control it gives you to control over CPU, memory on the basis of incoming requests from the application/user etc. But I have been hearing a very common QUESTION since SQL Server 2008 and that is, can we control physical IO using resource governor and the ANSWER is YES, you can do it in SQL SERVER 2014 & Above. But How ?

In SQL Server 2014, we have an additional control in resource governor namely CONTROL PHYSICAL IO. In other words, if you would like to restrict a user/application to use limited physical IO, you can restrict it with this additional control. You can implement this additional control in resource governor by just setting up two options which is MIN_IOPS_PER_VOLUME & MAX_IOPS_PER_VOLUME.

Let me demonstrate how to control physical IO in SQL Server 2014 step by step.

Step 1:
First of all, lets create a pool as usual and restrict its MAX_IOPS_PER_VOLUME limit to 50 ONLY, which means that whatever set of users / applications will be used, this pool cannot exceed 50 Physical IO.

USE master
GO
--DROP RESOURCE POOL Sample_Pool_Restrict_IO;
--GO
CREATE RESOURCE POOL Sample_Pool_Restrict_IO WITH
(
MAX_IOPS_PER_VOLUME = 50,
MIN_IOPS_PER_VOLUME = 1
);
GO

Step 2:
Once we created the pool, lets create the workload group. This is also a usual step while configuring resource governor.

USE master
GO
--DROP WORKLOAD GROUP Sample_Workload_Group_Restrict_IO
--GO
CREATE WORKLOAD GROUP Sample_Workload_Group_Restrict_IO
USING Sample_Pool_Restrict_IO;
GO

Step 3:
Let’s, create a test user, later on I will demonstrate how resource governor will restrict physical IO for this test user.

USE master
GO
CREATE LOGIN dba WITH PASSWORD = 'imran.1234@';
GO
ALTER SERVER ROLE [sysadmin] ADD MEMBER [dba]
GO

Step 4:
Create a classifier function and define if the above created user is the current user. Then classifier will assign the restricted IO workload group to this user. Then each time this user tries to use physical IO, it  CAN’T go beyond 50. SQL Server will restrict this user up to 50.

USE MASTER;
GO
--DROP FUNCTION dbo.fnIOClassifier
GO
CREATE FUNCTION dbo.fnIOClassifier()
RETURNS SYSNAME WITH SCHEMABINDING
AS
BEGIN
DECLARE @GroupName SYSNAME
IF SUSER_NAME() = 'dba'
BEGIN
SET @GroupName = 'Sample_Workload_Group_Restrict_IO'
END
ELSE
BEGIN
SET @GroupName = 'default'
END
RETURN @GroupName;
END
GO

Step 5:
Let’s assign the classifier function (created in the above step) to resource governor and reconfigure the resource governor to implement new settings.

USE master;
GO
ALTER RESOURCE GOVERNOR WITH (CLASSIFIER_FUNCTION = dbo.fnIOClassifier);
ALTER RESOURCE GOVERNOR RECONFIGURE;
GO

Step 6:
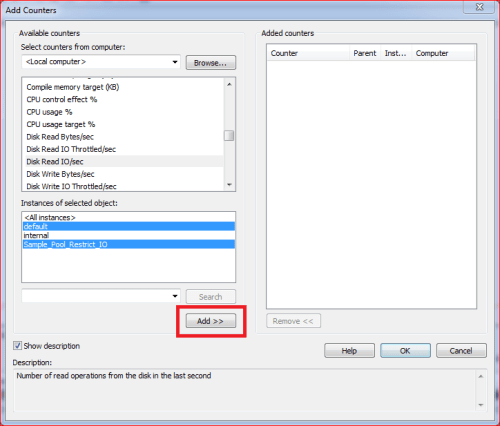
Now, we are ready to test the new feature (Control Physical IO). To test the feature, let’s open performance monitor, add counter and then select resource pool stats object, further select Disk read IO/sec and add default and custom Pool (Sample_Pool_Restrict_IO) created in step 1 and press ADD BUTTON as shown below.

Resource Governor 1.0

Step 7:
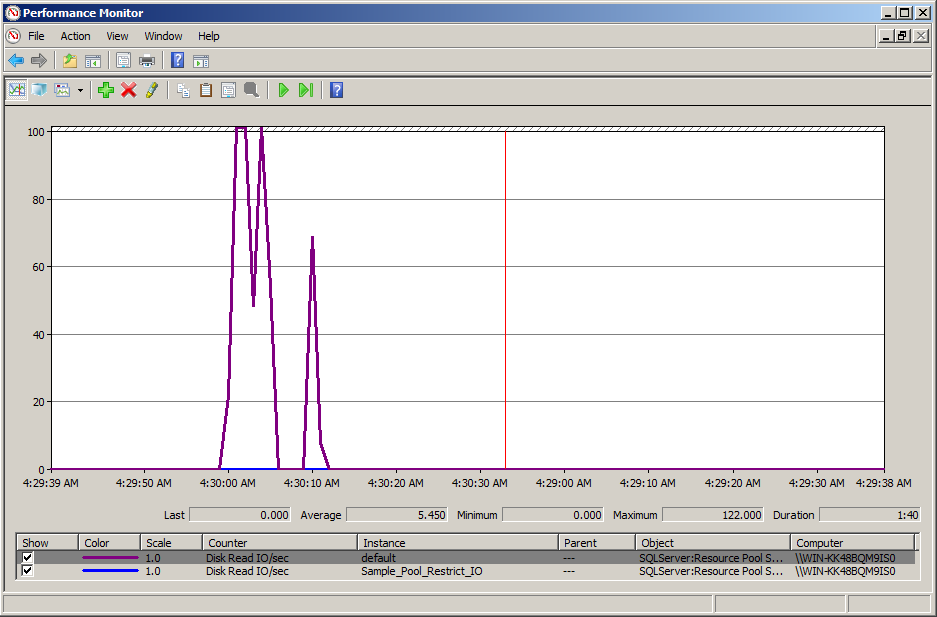
Now, we setup performance monitor to test the physical IO control feature via resource governor. Lets login with any user except the one created in step 3 and run the given below script and view the results in performance monitor. In my case, I logged in with sa and executed the script.

USE AdventureWorks2014
GO
DBCC DROPCLEANBUFFERS
GO
EXEC sp_MSforeachtable 'SELECT * FROM ?'
GO

Resource Governor 1.1

Note: In the above results, you can easily view that the DISK READ IO/SEC reached the maximum of 122 and it may go far from it as well because we did not restrict DISK READ IO/SEC for sa user.

Step 8:
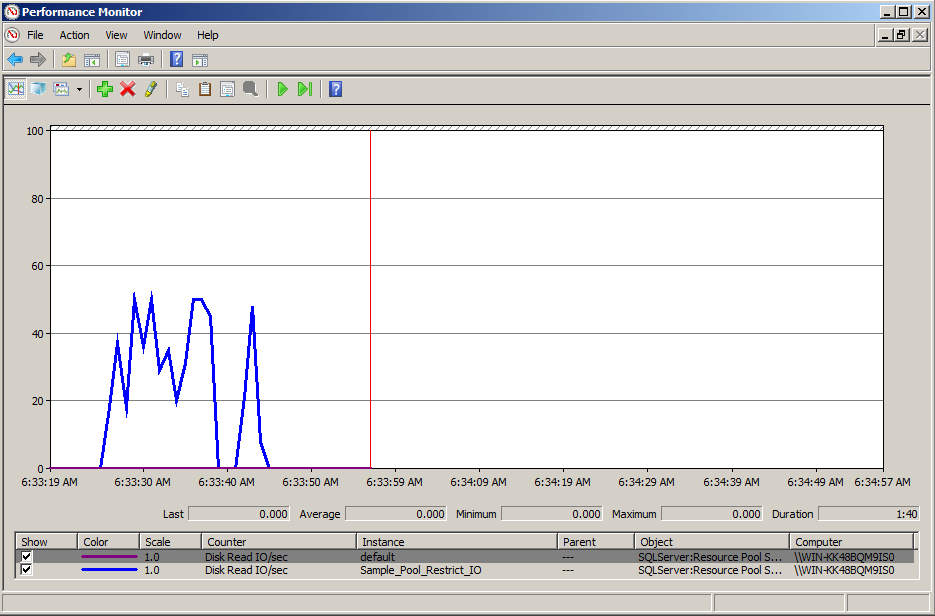
This time lets login with ‘dba’ user which we created in step 3 and execute the same script which we executed in the above step.

USE AdventureWorks2014
GO
DBCC DROPCLEANBUFFERS
GO
EXEC sp_MSforeachtable 'SELECT * FROM ?'
GO

Resource Governor 1.2

Note: In the above results, you can easily view that the DISK READ IO/SEC reached the maximum of 50 and why is it not going beyond 50 is because dba user has been restricted by resource governor using physical IO control feature.

Conclusion:
As you can see above that this feature really gives DBA’s more control on physical IO and it would be very handy for the DBA’s where they have serious problems with I/O which can be from users / applications.

Read Full Post »

Earlier, I have written a blog post about how to split a single row data into multiple rows using XQuery. Today, I came across a situation where I had to split a single column data into multiple columns using delimiter.

Lets me create a sample to demonstrate the solution.

Sample :

USE TEMPDB
GO
DROP TABLE [dbo].[tbl_Employee]
GO
CREATE TABLE [dbo].[tbl_Employee](
[Employee ID] INT IDENTITY(1,1) ,
[Employee Name] VARCHAR (100) NOT NULL)
GO
INSERT INTO dbo.[tbl_Employee] ([Employee Name])
VALUES ('Andreas Berglund T')
GO
INSERT INTO dbo.[tbl_Employee] ([Employee Name])
VALUES ('Sootha Charncherngkha T')
GO
INSERT INTO dbo.[tbl_Employee] ([Employee Name])
VALUES ('Peng Wu')
GO

--Browse the data
SELECT * FROM dbo.[tbl_Employee]
GO

Split single column into multiple columns.1.0

Solution :
Given below is the solution, where we need to convert the column into xml and then split it into multiple columns using delimiter. You can use any delimiter in the given below solution. In my sample, I used a blank space as a delimiter to split column into multiple columns.

USE TEMPDB
GO

DECLARE @delimiter VARCHAR(50)
SET @delimiter=' '  -- <=== Here, you can change the delimiter.
;WITH CTE AS
(
SELECT
[Employee ID],
[Employee Name],
CAST('' + REPLACE([Employee Name], @delimiter , '') + '' AS XML)
AS [Employee Name XML]
FROM  [tbl_Employee]
)
SELECT
[Employee ID],
[Employee Name],
[Employee Name XML].value('/M[1]', 'varchar(50)') As [First Name],
[Employee Name XML].value('/M[2]', 'varchar(50)') As [Last Name],
[Employee Name XML].value('/M[3]', 'varchar(50)') As [Middle Name]

FROM CTE
GO

Split single column into multiple columns.1.1

Let me know if you come across this situation and its solution.

Read Full Post »

« Newer Posts - Older Posts »