Feeds:
Posts
Comments

Archive for the ‘Solutions’ Category

In my earlier article, I explained, how to RESTORE the backup from URL using T-SQL and it was quite simple & easy to understand. In this article, I will explain how to how to RESTORE the backup from URL using SQL Server Management Studio (SSMS). It would be the same configuration but with the different screens & steps.

Pre-Requisite :

  1. Microsoft Azure – How to create storage and container
  2. SQL SERVER 2014 – How to take backup to URL (Windows Azure Storage) – SSMS

Let me now demonstrate in few easy steps how to RESTORE backup from URL.

Step 1 – Create Account, storage & container :
First of all you need to create a windows Azure account, a storage and a container as explained in this article.

Step 2 – Create Credential :
Once you have the details of Azure account, you need to create the credential using given below script. But if you notice, this script requires two parameters namely IDENTITY & SECRET. So how will I get them? Actually IDENTITY is the storage name that we created in the Pre-Requisite article -1 (Step 4) namely ‘raresql‘ and SECRET is the primary access key that we also picked up in the Pre-Requisite article -1 (Step 5). Lets create a credential.

Note: Please skip this step if you have already created the credentials.

USE master
GO
CREATE CREDENTIAL [My_Credential]
WITH IDENTITY ='raresql'
,SECRET = '/ByNUTZqJ6EcJR/VQcNmNj+zSu++iCfbcxlyWye6Ok9uY3L5nw3XkndmAnDjiKn'
GO

Step 3 – Open Windows Azure Storage dialogue box :
Once you created the credentials, the next step is to right click on the particular database you want to restore the back up and select tasks, further you need to select Restore and Database … as shown below.

How to take backup to URL (Windows Azure Storage) - SSMS.1.1

Step 4 – Connect to Windows Azure Storage :
Now, SSMS opened the Connect Windows Azure Storage dialogue box, here you need to enter storage account (Pre-Requisite article -1 (Step 4)), account key (Pre-Requisite article -1 (Step 5)) & select / create the credentials. As we have already created the credentials in the above step, we will just select the credentials and click on Connect button as shown below.

How to take backup to URL (Windows Azure Storage) - SSMS.1.2

Step 5 – RESTORE the backup from URL :
Once you click on the Connect button, it will authenticate your account with Azure, once it will be authenticated, it will open the restore dialogue box and shows your back up. Now, you can select the back and restore it as shown below.

How to take backup to URL (Windows Azure Storage) - SSMS.1.3

How to take backup to URL (Windows Azure Storage) - SSMS.1.4

How to take backup to URL (Windows Azure Storage) - SSMS.1.5

As you can see, the messages show that your backup has been restored successfully.

Read Full Post »

In my earlier articles, I explained, how to take SQL Server backup to URL using T-SQL, SQL Server Management Studio (SSMS) & PowerShell. In this article, I will explain how to RESTORE the backup from URL using T-SQL.

Pre-Requisite :

  1. Microsoft Azure – How to create storage and container
  2. SQL SERVER 2014 – How to take backup to URL (Windows Azure Storage) – TSQL

Let me now demonstrate in few easy steps how to RESTORE backup from URL.

Step 1 – Create Account, storage & container :
First of all you need to create a windows Azure account, a storage and a container as explained in this article.

Step 2 – Create Credential :
Once you have the details, you need to create the credential using given below script. But if you notice, this script requires two parameters namely IDENTITY & SECRET. So how will I get them? Actually IDENTITY is the storage name that we created in the Pre-Requisite article -1 (Step 4) namely ‘raresql‘ and SECRET is the primary access key that we also picked up in the Pre-Requisite article -1 (Step 5). Lets create a credential.

Note: Please skip this step if you have already created the credentials.

USE master
GO
CREATE CREDENTIAL [My_Credential]
WITH IDENTITY ='raresql'
,SECRET = '/ByNUTZqJ6EcJR/VQcNmNj+zSu++iCfbcxlyWye6Ok9uY3L5nw3XkndmAnDjiKn'
GO

Step 3 – RESTORE the backup from URL :
Once you created the credential, lets RESTORE the backup on URL using given below script, which requires two parameters, one is credential that we created in the above step and the second is the URL of the backup that we created in the Pre-Requisite article -2 (Step 3).

Note: Before proceeding with the Backup restore, kindly log in to your Azure account and verify the existence of the backup which URL you will mention in the below script.

USE [master]
ALTER DATABASE [AdventureWorks2012] SET SINGLE_USER WITH ROLLBACK IMMEDIATE
RESTORE DATABASE [AdventureWorks2012] FROM  URL = N'https://raresql.blob.core.windows.net/sql-backup/AdventureWorks2012_25_Dec_2014.bak'
WITH  CREDENTIAL = N'My_Credential'
,  FILE = 1,  NOUNLOAD,  STATS = 5
ALTER DATABASE [AdventureWorks2012] SET MULTI_USER
GO
--OUTPUT

How to RESTORE backup from URL (Windows Azure Storage) - TSQL

As you can see, the messages show that your backup has been restored successfully.

Read Full Post »

SQL Server backup to URL is a new feature shipped with SQL Server 2014. I explained how to take backup via SSMS (SQL Server Management Studio) in my earlier article. Today,  I will demonstrate how to take SQL Server backup to URL via PowerShell.

Pre-Requisite :

Let me now demonstrate in few easy steps how to take backup to URL via PowerShell.

Step 1 – Create Account, storage & container :
First of all, you need to create a windows Azure account, a storage and a container as explained in this article.

Step 2 – Take backup to URL :
Once you created the the Azure account, a storage and container, you can take a backup on URL using given below script. In this script, first of all I declared the variables , then created credentials. After that take the backup as shown below. Rest of the script is self explanatory. Make sure that you have downloaded PowerShell Extensions for SQL Server in case you are using Windows PowerShell ISE instead of Windows PowerShell.


#Import sql module
Import-Module sqlps

#Create & set variables
$serverPath = "SQLSERVER:\SQL\WIN-KK48BQM9IS0\DEFAULT"
$storageAccount = "raresql"
$storageKey = "/ByNUTZqJ6EcJR/VQcNmNj+zSu++iCfbcxlyWye6Ok9uhsd5jsd62sjhsd7ksdh7sksdsdlhsd4bsdhsd52ksd=="
$secureString = convertto-securestring $storageKey -asplaintext -force
$credentialName = "My_Credential"

# Create Credentials
New-sqlcredential -Name $credentialName -Identity $storageAccount -Secret $secureString

# Set SQL Server instance Path
CD $serverPath

# Set the backup file name
$backupFile = "https://raresql.blob.core.windows.net/sql-backup/AdventureWorks2012_25_Dec_2014.bak"

# Take Backup Database to URL
Backup-SqlDatabase -Database "AdventureWorks2012" -backupFile $backupFile -SqlCredential $credentialName -CompressionOption On

How to take backup to URL (Windows Azure Storage) - PowerShell.1.2

How to take backup to URL (Windows Azure Storage) - PowerShell1.3

Step 3 – Verify backup to URL :
Lets go to the container inside the storage and check if the backup is available there or NOT because we saw the confirmation report in the above step.

How to take backup to URL (Windows Azure Storage) - PowerShell.1.1

Now, you can see above that your backup is available on Azure, what you have taken in the above step.

Read Full Post »

In my earlier article, I explained how to take SQL Server backup to URL in SQL Server 2014 using T-SQL. In this article, I will explain how to take SQL Server backup to URL using SQL Server Management Studio (SSMS).

Pre-Requisite :

Let me demonstrate in few easy steps how to take backup to URL using SSMS.

Step 1 – Create Account, storage & container :
First of all, you need to create a windows Azure account, a storage and a container as explained in this article. This step is mandatory to move forward.

Step 2 – Download Publishing Profile :
Once you have the details, you need to download the publishing profile. We will use this publishing profile in the next step to create credentials. Given below is the URL that will take you to your Microsoft Azure account, and once you log in your account, it will download the publishing profile having extension of .publishsettings.

Step 3 – Open Backup dialogue Box :
The next step is to take the backup of any database on Microsoft Azure. In order to do it, first of all select that database, right click on it, go to tasks and further select backup as shown below. This is the same procedure we follow to take the traditional backup.

SQL Server Back to Azure using SSMS.1..1

Step 4 – Open Credential Dialogue box :
Once you selected the backup option, it will open the backup dialogue box. Here, you need to select the Back up to is URL. Here you see few backup options but for now you need to ignore these options and create credentials. Click the Create credential button as shown below.

SQL Server Back to Azure using SSMS.1.3

Step 5 – Create Credential :
Now, you are in the credential creation screen, here you need to BROWSE the file which you have downloaded in Step 2. Then SELECT the CERTIFICATE, it will automatically populate the STORAGE(s) after AZURE account verification. Then you need to select the STORAGE. Once you are done with all selections, you need to give a NAME to the credential and press Create button.

Note : If you have already created the credentials, you do not need to follow this step.

SQL Server Back to Azure using SSMS.1.4

Step 6 – Setup Backup options :
Once you created the credential, you will revert to back up dialogue box and your created credential will be selected automatically. Now you need to enter the FILE NAME of the backup as well as the AZURE STORAGE CONTAINER NAME that we have created in earlier article at Step 9 as shown below. Press OK button.

SQL Server Back to Azure using SSMS.1.5

Step 7 – Back Up in Progress :
Once you pressed OK button, the back up operation will start, however as compared to local, this back up operation will be slow. Be patient and wait for it to finish the operation as shown below.

SQL Server Back to Azure using SSMS.1.6

SQL Server Back to Azure using SSMS.1.7

SQL Server Back to Azure using SSMS.1.8

Step 8 – Verify backup to URL :
The back up is done now, lets go to the container inside the storage in Windows Azure and check if the backup is available there or NOT because we saw the confirmation report in the above step.

SQL Server Back to Azure using SSMS.1.9

As you can see above, the Back up is available in Azure. Isn’t it cool 😉 ?

Read Full Post »

SQL Server backup to URL is a new feature shipped with SQL Server 2014. Now, you do not need to manage backup tapes, tape drives, storage etc etc. All you need to do is to create a Windows Azure account, a storage and a container, remaining stuff Azure will handle your backup 😉

Pre-Requisite :

Let me now demonstrate in few easy steps how to take backup to URL.

Step 1 – Create Account, storage & container :
First of all you need to create a windows Azure account, a storage and a container as explained in this article.

Step 2 – Create Credential :
Once you have the details, you need to create the credential using given below script. But if you notice, this script requires two parameters namely  IDENTITY & SECRET. So how will I get them? Actually IDENTITY is the storage name that we created in the previous article (Step 4) namely ‘raresql‘ and SECRET is the primary access key that we also picked up in the previous article (Step 5). Lets create a credential.

USE master
GO
CREATE CREDENTIAL [My_Credential]
WITH IDENTITY ='raresql'
,SECRET = '/ByNUTZqJ6EcJR/VQcNmNj+zSu++iCfbcxlyWye6Ok9uY3L5nw3XkndmAnDjiKn'
GO

Step 3 – Take backup to URL :
Once you created the credential, lets take a backup on URL using given below script, which requires two parameters, one is credential that we created in the above step and the second is the URL that we created in the previous article (Step 10).

BACKUP DATABASE AdventureWorks2012
TO URL = 'https://raresql.blob.core.windows.net/sql-backup/AdventureWorks2012.bak'
WITH CREDENTIAL = 'My_Credential'
,STATS = 5;
GO
--OUTPUT

How to  take backup to URL.1.1

Step 4 – Verify backup to URL :
Lets go to the container inside the storage and check if the backup is available there or NOT. Because, we saw the confirmation report in the above step.

How to  take backup to URL.1.2

I am sure, you will be more than excited to try this solution, as this will eliminate your headache of maintaining the tape, its drives and last but not the least, its issues.

Read Full Post »

Recently, I came across a situation, where I had to place my SQL Server back on Microsoft Azure. Before placing the backup on Azure, there are some pre-requisites required, for example a valid account, a storage and a container on Azure. Given below is a step by step approach,  demonstrating how to create them using simple steps.

Step 1 :
First of all, you need to create a Microsoft Azure account (It is free for one month ONLY, however it asks the credit card details for verification ONLY).

Free tial account of Azure.1.1

Step 2 :
Once you create the account and Sign in to Microsoft Azure, you will be in the Microsoft Azure portal as shown below. Here you can see a lot of different exciting features, however, you need to select storage to create a NEW storage.

Azure Storage 1.2

Step 3 :
Now you are in the storage screen and Azure is showing that you have no storage because you have a new account, so you should create a storage as shown below. If you already have a storage you can utilize it.

create storage 1.3

Step 4 :
Once you click on the new storage account, Azure will take you to the storage creation screen and require a unique URL name that you can reference later. You should leave the remaining info as it is and click on create storage account button at the bottom as shown below. In my case I named the storage as ‘raresql‘.

create storage 1.4

Once your storage has been created, it would look like this :

create storage 1.4.1png

Step 5 :
Now, you have created the storage. The next step is to take the access keys that you require later to keep anything in this particular storage. In order to get the access keys, you need to click on the manage access keys button as shown below.

Azure Storage 1.5.2

Once you click on manage access keys, it will show the storage name, primary and secondary access keys.

Azure Storage 1.5.3

Step 6 :
The next step is to create the container, where you can keep your backups. Just click on raresql (storage)  in order to create container as shown below.

Azure Storage 1.5

Step 7 :

Once you click on the storage, it will take the storage dashboard and you will find a lot of exciting features here as well, however, you just need to select the container tab as shown below.

Azure Storage 1.5.1

Step 8 :
Once you click on the container tab, it will take you to the container creation screen as shown below. Here you need to click on create a container to proceed.

Azure Storage 1.6

Step 9 :
Once you click on create a container button, it will pop up the container creation screen. Here you need to enter the container name and its security and click the tick button at the right bottom. By default the security is private as shown below.

Azure Storage 1.7

Step 10 :
Once you click the tick, your container will be created as shown below. However, please make a note of your container name and its URL. This will help you to reference your container back.

Azure Storage 1.8

Let me know your comments if you face any problem during the creation of storage and container.

Read Full Post »

Recently, I was developing a report for one of my customers, who migrated their database from SQL Server 2005 to SQL Server 2012 Enterprise Edition. The database belongs to a legacy system , so I found couple of conversion issues, however the major issue I faced in developing the report was the date format. The required date format was Mon-yyyy and the data available in the table was in the format of yyyymm.

Before proceeding with the solution, let me create a sample to demonstrate the problem.

USE tempdb
GO
DROP TABLE tbl_Sample
GO
CREATE TABLE tbl_Sample
(
[ID] INT,
[Date] varchar(6)
)
GO
INSERT INTO tbl_Sample VALUES (1,'201401')
INSERT INTO tbl_Sample VALUES (2,'201402')
INSERT INTO tbl_Sample VALUES (3,'201403')
INSERT INTO tbl_Sample VALUES (4,'201404')
INSERT INTO tbl_Sample VALUES (5,'201405')
INSERT INTO tbl_Sample VALUES (6,'201406')
INSERT INTO tbl_Sample VALUES (7,'201407')
INSERT INTO tbl_Sample VALUES (8,'201408')
INSERT INTO tbl_Sample VALUES (9,'201409')
INSERT INTO tbl_Sample VALUES (10,'201410')
INSERT INTO tbl_Sample VALUES (11,'201411')
INSERT INTO tbl_Sample VALUES (12,'201412')
GO
SELECT * FROM tbl_Sample
GO

Convert YYYYmm 1.1

Solution 1 : Traditional Method
This is the old traditional method, which is compatible with SQL Server 2005 and above. In this method, you need to use many functions (LEFT, DATENAME, CONVERT, YEAR) to convert yyyymm date format to Mon-yyyy. Given below is the script.

USE tempdb
GO
SELECT
LEFT(DATENAME(MM,CONVERT(DATE,[Date]+'01')),3)
+ '-'
+ CONVERT(VARCHAR(4),YEAR(CONVERT(DATE,[Date]+'01'))) As [Mon-Year]
FROM tbl_Sample
GO

Convert YYYYmm 1.2

Solution 2 : New Method
This is the new method, which is compatible with SQL Server 2012 and above. In this script, I will use a newly shipped (in SQL Server 2012) function namely Format to reduce the line of script in order to convert yyyymm to Mon-yyyy. Given below is the script.

USE tempdb
GO
SELECT FORMAT(CONVERT(DATE,[Date]+'01'),'MMM-yyyy') As [Mon-Year]
FROM tbl_Sample
GO

Convert YYYYmm 1.2

Read Full Post »

Conversion of Select statement result set into Insert statement is a very frequent activity that a DBA/Developer needs to create, mostly when they need to migrate small amount of data from one instance to another or from one environment to another. I recently created one of my customer’s new branch database from other branches database and came across this scenario. Fortunately, we do have a solution since SQL Server 2005 but it was very complicated specially when you need to do it for the tables as they have numerous columns. The reason I am writing this solution is that you can do it in few clicks in SQL Server 2012 and above.
Before proceeding with the solution, I would like to create a sample to demonstrate the solution.

Sample :
Given below is a select statement in which I modified the result set to demonstrate.

USE [AdventureWorks2012]
GO
SELECT [DepartmentID]
,[Name] + ' Department' As [Name]
,[GroupName]
,Getdate() As [ModifiedDate]
FROM [HumanResources].[Department]
GO

Convert select.1.1

Given below are the two solutions, one of them is traditional solution and another one you can use it in SQL Server 2012 and above.

Solution 1 : Using String concatenation (Traditional Method)
In this solution, you need to concatenate the result set of the Select statement in order to convert into Insert statement (with some modifications in the data). You need to make sure that single quotes(‘) are in proper locations. In addition, if the data in the result set does not belong to string data type you must convert into string data type to concatenate. In case, the table is having identity column, you must pass the column name in the INSERT STATEMENT as well with SET IDENTITY_INSERT. The reason why I DO NOT recommend this solution is because if you have more number of columns in the table, it takes more time for the development and debug as well.

USE [AdventureWorks2012]
GO
SELECT
'INSERT INTO tbl_sample (
[DepartmentID],[Name],[GroupName],[ModifiedDate])
VALUES(' + CONVERT(VARCHAR(50),[DepartmentID])
+ ',''' + [Name] + ' Department'' ,'
+ ''''+ [GroupName] + ''','
+ ''''+ CONVERT(VARCHAR(50),GETDATE(),120) + ''')'
FROM [HumanResources].[Department]
GO

Convert select.1.2

Solution 2 : Using Generate Script (New Method)
This method is applicable to SQL Server 2012 and above and you will find it quite simple. Let me explain this method using two simple steps.

Step 1 :
First of all, you need to develop a select statement like I did it in the sample based on your requirements and INSERT INTO A TABLE as shown below.

USE [AdventureWorks2012]
GO
SELECT [DepartmentID]
,[Name] + ' Department' As [Name]
,[GroupName]
,Getdate() As [ModifiedDate]
INTO [tbl_Department_Sample]  -- Result set inserted in a table
FROM [HumanResources].[Department]
GO

Convert select.1.3

Step 2 :
Your select statement result set has been inserted into the table([tbl_Department_Sample]). Now, you just need to generate the script (data only) of the table ([tbl_Department_Sample]) using Generate Script feature in SQL Server 2012 and above.

Let me know if you come across these scenarios and their solutions.

Read Full Post »

Database mail is one of the best features shipped in SQL Server 2005. It allows us to send mails without writing even a single line of script. However, there is a general perception that you must have your own mail server to configure Database Mail in the SQL Server and frankly speaking, to configure a mail server,  a good amount of expertise is required. Due to the lack of expertise in mail server configuration in new bie of SQL Server, they usually avoid learning, testing and implementing this nice feature.

However, one of the benefits of SQL Server Database mail is that,  it is NOT mandatory that you must have your own mail server, you can easily configure, test and implement it on any FREE mail servers like Gmail, Yahoo & Hotmail etc. and it is just a  matter of few clicks.

In this article, I will demonstrate step by step how to configure & test SQL Server database mail using Gmail, Yahoo & Hotmail accounts.
Before proceeding with the configuration, please make sure that you HAVE a valid email account in any of the FREE mail servers.

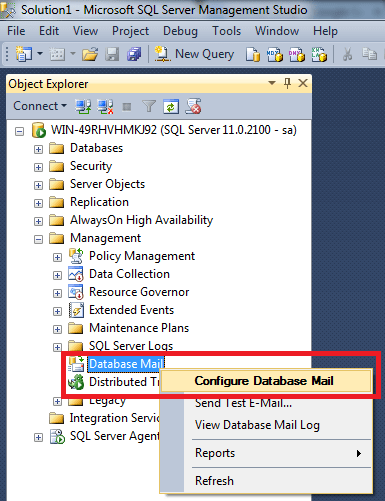
STEP 1  – Navigate to Database Mail:
First of all, you need to open SQL Server Management Studio (SSMS) and select Object Explorer followed by Management node and then Database Mail as shown below.

SQL Server Mail.0.1

STEP 2 – Configure Database Mail:
Once you select Database Mail, just right click on it and select Configure Database Mail as shown below.

SQL Server Mail.0.2

STEP 3  – Welcome Screen:
Now, you are in welcome screen. This screen tells you all about Database Mail. However, you can check “skip the page in the future” in order to avoid this screen next time. Just Press NEXT button to proceed as shown below.
SQL Server Mail.1.1

STEP 4 – Configuration Task:
Next step is to create a new profile and then you can add multiple Email accounts in it in the later steps. In order to create a new profile you should select Option 1 (Set up Database Mail by performing the following tasks ) and press NEXT button as shown below.

SQL Server Mail.1.2

STEP 5 – Enable Database Mail Feature:
Once you press Next button in the above step, it may ask you to Enable the Database Mail feature. It happens only when you configure the database mail for the first time. Click Yes and then Press NEXT to proceed.

SQL Server Mail.1.2.1

STEP 6 – Profile Creation:
Once you enable the database mail, it will take you to the profile creation screen, where you can create a new profile as shown below. In this screen you can enter a unique profile name and a description (NOT mandatory), which is just an explanation to your profile. Once you are done with this information, just click Add button in order to add an Email account in the profile.

SQL Server Mail.1.3

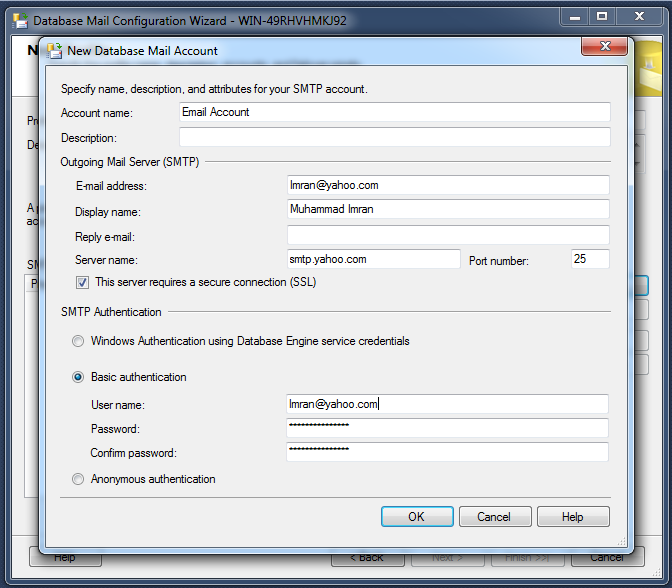
STEP 7 – Mail Account Creation:
Now you are in the Email account creation screen as shown below. You should be very careful to enter the data in this screen because your one typo mistake will STOP Database mail to send any email. The most important data that you must enter in this screen is its Server name (Actually SMTP Server name). In addition, you can use the Port No 25 but sometimes this port is blocked in your network. If you come across this situation, you can change the port number from 25 to 587.

Given below are the SMTP addresses of the FREE mail accounts.

  • Yahoo : smtp.mail.yahoo.com
  • Gmail : smtp.gmail.com
  • Hotmail : smtp.live.com

Below are the configurations for each mail account, however, you will use one/all of them. In addition, you need to make sure that your email credentials IS correct.

Yahoo account configuration :

SQL Server Mail.1.5

Gmail account configuration :

SQL Server Mail.1.4

Hotmail account configuration :

SQL Server Mail.1.4.2

STEP 8 – Profile Verification:
Once you are done with the email account press OK button and it will take you back to the profile screen and it adds the email account, you just configured it in STEP 7 in the profile as shown below. Press NEXT button to proceed.

SQL Server Mail.1.6

STEP 9 – Profile Security:
Now you entered into the manager profile security screen, you need to be very careful when configuring profile security. However, for testing purpose you can make it Public and default profile as well, as shown below and Press NEXT button.

SQL Server Mail.1.7
STEP 10 – System Parameters:
This screen will show the configuration of system parameters as shown below, you just need to press NEXT button to proceed.

SQL Server Mail.1.8

STEP 11  – Completion:
Now, you are in the database Mail complete wizard, this screen will show you a summary of all your configuration, if you find any mistake even in this step, you can press BACK button and correct. However, if each and every configuration is correct, press FINISH button to complete the database mail configurations.

SQL Server Mail.1.9

STEP 12 – Status:
Once you press FINISH button in the above step, it will show you the status of the database mail configuration as shown below. It can be either be a success or a failure.

SQL Server Mail.1.10

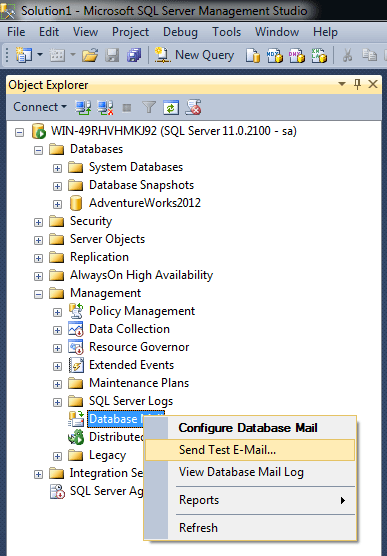
STEP 13  – Browse Send Test Email:
Lets test the database mail whether it is working fine or not. You need to again select the Database email and right click on it to further select the Send Test E-Mail.. as shown below.

SQL Server Mail.1.11
STEP 14 – Send Test Email:
Once you select the Send Test E-Mail.., it opens a test email creation screen, where you will find your default profile to be selected. You just need to type any valid email address in the  To where you want to send a test mail. In addition, you can change the subject and body as well and press the Send Test E-Mail button. The moment you press this button, you will receive (Depends upon the server configuration) the test email in that defined email address from your Gmail, Yahoo or Hotmail account whichever you configured above in the selected profile.

SQL Server Mail.1.12

Let me know if you configured Database and faced any particular issue in setting it up.

Read Full Post »

How to delete recent connection from Connect to Server window in SSMS is a very common issue and it becomes frustrated if you connect many servers on daily basis and SQL Server Management Studio (SSMS) pile up all the new server names in the list of Connect to Server window as shown below.

list of connection.1.1

I have been facing this common problem since SQL Server 2005 and it has been reported on Connect as well. Fortunately we do have a solution explained in this article that demonstrate step by step how to delete the recent connection list using mru.dat and SqlStudio.bin in SQL Server 2005  and SQL Server 2008 respectively. However, this is NOT smart solutions because it deletes all your recent connections including the active ones as well.

In SQL Server 2012, a proper solution came in the picture and I believe, this is much better than the earlier solution. Let me demonstrate it step by step.

Step 1 :
In order to open “Connect to Server” window, first of all you need to select file menu and click on connect object explorer.. in SSMS as shown below.

list of connection.1.3

Step 2 :
Once you open the Connect to Server window, you will find all recent connections in the server name as shown below but the drawback is you cannot determine what belongs to SQL Authentication and what to Windows.

list of connection.1.1

Step 3 :
Now, you need to eliminate the connection. In order to do it, you need to select the particular connection and press DELETE button from the keyboard. Once you press delete button, it will delete that particular connection but it will remain as selected in the server name dropdown list as shown below. If you need to delete multiple connections, you need to select server one by one and press delete button to delete  it,  as multiple selection is NOT allowed.

list of connection.1.2

Let me know if you come across this scenario and how did you resolve it.

Read Full Post »

« Newer Posts - Older Posts »