Feeds:
Posts
Comments

2014 in review

The WordPress.com stats helper monkeys prepared a 2014 annual report for this blog.

Here’s an excerpt:

The Louvre Museum has 8.5 million visitors per year. This blog was viewed about 370,000 times in 2014. If it were an exhibit at the Louvre Museum, it would take about 16 days for that many people to see it.

Click here to see the complete report.

In my earlier articles, I explained, how to take SQL Server backup to URL using T-SQL, SQL Server Management Studio (SSMS) & PowerShell. In this article, I will explain how to RESTORE the backup from URL using T-SQL.

Pre-Requisite :

  1. Microsoft Azure – How to create storage and container
  2. SQL SERVER 2014 – How to take backup to URL (Windows Azure Storage) – TSQL

Let me now demonstrate in few easy steps how to RESTORE backup from URL.

Step 1 – Create Account, storage & container :
First of all you need to create a windows Azure account, a storage and a container as explained in this article.

Step 2 – Create Credential :
Once you have the details, you need to create the credential using given below script. But if you notice, this script requires two parameters namely IDENTITY & SECRET. So how will I get them? Actually IDENTITY is the storage name that we created in the Pre-Requisite article -1 (Step 4) namely ‘raresql‘ and SECRET is the primary access key that we also picked up in the Pre-Requisite article -1 (Step 5). Lets create a credential.

Note: Please skip this step if you have already created the credentials.

USE master
GO
CREATE CREDENTIAL [My_Credential]
WITH IDENTITY ='raresql'
,SECRET = '/ByNUTZqJ6EcJR/VQcNmNj+zSu++iCfbcxlyWye6Ok9uY3L5nw3XkndmAnDjiKn'
GO

Step 3 – RESTORE the backup from URL :
Once you created the credential, lets RESTORE the backup on URL using given below script, which requires two parameters, one is credential that we created in the above step and the second is the URL of the backup that we created in the Pre-Requisite article -2 (Step 3).

Note: Before proceeding with the Backup restore, kindly log in to your Azure account and verify the existence of the backup which URL you will mention in the below script.

USE [master]
ALTER DATABASE [AdventureWorks2012] SET SINGLE_USER WITH ROLLBACK IMMEDIATE
RESTORE DATABASE [AdventureWorks2012] FROM  URL = N'https://raresql.blob.core.windows.net/sql-backup/AdventureWorks2012_25_Dec_2014.bak'
WITH  CREDENTIAL = N'My_Credential'
,  FILE = 1,  NOUNLOAD,  STATS = 5
ALTER DATABASE [AdventureWorks2012] SET MULTI_USER
GO
--OUTPUT

How to RESTORE backup from URL (Windows Azure Storage) - TSQL

As you can see, the messages show that your backup has been restored successfully.

SQL Server backup to URL is a new feature shipped with SQL Server 2014. I explained how to take backup via SSMS (SQL Server Management Studio) in my earlier article. Today,  I will demonstrate how to take SQL Server backup to URL via PowerShell.

Pre-Requisite :

Let me now demonstrate in few easy steps how to take backup to URL via PowerShell.

Step 1 – Create Account, storage & container :
First of all, you need to create a windows Azure account, a storage and a container as explained in this article.

Step 2 – Take backup to URL :
Once you created the the Azure account, a storage and container, you can take a backup on URL using given below script. In this script, first of all I declared the variables , then created credentials. After that take the backup as shown below. Rest of the script is self explanatory. Make sure that you have downloaded PowerShell Extensions for SQL Server in case you are using Windows PowerShell ISE instead of Windows PowerShell.


#Import sql module
Import-Module sqlps

#Create & set variables
$serverPath = "SQLSERVER:\SQL\WIN-KK48BQM9IS0\DEFAULT"
$storageAccount = "raresql"
$storageKey = "/ByNUTZqJ6EcJR/VQcNmNj+zSu++iCfbcxlyWye6Ok9uhsd5jsd62sjhsd7ksdh7sksdsdlhsd4bsdhsd52ksd=="
$secureString = convertto-securestring $storageKey -asplaintext -force
$credentialName = "My_Credential"

# Create Credentials
New-sqlcredential -Name $credentialName -Identity $storageAccount -Secret $secureString

# Set SQL Server instance Path
CD $serverPath

# Set the backup file name
$backupFile = "https://raresql.blob.core.windows.net/sql-backup/AdventureWorks2012_25_Dec_2014.bak"

# Take Backup Database to URL
Backup-SqlDatabase -Database "AdventureWorks2012" -backupFile $backupFile -SqlCredential $credentialName -CompressionOption On

How to take backup to URL (Windows Azure Storage) - PowerShell.1.2

How to take backup to URL (Windows Azure Storage) - PowerShell1.3

Step 3 – Verify backup to URL :
Lets go to the container inside the storage and check if the backup is available there or NOT because we saw the confirmation report in the above step.

How to take backup to URL (Windows Azure Storage) - PowerShell.1.1

Now, you can see above that your backup is available on Azure, what you have taken in the above step.

In my earlier article, I explained how to take SQL Server backup to URL in SQL Server 2014 using T-SQL. In this article, I will explain how to take SQL Server backup to URL using SQL Server Management Studio (SSMS).

Pre-Requisite :

Let me demonstrate in few easy steps how to take backup to URL using SSMS.

Step 1 – Create Account, storage & container :
First of all, you need to create a windows Azure account, a storage and a container as explained in this article. This step is mandatory to move forward.

Step 2 – Download Publishing Profile :
Once you have the details, you need to download the publishing profile. We will use this publishing profile in the next step to create credentials. Given below is the URL that will take you to your Microsoft Azure account, and once you log in your account, it will download the publishing profile having extension of .publishsettings.

Step 3 – Open Backup dialogue Box :
The next step is to take the backup of any database on Microsoft Azure. In order to do it, first of all select that database, right click on it, go to tasks and further select backup as shown below. This is the same procedure we follow to take the traditional backup.

SQL Server Back to Azure using SSMS.1..1

Step 4 – Open Credential Dialogue box :
Once you selected the backup option, it will open the backup dialogue box. Here, you need to select the Back up to is URL. Here you see few backup options but for now you need to ignore these options and create credentials. Click the Create credential button as shown below.

SQL Server Back to Azure using SSMS.1.3

Step 5 – Create Credential :
Now, you are in the credential creation screen, here you need to BROWSE the file which you have downloaded in Step 2. Then SELECT the CERTIFICATE, it will automatically populate the STORAGE(s) after AZURE account verification. Then you need to select the STORAGE. Once you are done with all selections, you need to give a NAME to the credential and press Create button.

Note : If you have already created the credentials, you do not need to follow this step.

SQL Server Back to Azure using SSMS.1.4

Step 6 – Setup Backup options :
Once you created the credential, you will revert to back up dialogue box and your created credential will be selected automatically. Now you need to enter the FILE NAME of the backup as well as the AZURE STORAGE CONTAINER NAME that we have created in earlier article at Step 9 as shown below. Press OK button.

SQL Server Back to Azure using SSMS.1.5

Step 7 – Back Up in Progress :
Once you pressed OK button, the back up operation will start, however as compared to local, this back up operation will be slow. Be patient and wait for it to finish the operation as shown below.

SQL Server Back to Azure using SSMS.1.6

SQL Server Back to Azure using SSMS.1.7

SQL Server Back to Azure using SSMS.1.8

Step 8 – Verify backup to URL :
The back up is done now, lets go to the container inside the storage in Windows Azure and check if the backup is available there or NOT because we saw the confirmation report in the above step.

SQL Server Back to Azure using SSMS.1.9

As you can see above, the Back up is available in Azure. Isn’t it cool 😉 ?

SQL Server backup to URL is a new feature shipped with SQL Server 2014. Now, you do not need to manage backup tapes, tape drives, storage etc etc. All you need to do is to create a Windows Azure account, a storage and a container, remaining stuff Azure will handle your backup 😉

Pre-Requisite :

Let me now demonstrate in few easy steps how to take backup to URL.

Step 1 – Create Account, storage & container :
First of all you need to create a windows Azure account, a storage and a container as explained in this article.

Step 2 – Create Credential :
Once you have the details, you need to create the credential using given below script. But if you notice, this script requires two parameters namely  IDENTITY & SECRET. So how will I get them? Actually IDENTITY is the storage name that we created in the previous article (Step 4) namely ‘raresql‘ and SECRET is the primary access key that we also picked up in the previous article (Step 5). Lets create a credential.

USE master
GO
CREATE CREDENTIAL [My_Credential]
WITH IDENTITY ='raresql'
,SECRET = '/ByNUTZqJ6EcJR/VQcNmNj+zSu++iCfbcxlyWye6Ok9uY3L5nw3XkndmAnDjiKn'
GO

Step 3 – Take backup to URL :
Once you created the credential, lets take a backup on URL using given below script, which requires two parameters, one is credential that we created in the above step and the second is the URL that we created in the previous article (Step 10).

BACKUP DATABASE AdventureWorks2012
TO URL = 'https://raresql.blob.core.windows.net/sql-backup/AdventureWorks2012.bak'
WITH CREDENTIAL = 'My_Credential'
,STATS = 5;
GO
--OUTPUT

How to  take backup to URL.1.1

Step 4 – Verify backup to URL :
Lets go to the container inside the storage and check if the backup is available there or NOT. Because, we saw the confirmation report in the above step.

How to  take backup to URL.1.2

I am sure, you will be more than excited to try this solution, as this will eliminate your headache of maintaining the tape, its drives and last but not the least, its issues.

Recently, I came across a situation, where I had to place my SQL Server back on Microsoft Azure. Before placing the backup on Azure, there are some pre-requisites required, for example a valid account, a storage and a container on Azure. Given below is a step by step approach,  demonstrating how to create them using simple steps.

Step 1 :
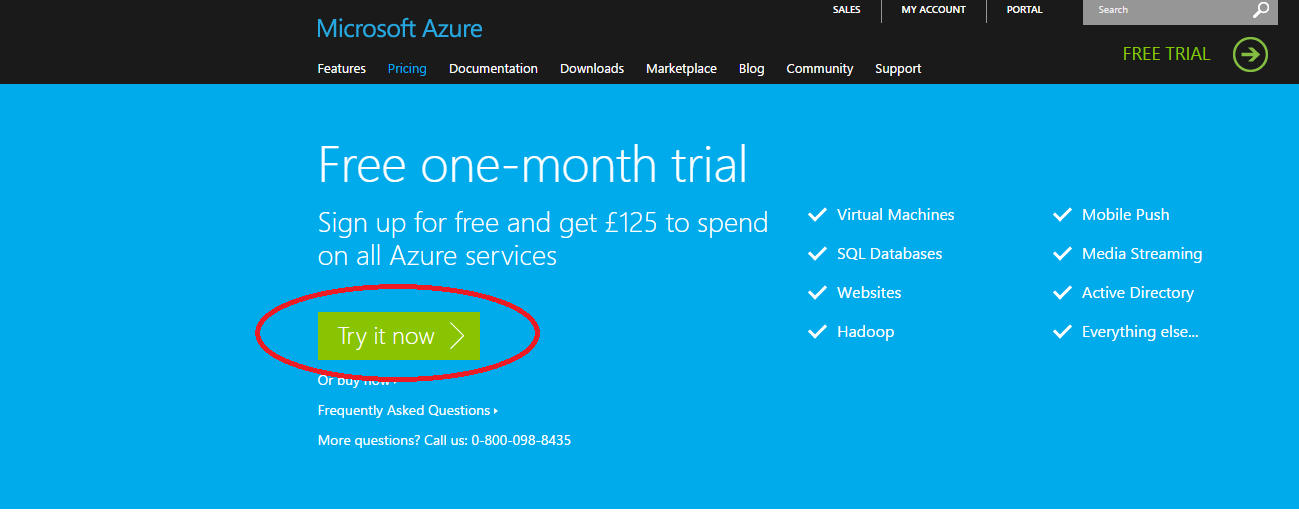
First of all, you need to create a Microsoft Azure account (It is free for one month ONLY, however it asks the credit card details for verification ONLY).

Free tial account of Azure.1.1

Step 2 :
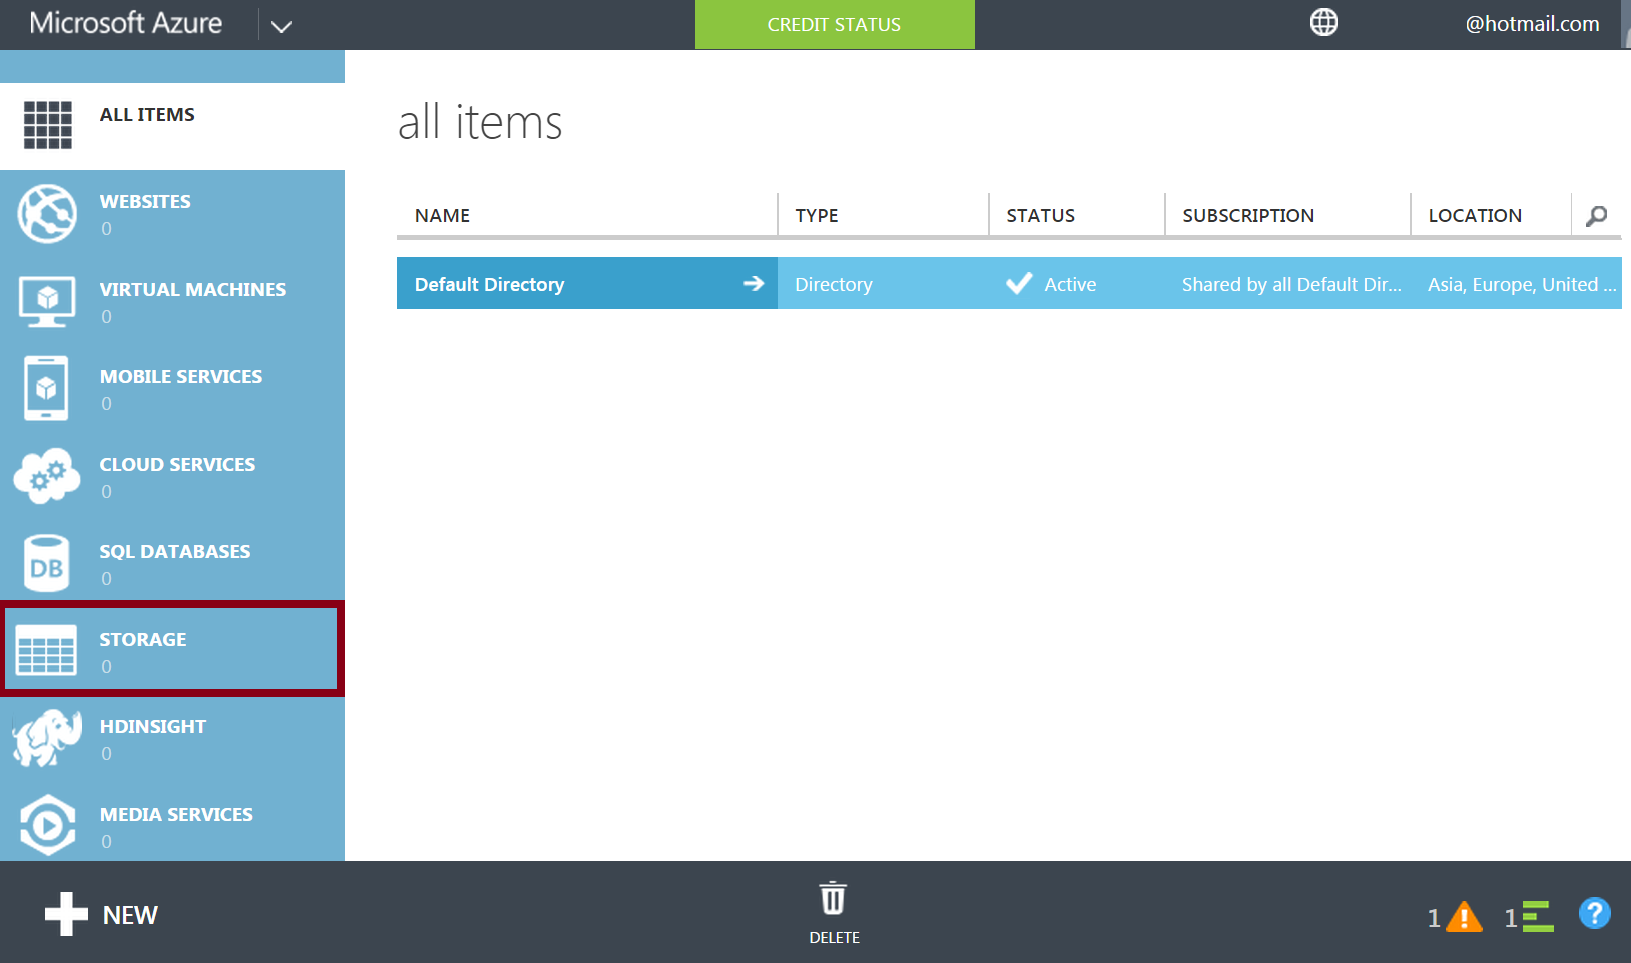
Once you create the account and Sign in to Microsoft Azure, you will be in the Microsoft Azure portal as shown below. Here you can see a lot of different exciting features, however, you need to select storage to create a NEW storage.

Azure Storage 1.2

Step 3 :
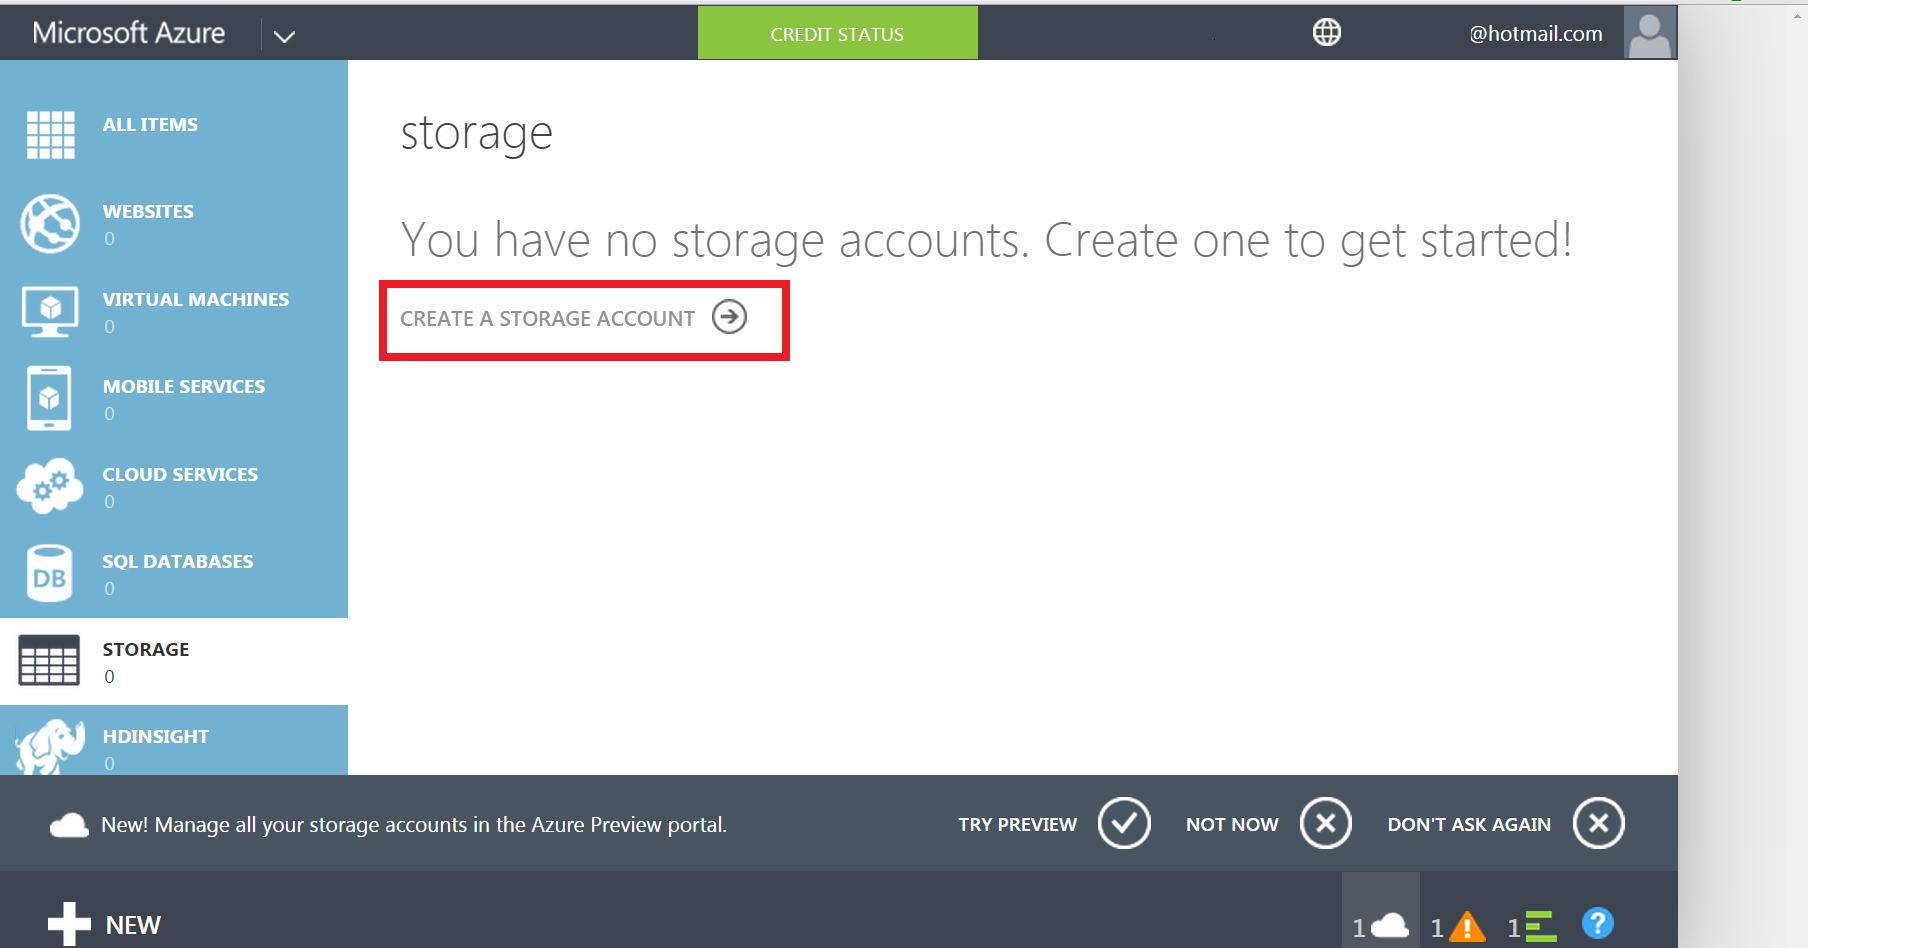
Now you are in the storage screen and Azure is showing that you have no storage because you have a new account, so you should create a storage as shown below. If you already have a storage you can utilize it.

create storage 1.3

Step 4 :
Once you click on the new storage account, Azure will take you to the storage creation screen and require a unique URL name that you can reference later. You should leave the remaining info as it is and click on create storage account button at the bottom as shown below. In my case I named the storage as ‘raresql‘.

create storage 1.4

Once your storage has been created, it would look like this :

create storage 1.4.1png

Step 5 :
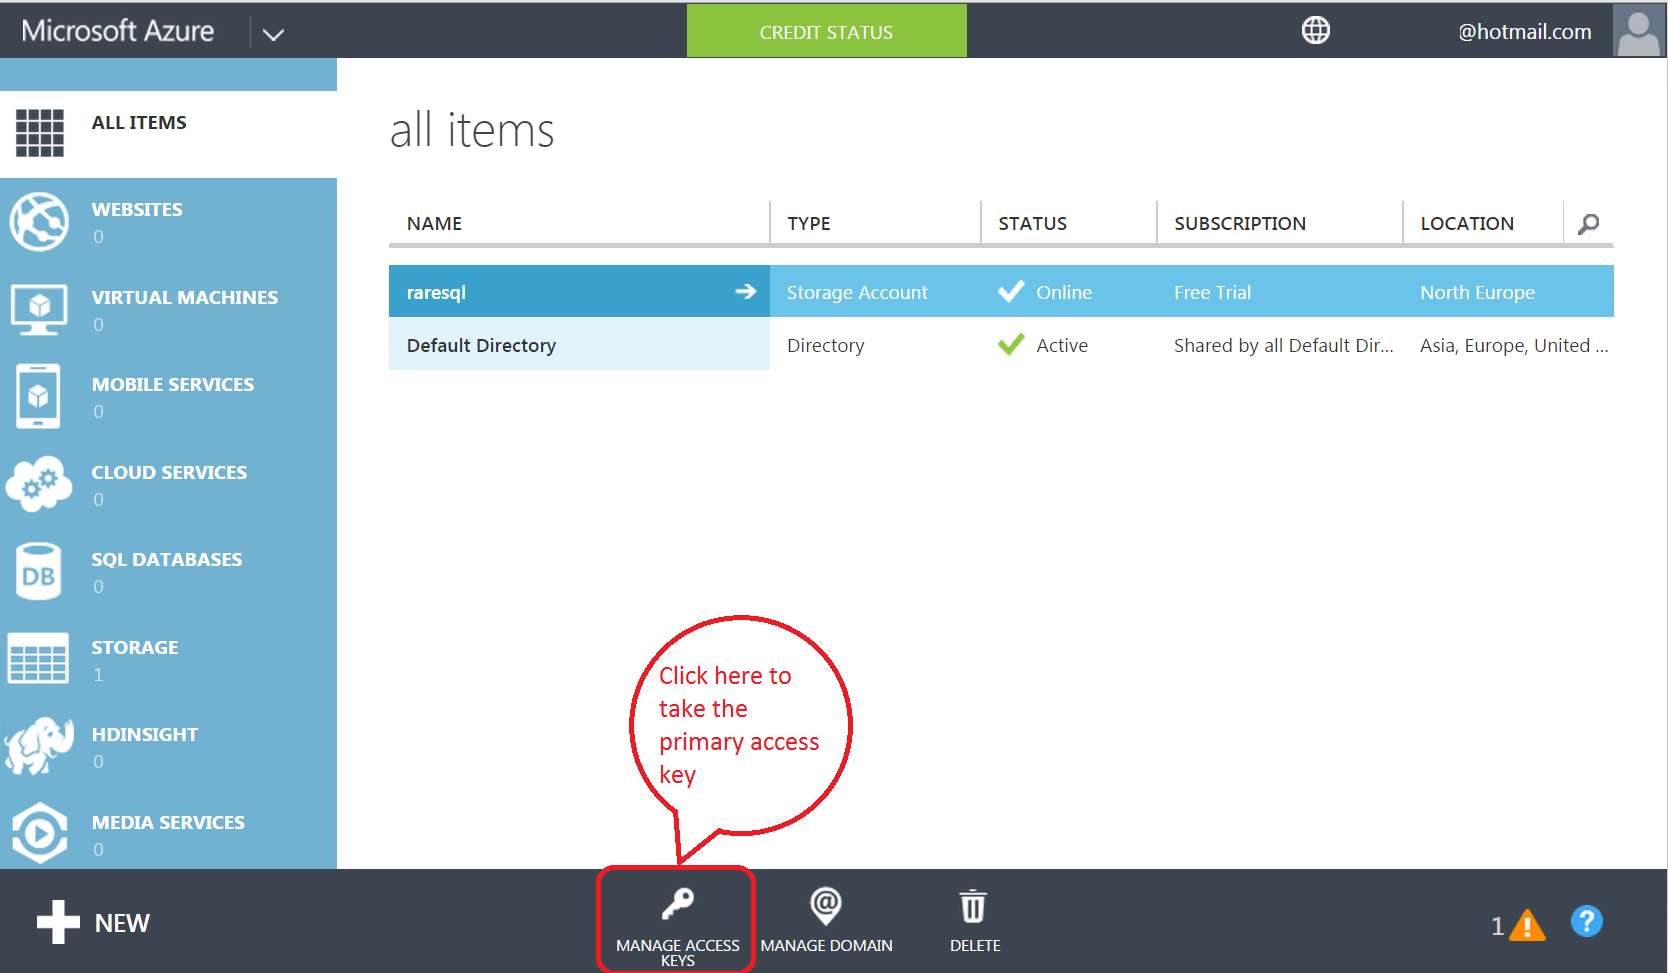
Now, you have created the storage. The next step is to take the access keys that you require later to keep anything in this particular storage. In order to get the access keys, you need to click on the manage access keys button as shown below.

Azure Storage 1.5.2

Once you click on manage access keys, it will show the storage name, primary and secondary access keys.
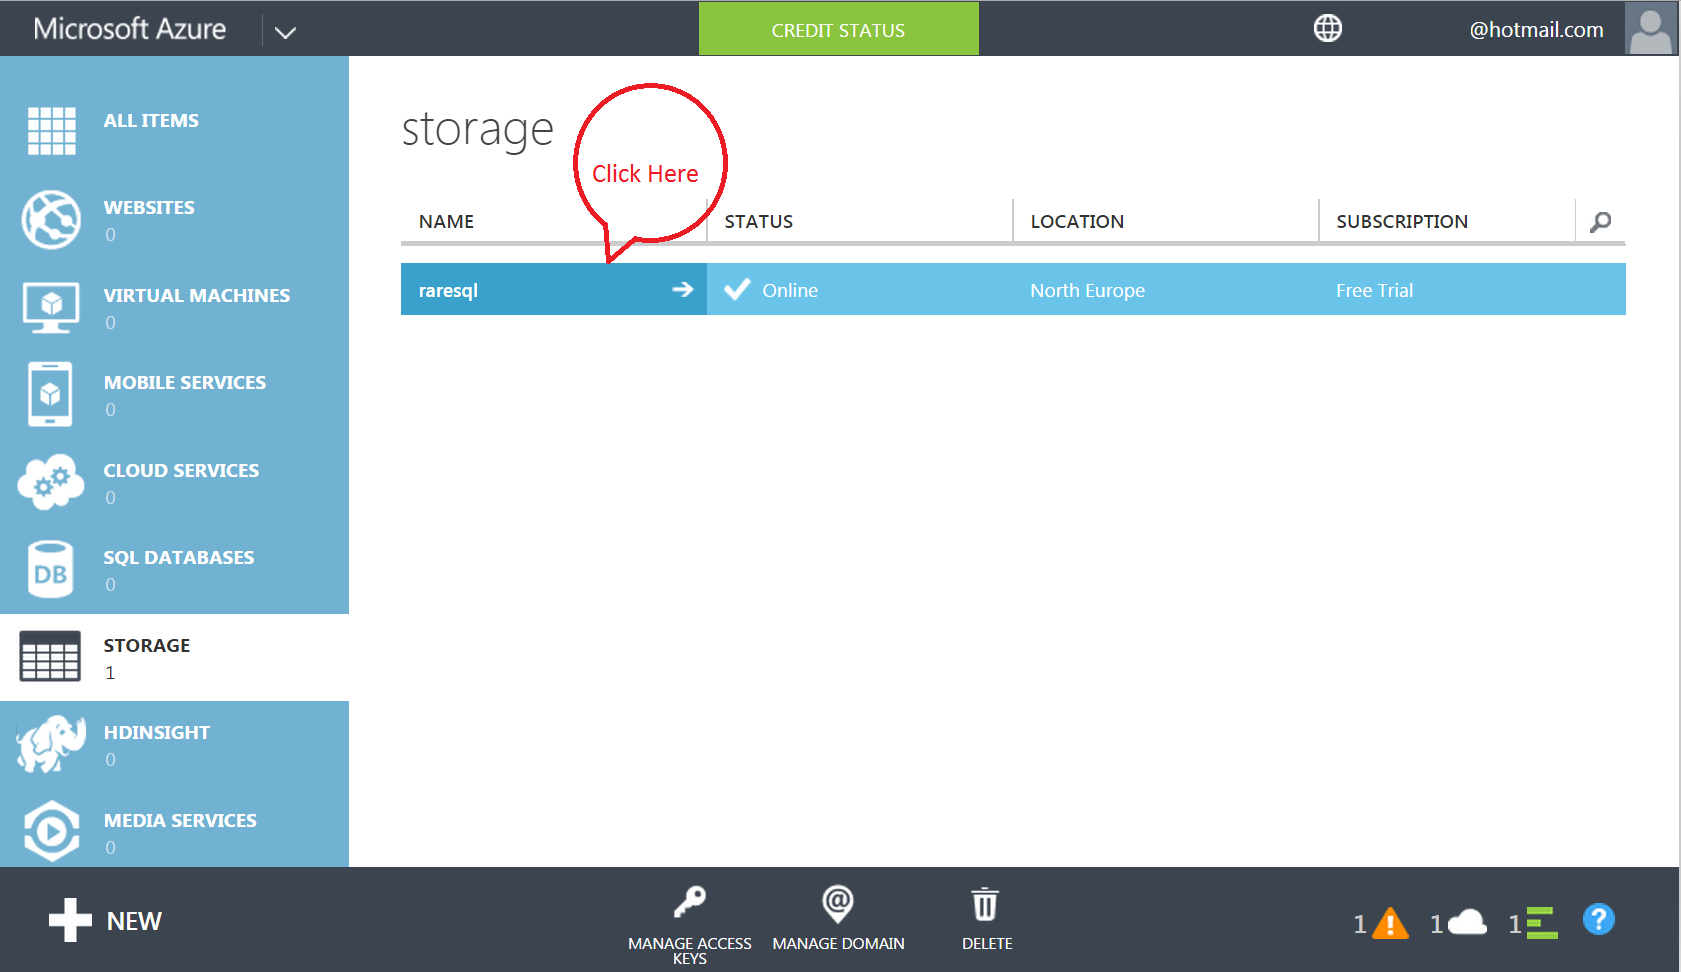
Azure Storage 1.5.3

Step 6 :
The next step is to create the container, where you can keep your backups. Just click on raresql (storage)  in order to create container as shown below.
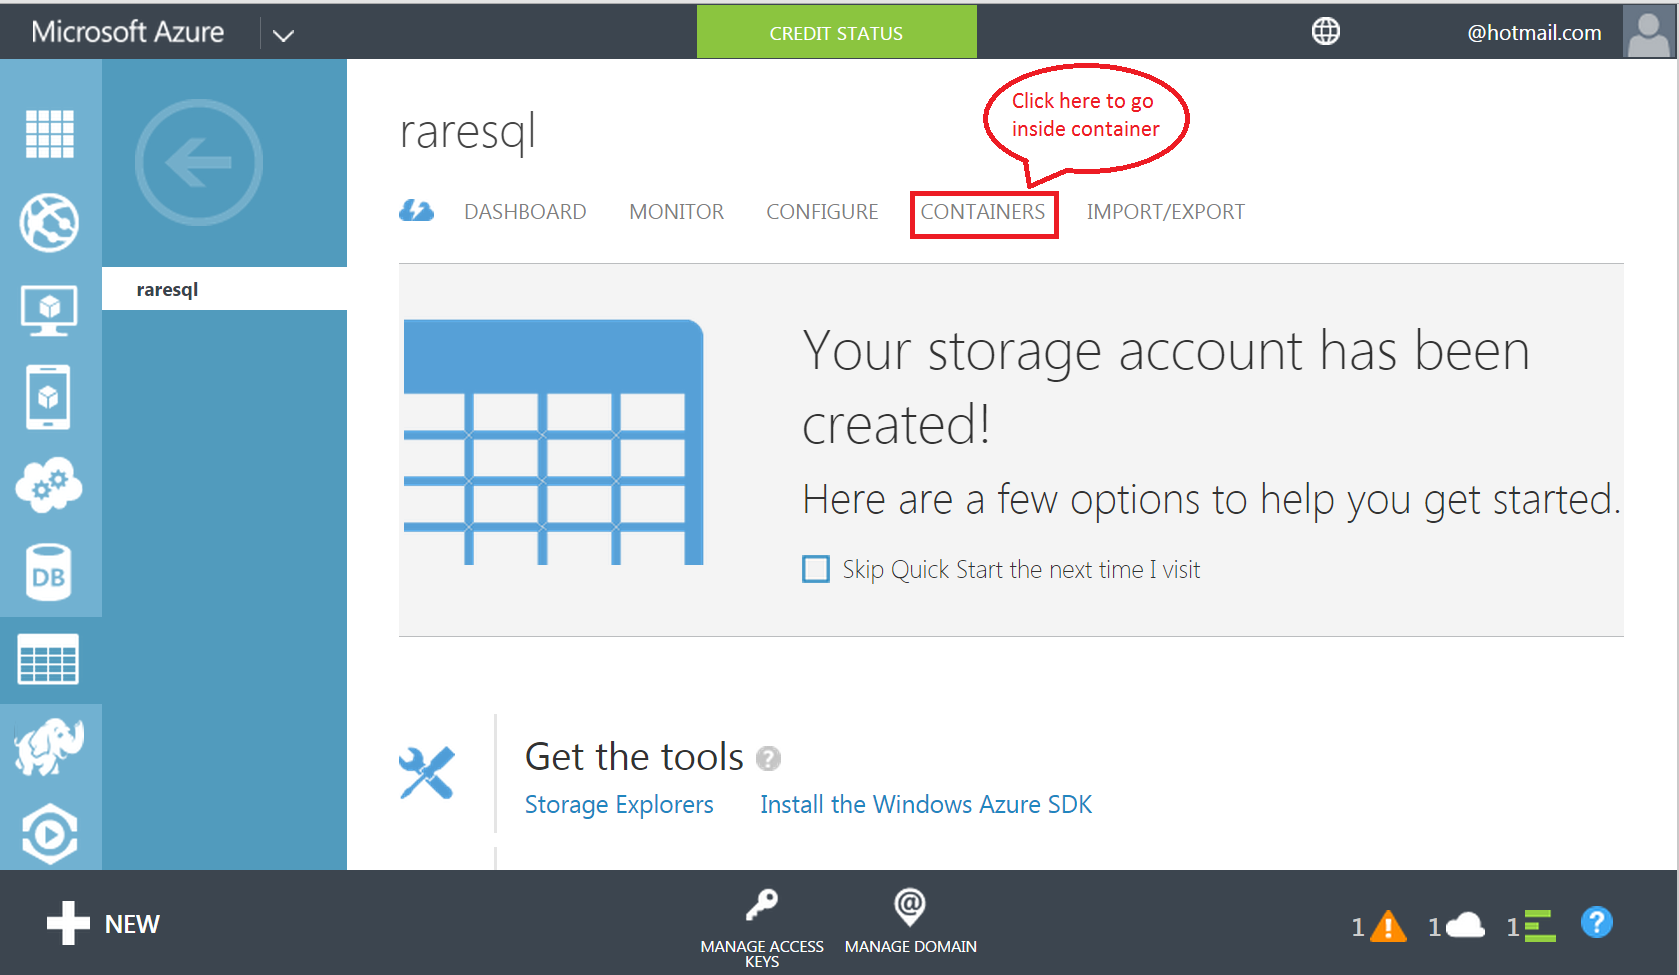
Azure Storage 1.5

Step 7 :

Once you click on the storage, it will take the storage dashboard and you will find a lot of exciting features here as well, however, you just need to select the container tab as shown below.

Azure Storage 1.5.1

Step 8 :
Once you click on the container tab, it will take you to the container creation screen as shown below. Here you need to click on create a container to proceed.
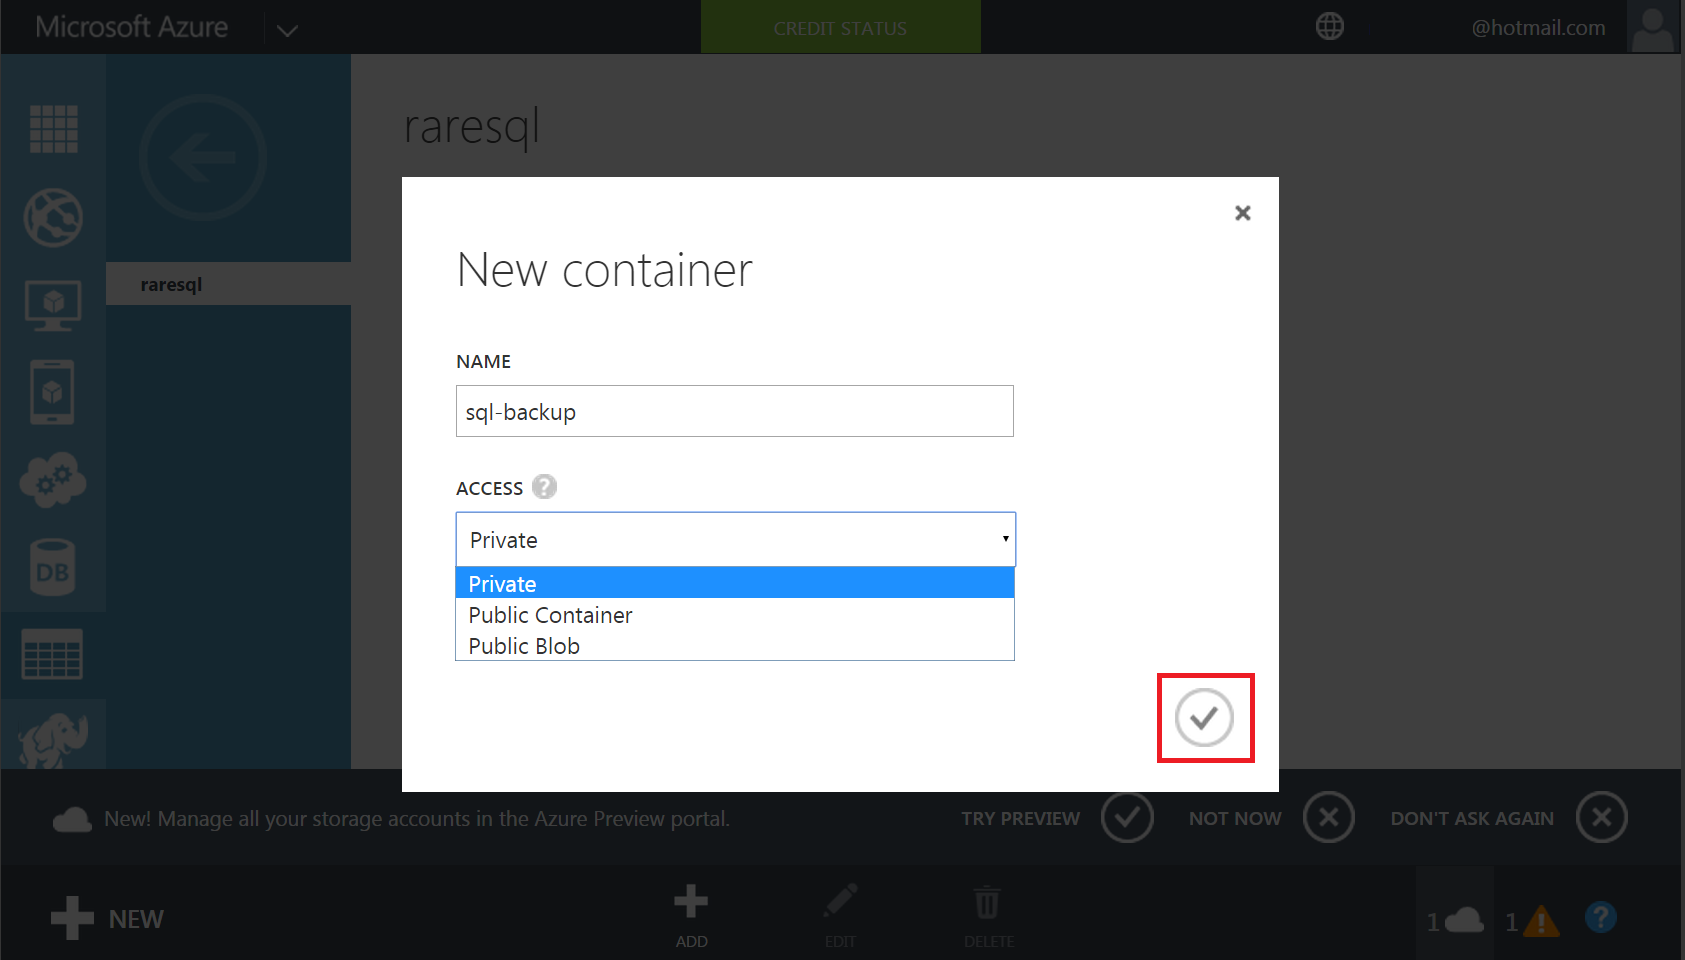
Azure Storage 1.6

Step 9 :
Once you click on create a container button, it will pop up the container creation screen. Here you need to enter the container name and its security and click the tick button at the right bottom. By default the security is private as shown below.
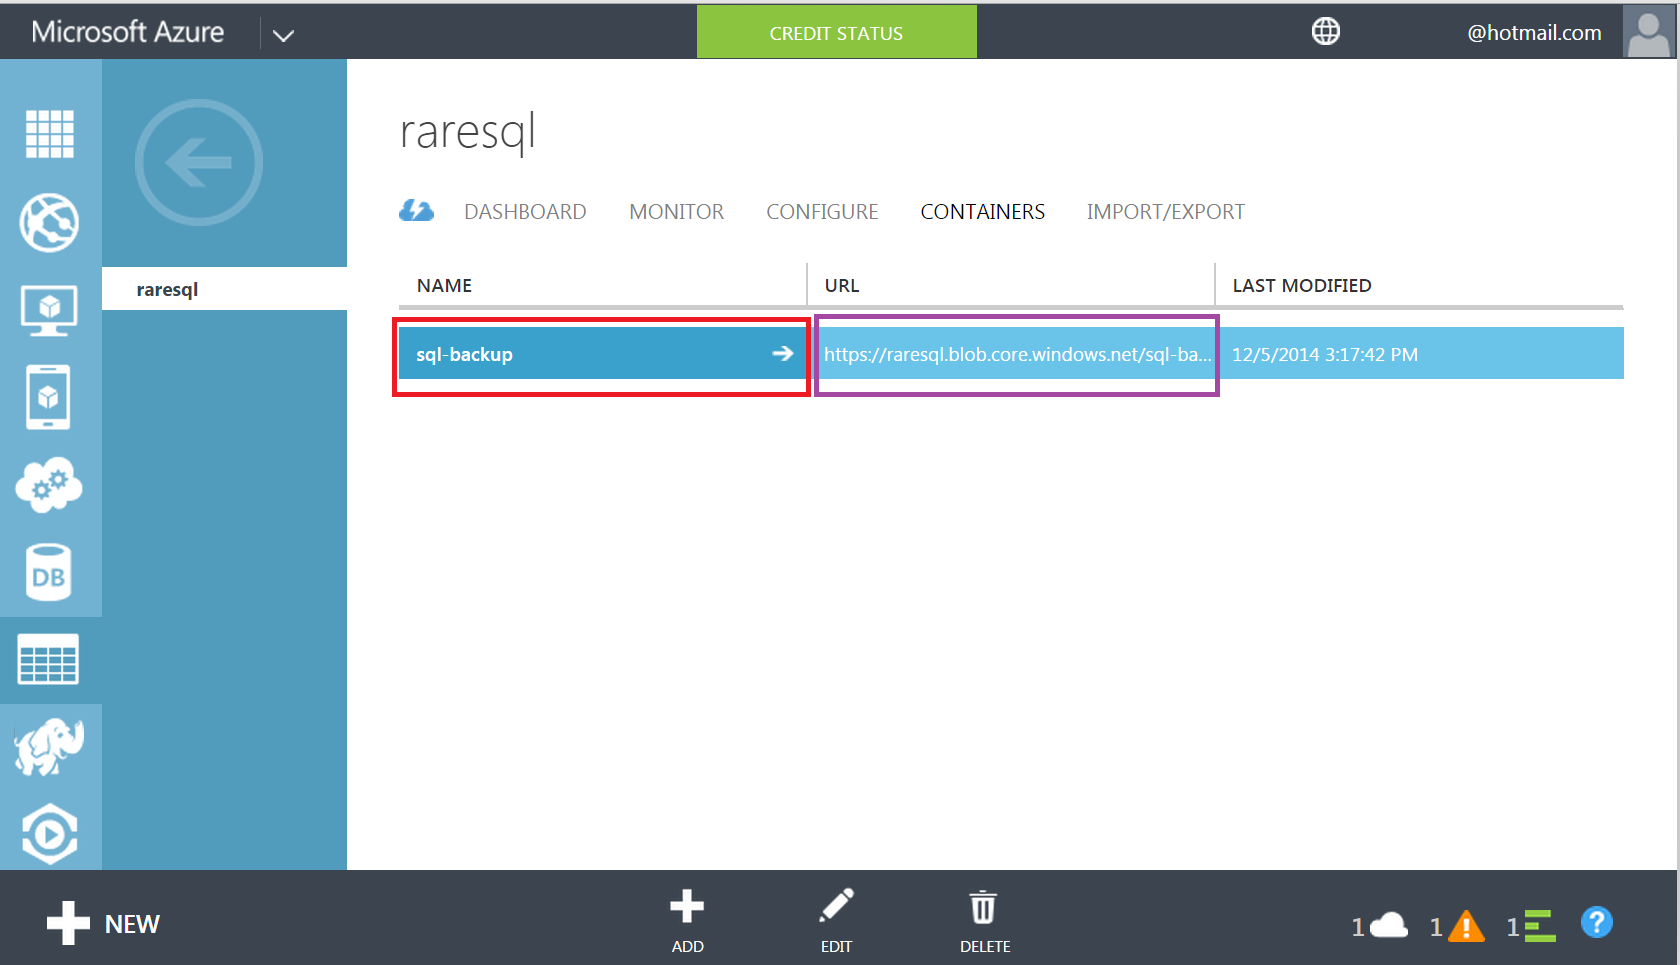
Azure Storage 1.7

Step 10 :
Once you click the tick, your container will be created as shown below. However, please make a note of your container name and its URL. This will help you to reference your container back.

Azure Storage 1.8

Let me know your comments if you face any problem during the creation of storage and container.

I came across this scenario many times when you need to find the largest tables in the database, specially at the time of maintenance or support. Fortunately we do have a solution in the shape of different scripts that you can easily find in many blogs and sites. In fact, I have written a solution earlier. In this article, I will discuss how to find the largest object without writing a single line of script.

Let me explain it step by step by step.

Step 1 :
First, open SQL Server Management Studio (SSMS) and select the target database (where you need to find the largest object) and right click on it as shown below.

Find largest table 01

Step 2 :
Once you right click on the target database you will see a lot of options. Select reports \ standard reports \ Disk Usage by Top Tables as shown below. There are other very useful reports that give you the statistical data about your SQL Server.

Find largest table 02

Step 3 :
Once you click on reports \ standard reports \ Disk Usage by Top Tables, SSMS will open a report showing which tables are using more Disk spaces, reserved space & having highest record counts etc as shown below.

Find largest table 03

Step 4 :
Now you have the report and by default it is sorted by Reserved (KB), but you can sort it with any column (# Records (Actually record count), Reserved(KB), Data(KB), Indexes(KB), Unused(KB)) by clicking on up and down sign as shown below.

Find largest table 04

The beauty of this feature (Standard reports) is that you can generate the statistical report within few seconds, just by click of a menu. In addition you can export / print this report in a nice format without any extra effort as shown below.

Note : Please do not forget to refresh this report before export or print ;).

Let me know if you tried this solution and how did you like it ?

Today I had a very informative session in SQL Server community meet up at Microsoft Office in Dubai, UAE. This usually occurs every last Tuesday of the month. I must appreciate the SQL Server User group (www.uaessug.com) who have been organizing it very well for the last one year. This meet up usually consists of two comprehensive and informative sessions that focus on the SQL Server latest technology, best practice, user experience, tips & tricks. I usually attend this meet up because I get an opportunity to network with SQL Server experts face to face instead of Facebook chat :). I was the speaker in today’s meet up along with Mr. Mohammed Owais (CTO at CAZAR).

Following topics were covered in today’s session:

  • UDFs are evil and other execution plan nightmares presented by Mr. Mohammed Owais
  • The easy path to compliance with SQL Server Audit presented by me

We focused on delivering the latest technology enhancements, best practices and troubleshooting (the scariest part) throughout the event and hands on with live demos to demonstrate the real world challenges and its solution.

I hope today’s session was informative and believe that everybody got to add something to their knowledge-village 🙂
Our next meetup will be in January 2015.

Some pictures from today’s sessions.

Mr. Mohammed Owais busy explaining UDFs execution plans :

IMG_9153

Me presenting SQL Server Auditing :

IMG_9156

Group discussions :

IMG_9152

IMG_9154

IMG_9155

IMG_9157

IMG_9158

Mr. Waqar discussing BI with Mr. Kevin :
IMG_9159

Thank you guys.

Recently, I was developing a report for one of my customers, who migrated their database from SQL Server 2005 to SQL Server 2012 Enterprise Edition. The database belongs to a legacy system , so I found couple of conversion issues, however the major issue I faced in developing the report was the date format. The required date format was Mon-yyyy and the data available in the table was in the format of yyyymm.

Before proceeding with the solution, let me create a sample to demonstrate the problem.

USE tempdb
GO
DROP TABLE tbl_Sample
GO
CREATE TABLE tbl_Sample
(
[ID] INT,
[Date] varchar(6)
)
GO
INSERT INTO tbl_Sample VALUES (1,'201401')
INSERT INTO tbl_Sample VALUES (2,'201402')
INSERT INTO tbl_Sample VALUES (3,'201403')
INSERT INTO tbl_Sample VALUES (4,'201404')
INSERT INTO tbl_Sample VALUES (5,'201405')
INSERT INTO tbl_Sample VALUES (6,'201406')
INSERT INTO tbl_Sample VALUES (7,'201407')
INSERT INTO tbl_Sample VALUES (8,'201408')
INSERT INTO tbl_Sample VALUES (9,'201409')
INSERT INTO tbl_Sample VALUES (10,'201410')
INSERT INTO tbl_Sample VALUES (11,'201411')
INSERT INTO tbl_Sample VALUES (12,'201412')
GO
SELECT * FROM tbl_Sample
GO

Convert YYYYmm 1.1

Solution 1 : Traditional Method
This is the old traditional method, which is compatible with SQL Server 2005 and above. In this method, you need to use many functions (LEFT, DATENAME, CONVERT, YEAR) to convert yyyymm date format to Mon-yyyy. Given below is the script.

USE tempdb
GO
SELECT
LEFT(DATENAME(MM,CONVERT(DATE,[Date]+'01')),3)
+ '-'
+ CONVERT(VARCHAR(4),YEAR(CONVERT(DATE,[Date]+'01'))) As [Mon-Year]
FROM tbl_Sample
GO

Convert YYYYmm 1.2

Solution 2 : New Method
This is the new method, which is compatible with SQL Server 2012 and above. In this script, I will use a newly shipped (in SQL Server 2012) function namely Format to reduce the line of script in order to convert yyyymm to Mon-yyyy. Given below is the script.

USE tempdb
GO
SELECT FORMAT(CONVERT(DATE,[Date]+'01'),'MMM-yyyy') As [Mon-Year]
FROM tbl_Sample
GO

Convert YYYYmm 1.2

Conversion of Select statement result set into Insert statement is a very frequent activity that a DBA/Developer needs to create, mostly when they need to migrate small amount of data from one instance to another or from one environment to another. I recently created one of my customer’s new branch database from other branches database and came across this scenario. Fortunately, we do have a solution since SQL Server 2005 but it was very complicated specially when you need to do it for the tables as they have numerous columns. The reason I am writing this solution is that you can do it in few clicks in SQL Server 2012 and above.
Before proceeding with the solution, I would like to create a sample to demonstrate the solution.

Sample :
Given below is a select statement in which I modified the result set to demonstrate.

USE [AdventureWorks2012]
GO
SELECT [DepartmentID]
,[Name] + ' Department' As [Name]
,[GroupName]
,Getdate() As [ModifiedDate]
FROM [HumanResources].[Department]
GO

Convert select.1.1

Given below are the two solutions, one of them is traditional solution and another one you can use it in SQL Server 2012 and above.

Solution 1 : Using String concatenation (Traditional Method)
In this solution, you need to concatenate the result set of the Select statement in order to convert into Insert statement (with some modifications in the data). You need to make sure that single quotes(‘) are in proper locations. In addition, if the data in the result set does not belong to string data type you must convert into string data type to concatenate. In case, the table is having identity column, you must pass the column name in the INSERT STATEMENT as well with SET IDENTITY_INSERT. The reason why I DO NOT recommend this solution is because if you have more number of columns in the table, it takes more time for the development and debug as well.

USE [AdventureWorks2012]
GO
SELECT
'INSERT INTO tbl_sample (
[DepartmentID],[Name],[GroupName],[ModifiedDate])
VALUES(' + CONVERT(VARCHAR(50),[DepartmentID])
+ ',''' + [Name] + ' Department'' ,'
+ ''''+ [GroupName] + ''','
+ ''''+ CONVERT(VARCHAR(50),GETDATE(),120) + ''')'
FROM [HumanResources].[Department]
GO

Convert select.1.2

Solution 2 : Using Generate Script (New Method)
This method is applicable to SQL Server 2012 and above and you will find it quite simple. Let me explain this method using two simple steps.

Step 1 :
First of all, you need to develop a select statement like I did it in the sample based on your requirements and INSERT INTO A TABLE as shown below.

USE [AdventureWorks2012]
GO
SELECT [DepartmentID]
,[Name] + ' Department' As [Name]
,[GroupName]
,Getdate() As [ModifiedDate]
INTO [tbl_Department_Sample]  -- Result set inserted in a table
FROM [HumanResources].[Department]
GO

Convert select.1.3

Step 2 :
Your select statement result set has been inserted into the table([tbl_Department_Sample]). Now, you just need to generate the script (data only) of the table ([tbl_Department_Sample]) using Generate Script feature in SQL Server 2012 and above.

Let me know if you come across these scenarios and their solutions.