Sometimes, we come across a situation where the transaction log file grows unexpectedly, and it needs to be managed properly. One of the options is to reduce the size of database transaction log by shrinking the database transaction log file. Please be careful while implementing this solution on production databases.
Let me create a sample and then expalin it step by step as shown below.
Sample:
CREATE DATABASE SampleDB;
GO

Use SampleDB
GO

CREATE TABLE [Customers]
(
 [CustomerID]         INT IDENTITY(1,1),
 [CustomerName]       VARCHAR(250),
 [RegistrationDate]   DATE,
 [EmailAddress]       VARCHAR(100),
 [Address]            VARCHAR(500),
 [PhoneNumber]        VARCHAR(100)
);
GO

--Lets's insert 3,000,000 records in customer table
INSERT INTO [Customers]
(CustomerName,RegistrationDate,EmailAddress,Address,PhoneNumber)
VALUES('John','01-13-2023','John@raresql.com','AB Street','0134018201');
GO 3000000
Step 1:
Let’s check the size of the database files as shown below.
Use SampleDB
GO

SELECT name           AS [DB File Name]
     , size           AS [Size in KBs]
     , size * 8/1024  AS [Size in MBs]
     , Max_Size       AS [Max Size]
FROM sys.master_files
WHERE DB_NAME(database_id) = 'SampleDB';
GO
Step 2:
Now, let’s take the full backup of the database by using the following query.
--Backup database
BACKUP DATABASE [SampleDB] TO  DISK = N'D:\SampleDB_Backup.bak';
GO
Step 3:
Let’s shrink database log file by using the following script.
Use SampleDB
GO

--Let's change recovery model to simple
ALTER DATABASE SampleDB
SET RECOVERY SIMPLE;
GO

--Let's shrink the database log file
DBCC SHRINKFILE (SampleDB_log, 1, TRUNCATEONLY);
GO

--Let's change recovery model to full
ALTER DATABASE SampleDB
SET RECOVERY FULL;
GO
Step 4:
Let’s check the database log file size again. As we can see below the database_log file size has been reduced.
Use SampleDB
GO

SELECT name           AS [DB File Name]
     , size           AS [Size in KBs]
     , size * 8/1024  AS [Size in MBs]
     , Max_Size       AS [Max Size]
FROM sys.master_files
WHERE DB_NAME(database_id) = 'SampleDB';
GO
Conclusion:
This is one of easiest ways to shrink the database transation log. Do let me know, which method you use and how effective it is.
All of us are familiar with Common Table Expression (CTE) because of its frequent use. We use it in our day-to-day operation quite frequently. Recently, I came across a case where I had to use CTE in a user defined function.
Let me create a sample user defined function (UDF) in Northwind database with the help of CTE to use in my demonstration as shown below.
USE Northwind
GO

CREATE FUNCTION [dbo].[udf_Most_Expensive_Product]
(
	@SupplierID INT
)
RETURNS NVARCHAR(50)
AS
BEGIN
	DECLARE @ProductName NVARCHAR(50)

	;WITH CTE AS
	(
		SELECT ROW_NUMBER() OVER (ORDER BY UnitPrice DESC) AS SNo
			 , ProductName
			 , UnitPrice FROM Products
		WHERE SupplierID = @SupplierID
	)

	SELECT
			@ProductName = ProductName
	FROM CTE
	WHERE SNo = 1

	RETURN @ProductName;
END

GO
Let me call the above created user defined function(UDF) and see the results.
USE Northwind
GO

SELECT [dbo].[udf_Most_Expensive_Product](2) AS [ProductName];
GO
--OUTPUT
Conclusion:
It is quite simple to use Common Table Expression (CTE) in user defined function (UDF).
In SQL Server 2022, an enhancement came in RTRIM() function, which was a long awaited functionality. This enhancement helps us to remove last character from the string. I have written an article about it in detail.
Recently, I was using RTRIM() function and came across an error as mentioned below.
Error:
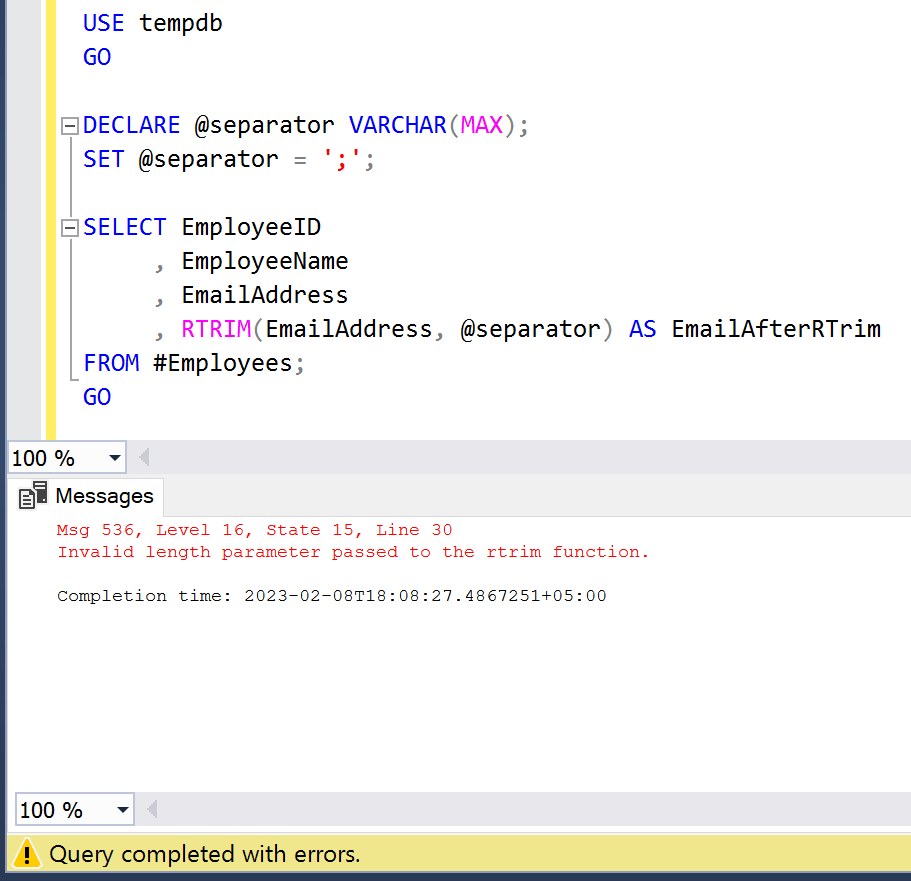
Invalid length parameter passed to the rtrim function.
Sample:
USE tempdb
GO

CREATE TABLE #Employees
(
 EmployeeID   INT IDENTITY(1,1),
 EmployeeName VARCHAR(250),
 EmailAddress VARCHAR(MAX)
);
GO

INSERT INTO #Employees
VALUES ('Alex','alex114@gmail.com;')
     , ('Sarina','sarina152@gmail.com;')
     , ('Sophia','sophiaa123@gmail.com;');
GO

SELECT * FROM #Employees;
GO
Example:
In the given below example, I have written a simple script using RTRIM() function and I declared separator as variable and kept its data type & length as VARCHAR(MAX). This script generates an error as shown below.
USE tempdb
GO

DECLARE @separator VARCHAR(MAX);
SET @separator = ';';

SELECT EmployeeID
	 , EmployeeName
	 , EmailAddress
	 , RTRIM(EmailAddress, @separator) AS EmailAfterRTrim
FROM #Employees;
GO
Solution:
The solution to this problem is that while declaring datatype and length of a separator variable, we should never use MAX as its length since it does not support. We should always give length in numbers as shown below.
USE tempdb
GO

DECLARE @separator VARCHAR(1);
SET @separator = ';';

SELECT EmployeeID
	 , EmployeeName
	 , EmailAddress
	 , RTRIM(EmailAddress, @separator) AS EmailAfterRTrim
FROM #Employees;
GO
Conclusion:
Whenever you use RTRIM() function by using a separator variable, you should always define the length of the variable. Please don’t use MAX as a length to avoid such error.
In SQL Server 2022, an enhancement came in LTRIM() function, which was a long awaited enhancement. This enhancement helps us to remove first character from the string. I have written an article about it in detail.
Recently, I was using LTRIM() function and came across an error as mentioned below.
Error:
Invalid length parameter passed to the ltrim function.
Sample:
USE tempdb
GO

CREATE TABLE #Employees
(
EmployeeID   INT IDENTITY(1,1),
EmployeeName VARCHAR(250),
EmailAddress VARCHAR(MAX)
);
GO

INSERT INTO #Employees
VALUES ('Alex','alex114@gmail.com;')
     , ('Sarina','sarina152@gmail.com;')
     , ('Sophia','sophiaa123@gmail.com;');
GO

SELECT * FROM #Employees;
GO
Example:
In the given below example, I have written a simple script using LTRIM() function and I declared separator as variable and kept its data type & length as VARCHAR(MAX). This script generates an error as shown below.
USE tempdb
GO

DECLARE @separator VARCHAR(MAX);
SET @separator = ';';

SELECT EmployeeID
	 , EmployeeName
	 , EmailAddress
	 , LTRIM(EmailAddress, @separator) AS EmailAfterLTrim
FROM #Employees;
GO
Solution:
The solution to this problem is that while declaring datatype and length of a separator variable, we should never use MAX as its length since it does not support. We should always give length in numbers as shown below.
USE tempdb
GO

DECLARE @separator VARCHAR(1);
SET @separator = ';';

SELECT EmployeeID
	 , EmployeeName
	 , EmailAddress
	 , LTRIM(EmailAddress, @separator) AS EmailAfterLTrim
FROM #Employees;
GO
Conclusion:
Whenever you use LTRIM() function by using a separator variable, you should always define the length of the variable. Please don’t use MAX as a length to avoid such error.
SQL Server 2022brought some exciting features which will help us in optimising the SQL scripts. IS [NOT] DISTINCT FROM is one of the new features. It helps us in code optimisation and reduce the code complexity.
Compatibility Level:
Your database compatibility level MUST be 160 or higher to use this new feature.
ALTER DATABASE tempdb SET COMPATIBILITY_LEVEL = 160
Sample:
USE tempdb
GO

CREATE TABLE [#Customer](
[CustomerID] INT IDENTITY(1,1),
[CustomerName] VARCHAR(100),
[PhoneNumber] VARCHAR(100),
[AlternatePhoneNumber] VARCHAR(100));
GO

INSERT INTO [#Customer]
      ([CustomerName],[PhoneNumber],[AlternatePhoneNumber])
VALUES
      ('Maria','+92-300074321','+92-300074321'),
      ('Trujillo',null,null),
      ('Antonio','+96-562108460',null),
      ('Thomas',null,'+96-0515552282'),
      ('Christina','+92-059675428','+92-05676753425');
GO

SELECT * FROM [#Customer];
GO
--OUTPUT
Example 1:
IS DISTINCT FROM
Old Approach:(Using Complex WHERE Clause)
Whenever we need to search some records having NULL, the search criteria will look like this.
USE tempdb
GO

SELECT [CustomerID]
     , [CustomerName]
     , [PhoneNumber]
     , [AlternatePhoneNumber]
FROM   [#Customer]
WHERE
     (([PhoneNumber] <> [AlternatePhoneNumber]
   OR  [PhoneNumber] IS NULL
   OR  [AlternatePhoneNumber] IS NULL)
   AND NOT ([PhoneNumber] IS NULL
   AND [AlternatePhoneNumber] IS NULL));
GO
--OUTPUT
New Approach:(Using IS DISTINCT FROM)
The complexity and length of where clause has been reduced by the new enhancement which comes with the name IS DISTINCT FROM which takes all unique records of two columns as well as return single null values and drop where both columns are null as shown below:
USE tempdb
GO

SELECT [CustomerID]
     , [CustomerName]
	 , [PhoneNumber]
	 , [AlternatePhoneNumber]
FROM   [#Customer]
WHERE  [PhoneNumber] IS DISTINCT FROM [AlternatePhoneNumber];
GO
--OUTPUT
Example 2:
IS NOT DISTINCT FROM
Old Approach:(Using Complex WHERE Clause)
In old methodology if we had to take same values from two columns and also where both columns have null values, then the query would be as shown below:
USE tempdb
GO

SELECT [CustomerID]
     , [CustomerName]
	 , [PhoneNumber]
	 , [AlternatePhoneNumber]
FROM   [#Customer]
WHERE
 (NOT ([PhoneNumber] <> [AlternatePhoneNumber]
  OR   [PhoneNumber] IS NULL
  OR   [AlternatePhoneNumber] IS NULL)
  OR  ([PhoneNumber] IS NULL
  AND  [AlternatePhoneNumber] IS NULL));
GO
--OUTPUT
New Approach:(Using IS NOT DISTINCT FROM)
In new Approach, the complexity has been reduced to just single clause named IS [NOT] DISTINCT FROM & rest all conditions are applied by default as shown in the picture below:
USE tempdb
GO

SELECT [CustomerID]
     , [CustomerName]
	 , [PhoneNumber]
	 , [AlternatePhoneNumber]
FROM   [#Customer]
WHERE  [PhoneNumber] IS NOT DISTINCT FROM [AlternatePhoneNumber];
GO
--OUTPUT
Example 3:
IS DISTINCT FROM
Old Approach:(Using Complex HAVING Clause)
In old methodology if we had to take unique values using HAVING Clause from two columns and also single null values and drop where both columns are null, then the query would be as shown below:
USE tempdb
GO

SELECT [CustomerID]
     , [CustomerName]
     , [PhoneNumber]
     , [AlternatePhoneNumber]
FROM   [#Customer]
GROUP BY
       [CustomerID]
     , [CustomerName]
     , [PhoneNumber]
     , [AlternatePhoneNumber]
HAVING
     (([PhoneNumber] <> [AlternatePhoneNumber]
   OR  [PhoneNumber] IS NULL
   OR  [AlternatePhoneNumber] IS NULL)
   AND NOT ([PhoneNumber] IS NULL
   AND [AlternatePhoneNumber] IS NULL));
GO
--OUTPUT
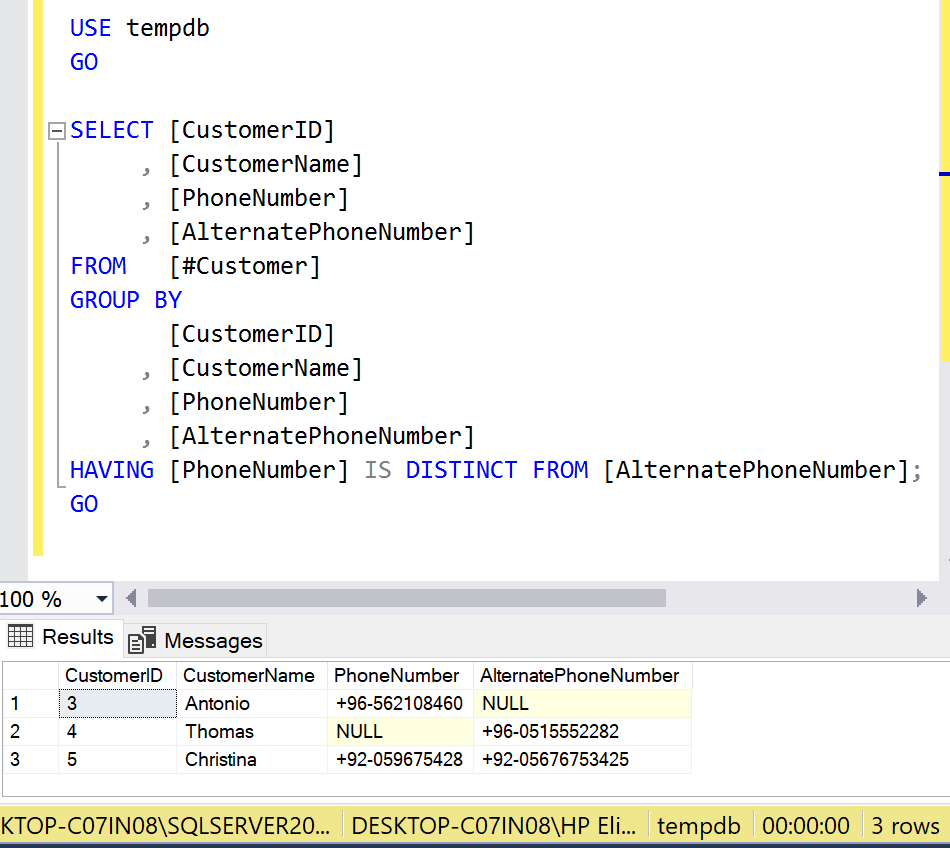
New Approach:(Using IS DISTINCT FROM)
The complexity is being reduced by New Approach where we need to write only one clause and rest is handled by itself as shown in the example below.
USE tempdb
GO

SELECT [CustomerID]
     , [CustomerName]
     , [PhoneNumber]
     , [AlternatePhoneNumber]
FROM   [#Customer]
GROUP BY
       [CustomerID]
     , [CustomerName]
     , [PhoneNumber]
     , [AlternatePhoneNumber]
HAVING
       [PhoneNumber] IS DISTINCT FROM [AlternatePhoneNumber];
GO
--OUTPUT
Example 4:
IS NOT DISTINCT FROM
Old Approach:(Using Complex HAVING Clause):
In old methodology if we had to take same values using HAVING from two columns and also where both columns have null values then the query would be as shown below.
USE tempdb
GO

SELECT [CustomerID]
     , [CustomerName]
     , [PhoneNumber]
     , [AlternatePhoneNumber]
FROM   [#Customer]
GROUP BY
       [CustomerID]
     , [CustomerName]
     , [PhoneNumber]
     , [AlternatePhoneNumber]
HAVING
(NOT  ([PhoneNumber]  [AlternatePhoneNumber]
 OR    [PhoneNumber] IS NULL
 OR    [AlternatePhoneNumber] IS NULL)
 OR   ([PhoneNumber] IS NULL
 AND   [AlternatePhoneNumber] IS NULL));
GO
--OUTPUT
New Approach:(Using IS NOT DISTINCT FROM)
The complexity is being reduced by New Approach where we need to write only one clause and rest is handled by itself as shown in the example below.
USE tempdb
GO

SELECT [CustomerID]
     , [CustomerName]
	 , [PhoneNumber]
	 , [AlternatePhoneNumber]
FROM   [#Customer]
GROUP BY
       [CustomerID]
     , [CustomerName]
	 , [PhoneNumber]
	 , [AlternatePhoneNumber]
HAVING [PhoneNumber] IS DISTINCT FROM [AlternatePhoneNumber];
GO
--OUTPUT
Conclusion:
The IS [NOT] DISTINCT Clause is a life saver where writing a query with multiple conditions just reduced to a single clause. It also reduces the complexity of the query. Do let me know if you used IS [NOT] DISTINCT Clause and found it useful.
In SQL Server 2022, a new enhancement was introduced in dynamic data masking known as Granular Permissions which was a long-awaited enhancement. This new enhancement gives us control to provide unmasking permission at lowest level (table’s column) which we could not achieve in the earlier version of SQL Server. In other words, we can give permissions to unmask columns, tables, schemas & databases to different users based on their accessibility levels.
Let me create a sample to demonstrate the functionality of Dynamic data masking granular permissions in which, I will create a Sample database, two schemas and each schema will have one table as shown below.
Sample:
--Create Sample Database
CREATE DATABASE SampleDB;
GO

USE SampleDB
GO

--Create HumanResources Schema
CREATE SCHEMA HumanResources;
GO

--Create Accounts Schema
CREATE SCHEMA Accounts;
GO

--Create Employee Table
CREATE TABLE HumanResources.Employee
(
 EmployeeID    INT IDENTITY(1,1) NOT NULL PRIMARY KEY,
 EmployeeName  VARCHAR(250),
 Birthdate     DATE MASKED WITH (FUNCTION = 'default()') NULL,
 Salary        DECIMAL(10,2) MASKED WITH (FUNCTION = 'default()') NULL
);
GO

--Create BankAccount Table
CREATE TABLE Accounts.BankAccount
(
 AccountID     INT IDENTITY(1,1) PRIMARY KEY,
 EmployeeID    INT NOT NULL,
 AccountTitle  VARCHAR(250) MASKED WITH (FUNCTION = 'default()') NULL,
 AccountNumber VARCHAR(250) MASKED WITH (FUNCTION = 'partial(3,"xxxxxxxxx", 4)') NULL
);
GO

--Insert few records into Employee Table
INSERT INTO Humanresources.Employee(EmployeeName,Birthdate,Salary)
VALUES ('Nancy','1988-12-08','200000'),
       ('Andrew','1994-07-16','120000'),
	   ('Janet','1994-07-16','75000');
GO

--Insert few records into BankAccount table
INSERT INTO Accounts.BankAccount(EmployeeID,AccountTitle,AccountNumber)
VALUES(1,'Nancy','9922-0105664197'),
      (2,'Andrew','0010-0107605278'),
	  (3,'Janet','4010-3568743987');
GO
Configuration:
Step 1:
Let’s create few users, which will be used to provide relevant permissions to unmask data as shown below.
USE SampleDB
GO

--Create User HRAdministrator
CREATE USER HRAdministrator WITHOUT LOGIN;
GO

--Create User PayrollAdministrator
CREATE USER PayrollAdministrator WITHOUT LOGIN;
GO

--Create User Accountant
CREATE USER Accountant WITHOUT LOGIN;
GO

--Create User HRManager
CREATE USER HRManager WITHOUT LOGIN;
GO
Step 2:
Let’s add the db_datareader role in each user created above.
USE SampleDB
GO

--Grant db_datareader role to HRAdministrator
ALTER ROLE db_datareader ADD MEMBER HRAdministrator;
GO

--Grant db_datareader role to PayrollAdministrator
ALTER ROLE db_datareader ADD MEMBER PayrollAdministrator ;
GO

--Grant db_datareader role to Accountant
ALTER ROLE db_datareader ADD MEMBER Accountant;
GO

--Grant db_datareader role to HRManager
ALTER ROLE db_datareader ADD MEMBER HRManager;
GO
Step 3:
Let’s provide UNMASK permissions to above created users. The details of the access are as shown below:
HRAdministrator: can view Birthdate column Data only in Employee table.
PayrollAdministrator: can view Salary column Data only in Employee table .
Accountant : can view the entire tables data in Account schema only.
HRManager : can view the entire data in the SampleDB database.
USE SampleDB
GO

--Grant Birthday column unmask permission to HRAdministrator;
GRANT UNMASK ON Humanresources.Employee(Birthdate) TO HRAdministrator;
GO

--Grant salary column unmask permission to PayrollAdministrator
GRANT UNMASK ON Humanresources.Employee(Salary) TO PayrollAdministrator;
GO

--Grant Accounts schema unmask permission to Accountant
GRANT UNMASK ON SCHEMA::Accounts TO Accountant;
GO

--Grant entire database unmask permission to HRManager
GRANT UNMASK TO HRManager;
GO
Testing:
HRAdministrator
Let’s access the Employee table under the context of HRAdministrator user.
USE SampleDB
GO

EXECUTE AS USER='HRAdministrator';
SELECT EmployeeID
     , EmployeeName
	 , Birthdate
	 , Salary
FROM   Humanresources.Employee;
REVERT;
GO
--OUTPUT
As we can see above, the HRAdministrator can view the Birthdate column data in Employee table but cannot view Salary column data in Employee table.
Let’s access the BankAccount table under the context of HRAdministrator user.
USE SampleDB
GO

EXECUTE AS USER='HRAdministrator';
SELECT EmployeeID
     , AccountTitle
	 , AccountNumber
FROM   Accounts.BankAccount;
REVERT;
GO
--OUTPUT
As we can see above, the HRAdministrator can’t view the data of BankAccount Table since unmask permission is not given.
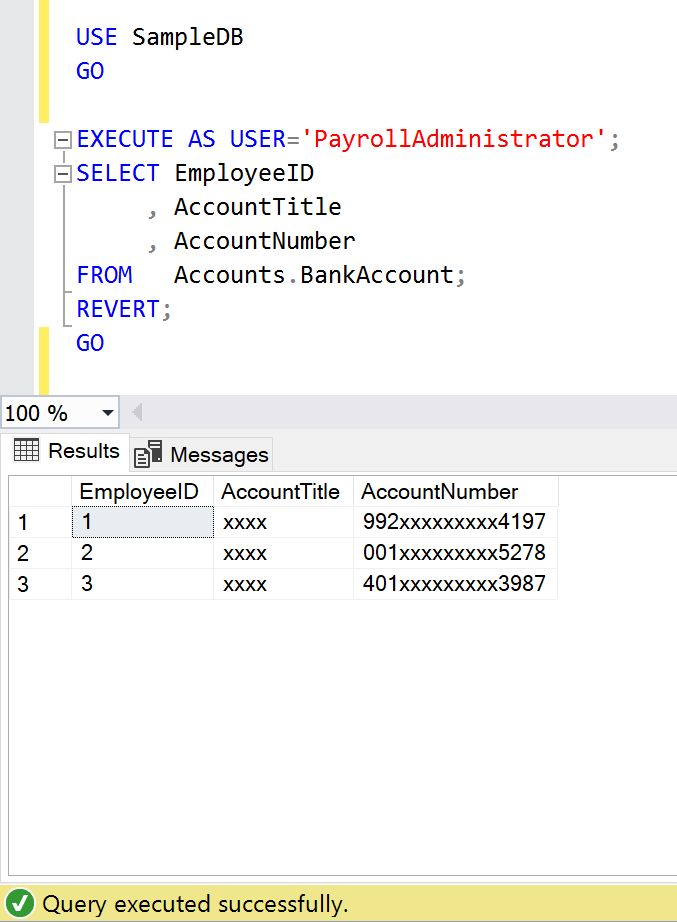
PayrollAdministrator
Let’s access Employee table under the context of PayrollAdministrator user.
USE SampleDB
GO

EXECUTE AS USER='PayrollAdministrator';
SELECT EmployeeID
     , EmployeeName
	 , Birthdate
	 , Salary
FROM   Humanresources.Employee;
REVERT;
GO
--OUTPUT
As we can see above, the PayrollAdministrator can view the Salary column data in Employee table but cannot view Birthdate column data in Employee table.
Let’s access the BankAccount table under the context of PayrollAdministrator user.
USE SampleDB
GO

EXECUTE AS USER='PayrollAdministrator';
SELECT EmployeeID
     , AccountTitle
	 , AccountNumber
FROM   Accounts.BankAccount;
REVERT;
GO
--OUTPUT
As we can see above, the PayrollAdministrator can’t view the data of BankAccount Table since unmask permission is not given.
Let’s access the Employee table under the context of Accountant user.
USE SampleDB
GO

EXECUTE AS USER='Accountant';
SELECT EmployeeID
     , EmployeeName
	 , Birthdate
	 , Salary
FROM   Humanresources.Employee;
REVERT;
GO
--OUTPUT
As we can see above, the Accountant cannot view the Salary, Birthdate column data in Employee table since unmask permission is not given.
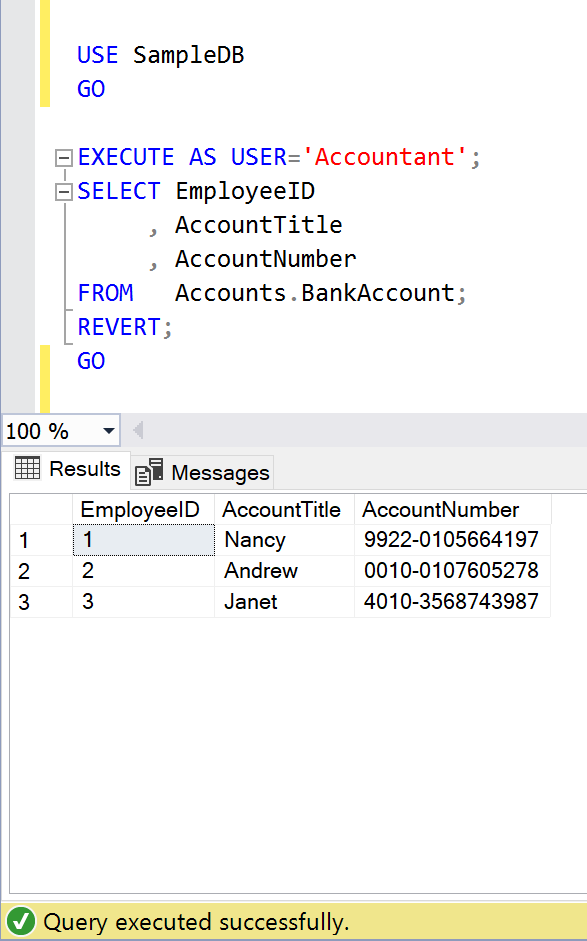
Let’s access the BankAccount table which is in Accounts schema under the context of Accountant user.
USE SampleDB
GO

EXECUTE AS USER='Accountant';
SELECT EmployeeID
     , AccountTitle
	 , AccountNumber
FROM   Accounts.BankAccount;
REVERT;
GO
--OUTPUT
As we can see above, the Accountant can view the data of BankAccount Table.
Let’s access the Employee table which is in HumanResources schema under the context of HRManager user.
USE SampleDB
GO

EXECUTE AS USER='HRManager';
SELECT EmployeeID
     , EmployeeName
	 , Birthdate
	 , Salary
FROM   Humanresources.Employee;
REVERT;
GO
--OUTPUT
As we can see above, the HRManager can view the data of Employee Table.
Let’s access the BankAccount table which is in Accounts schema under the context of HRManager user.
USE SampleDB
GO

EXECUTE AS USER='HRManager';
SELECT EmployeeID
     , AccountTitle
	 , AccountNumber
FROM   Accounts.BankAccount;
REVERT;
GO
--OUTPUT
As we can see above, the HRManager can view the data of BankAccount Table.
Conclusion:
Granular Permission in dynamic data masking is a very handy enhancement, it gives us the control to unmask column, table, schema, database data to different users. Do let me know if you use it and found it helpful.
From the beginning of SQL Server, we used to filter data from any table with the help of WHERE Clause. Can we filter data withoutWHERE clause? The answer was a Big NO before Azure Data Studio but it is possible in Azure Data Studio. Curious?
Let me demostrate it with the help of examples.
Example 1: (Filter single column data)
Using SQL Server Management Studio (SSMS):
In SSMS, we use WHERE clause in order to filter the data as shown below.
USE AdventureWorks2019
GO

SELECT  BusinessEntityID
      , FirstName
	  , LastName
      , ModifiedDate
FROM    Person.Person
WHERE   FirstName = 'Abraham';
GO
--OUTPUT
Using Azure Data Studio:
Step 1:
First of all, you need to write a query without WHERE clause and run it. After that just click on show filter button as highlighted below and it opens up the filter window.
Step 2:
In this step, you just need to select the respective value, which you want to filter. Since I selected FirstName as “Abraham” and pressed ok, it will show all employees having “Abraham” as first name as shown below.
Example 2: (Filter using wildcard techniques)
Using SQL Server Management Studio(SSMS):
In SSMS, we use WHERE clause in order to filter the data as shown below.
USE AdventureWorks2019
GO

SELECT EmailAddressID
     , EmailAddress
     , ModifiedDate
FROM   Person.EmailAddress
WHERE  EmailAddress LIKE 'Kendra0%' OR EmailAddress LIKE 'kendall0%';
GO

--OUTPUT
Using Azure Data Studio:
Step 1:
First of all, you need to write a query without WHERE clause and run it. After that, you just need to click on show filter button as highlighted below and it opens up the filter window.
Step 2:
In this step, you just need to select the respective value which you want to filter. Since I selected EmailAddress “kendra0% ” or “kendall0%” and pressed ok, it will show all EmailAddresses having “kendra0% ” or “kendall0%” as EmailAddress as shown below.
Conclusion:
I use Azure Data Studio for filtering the data and found it quite helpful and hassle free. Do let me know if you use it.
Policy Based Management (PBM) is one of the greatest features shipped with SQL Server 2008. It made DBA’s life easier when it comes to implementation, compliance as well as changing any database/ server properties, especially when you need to implement /check some database / server settings across the databases/ servers. Recently, we have implemented Delayed durability database setting to Forced in one of our clients’ databases using Policy Based Management across the databases. Delayed durability is actually one of the best features shipped with SQL Server 2014. What made it best actually is its handling vs performance. You can just enable with a single statement and you get a huge performance boast.
Note: Delayed durability is disabled by default.
In this article, I will show you step by step, how to implement any database / server settings across the databases / servers using few clicks with the help of Policy Based Management.
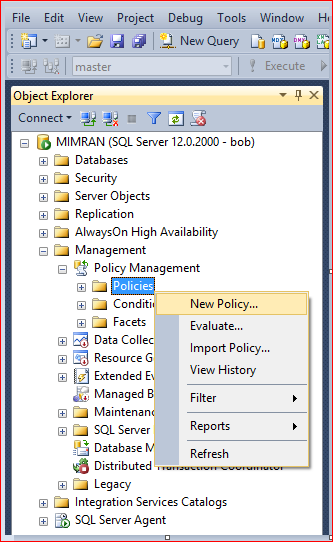
Step 1:
Open SQL Server Management Studio (SSMS) and Select Management >>Policy Management >>Conditions and right click on it to Select New Condition… as shown below.
Step 2:
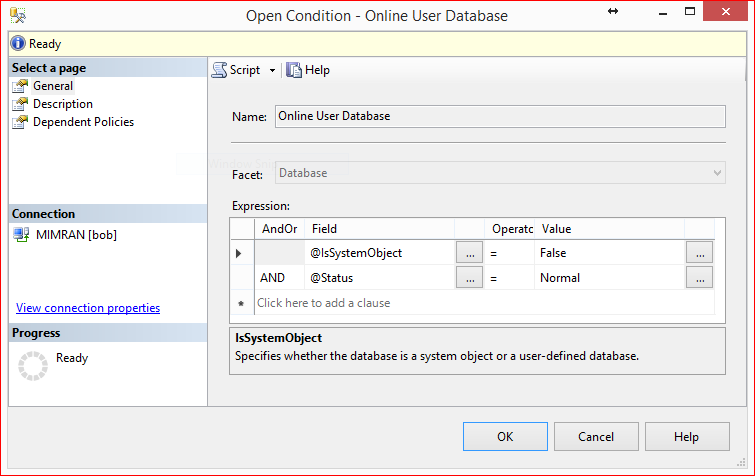
Now, we are in condition building screen, so lets build the 1st condition and that is to check delayed durability in all user databases which is online ONLY. Given below is the configuration. Do not forget to give a proper name to this condition.
Step 3:
Lets repeat Step 1 and open the condition creation screen. This time we will create the condition to check database setting which is delayed durability=FORCED. Given below is the configuration.
Step 4:
Now we are done with the conditions, so the next step is to build the Policy. In order to build the policy you need to Select Management>>Policy Management >> Policies and right click on it to select New Policy… as shown below.
Step 5:
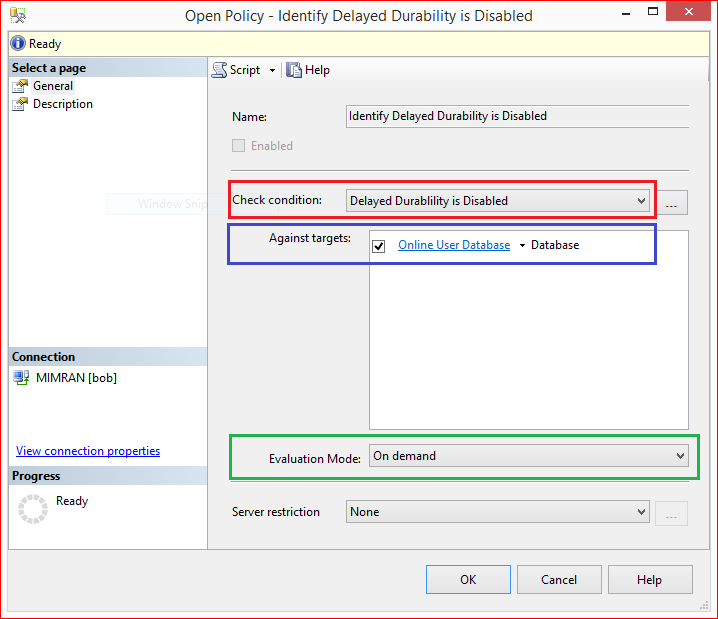
Now, we are in policy creation screen, here we need to give a proper Policy Name and then select the conditions created in Step 2 and Step 3 shown below in red and blue color border respectively. In other words, we are trying to make policy which checks the delayed durability is forced or NOT in all user databases which is online.
Usually I choose the Evaluation Mode to “On Demand” showing above because it is the easiest way to evaluate and fix any discrepancy across the databases / servers, however, you can select On Schedule as well and Press OK.
Step 6:
Now, the policy has been created and you can see it under policies as shown below. Just right click on and select Evaluate to evaluate the policy as shown below.
Step 7:
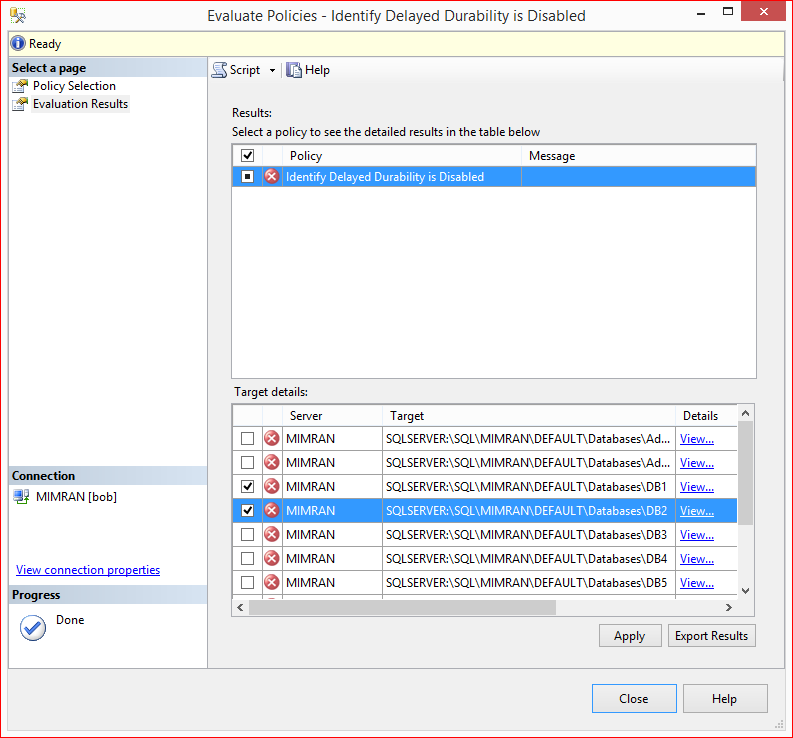
You are in evaluation screen and you can see all the user databases shows in red color because none of them is having database settings to delayed durability= force.
Step 8:
Lets click on View Details to see the difference in database settings as shown below. You can see that Policy is expecting the Delayed durability = force but the actual value is disabled.
Step 9:
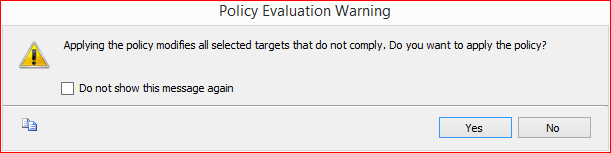
Lets select the databases where you want to change the database settings of delayed durability to FORCE and press Apply button. It gives the given below messages. Press YES button.
Step 10:
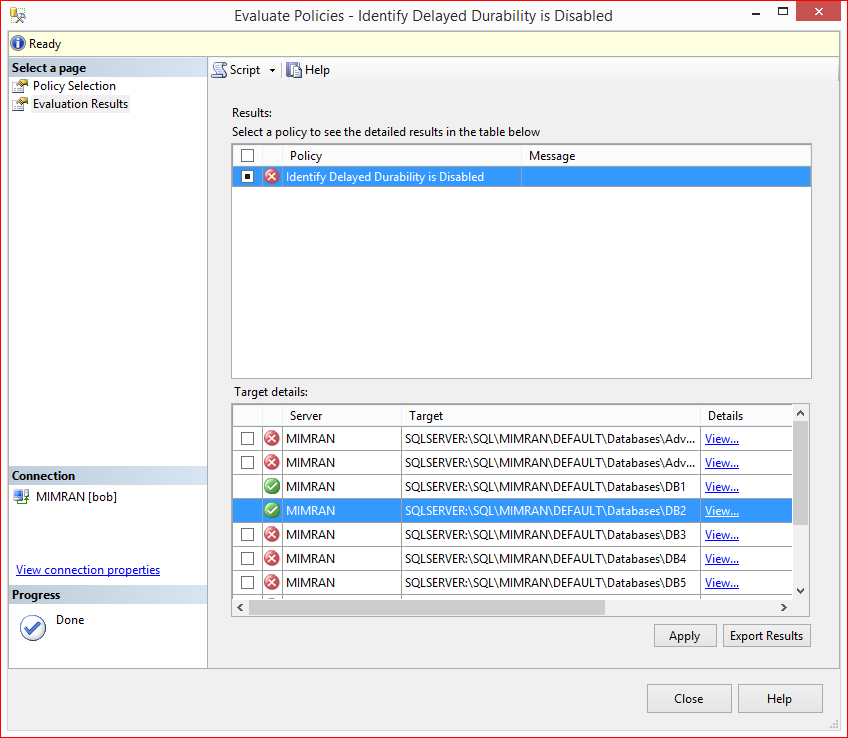
Once the policy has been implemented, policy based management will automatically evaluate the policy again and shows as green color icon as shown below.
Let me know if you have implemented any databases / servers settings using Policy Based Management.
In SQL Server 2022, a new column namely last_valid_restore_time has been added to the table backupset as a part of the enhancements. It contains the information regarding the last valid restore time, and it became very handy when something happens to your database and you need to restore data from the backup and you want to know the exact last valid restore time. Actually, it is the time when you post your last transaction in your database before taking backup. By the way, last transaction can be way before you take your backup.
One important point is that it shows the last_valid_restore_time in Transaction Log Backup ONLY. In Full Backup & differential back, it returns NULL value and which makes sense.
Let me create a sample database, a table and insert a record to demonstrate the behaviour of last_valid_restore_time as shown below.
Sample:
USE master
GO
CREATE DATABASE TESTDB;
GO
USE TESTDB
GO
CREATE TABLE Customers
(
CustomerID INT IDENTITY,
CustomerName VARCHAR(100),
CreatedAt DATETIME,
ModifiedAt DATETIME
);
GO
INSERT INTO Customers(CustomerName, CreatedAt)
VALUES('Customer-1', GETDATE());
GO
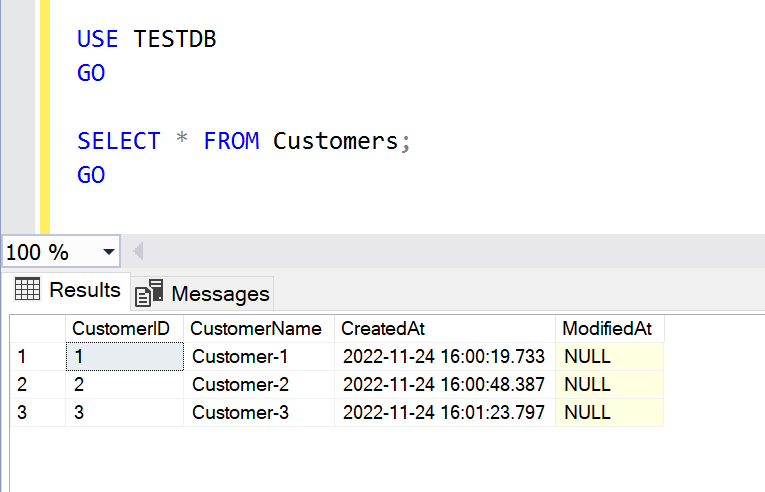
SELECT * FROM Customers;
GO
--OUTPUT
Step 1: Full Backup
In this step, we will take full backup of the database.
--Taking full backup
BACKUP DATABASE TESTDB
TO DISK ='D:\Backup\TESTDBfullbackup.BAK';
GO
--OUTPUT
Step 2: Differential Backup
In this step, first we will insert a new record then will take differential backup.
USE TESTDB
GO

INSERT INTO Customers(CustomerName, CreatedAt)
VALUES('Customer-2', GETDATE());
GO

--Taking differential backup
BACKUP DATABASE TESTDB
TO DISK ='D:\Backup\TESTDBdifferentialbackup.BAK'
WITH DIFFERENTIAL;
GO

SELECT * FROM Customers;
GO
--OUTPUT
Step 3: Log backup
In this step, we will insert and update few records and then take log backup.
USE TESTDB
GO

INSERT INTO Customers(CustomerName, CreatedAt)
VALUES('Customer-3', GETDATE());
GO

UPDATE Customers
SET    CustomerName = 'Customer22'
     , ModifiedAt   =  GETDATE()
FROM   Customers
WHERE  CustomerID = 2;
GO

--Taking log backup
BACKUP LOG TESTDB
TO DISK ='D:\Backup\TESTDBlogbackup1.TRN' ;
GO

SELECT * FROM Customers;
GO
--OUTPUT
Step 4: Last Valid Restore Time
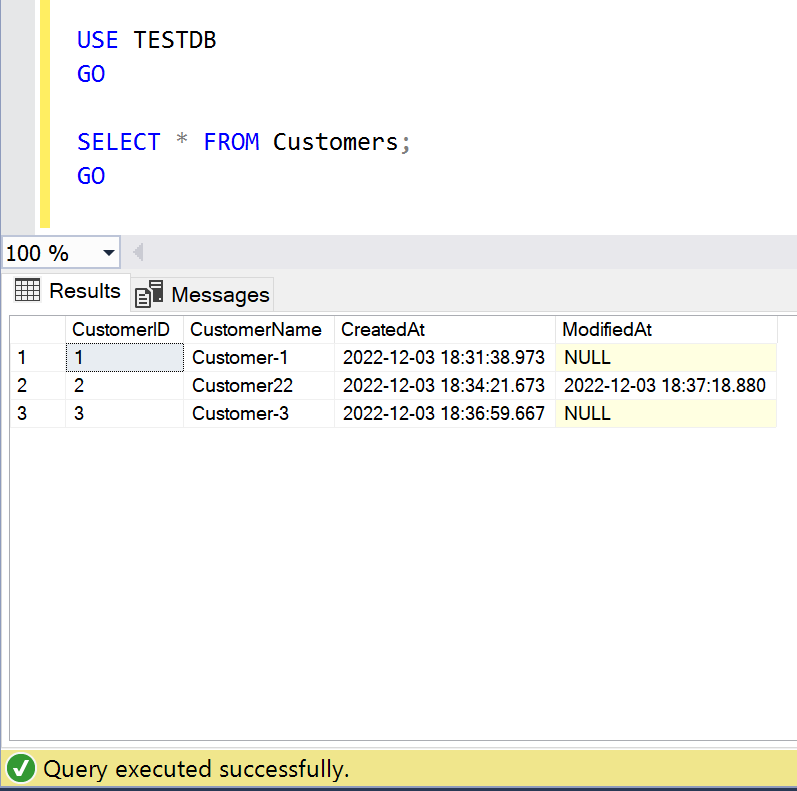
Now, we have successfully created the sample along with backups. Let me run the query and add this new column namely last_valid_restore_time as shown below. As we can see, the last_valid_restore_time & the last record modified date & time is same which is 2022-12-03 18:37:18.
SELECT bs.database_name, backuptype = CASE
        WHEN bs.type = 'D' AND bs.is_copy_only = 0 THEN 'Full Database'
        WHEN bs.type = 'D' AND bs.is_copy_only = 1 THEN 'Full Copy-Only Database'
        WHEN bs.type = 'I' THEN 'Differential database backup'
        WHEN bs.type = 'L' THEN 'Transaction Log'
        WHEN bs.type = 'F' THEN 'File or filegroup'
        WHEN bs.type = 'G' THEN 'Differential file'
        WHEN bs.type = 'P' THEN 'Partial'
        WHEN bs.type = 'Q' THEN 'Differential partial'
        when bs.type = 'i' THEN 'last valid restore value' END + ' Backup',
    CASE bf.device_type
        WHEN 2 THEN 'Disk' WHEN 5 THEN 'Tape' WHEN 7 THEN 'Virtual device'
        WHEN 9 THEN 'Azure Storage' WHEN 105 THEN 'A permanent backup device'
        ELSE 'Other Device' END AS DeviceType,
    bms.software_name AS backup_software,
    /**New column addition in SQL Server 2022**/
    bs.last_valid_restore_time,
    /**************************************/
    BackupStartDate = bs.Backup_Start_Date,
    BackupFinishDate = bs.Backup_Finish_Date,
    LatestBackupLocation = bf.physical_device_name,
    backup_size_mb = CONVERT(DECIMAL(10, 2), bs.backup_size / 1024. / 1024.),
    compressed_backup_size_mb = CONVERT(DECIMAL(10, 2), bs.compressed_backup_size / 1024. / 1024.),
    database_backup_lsn, -- For tlog and differential backups, this is the checkpoint_lsn of the FULL backup it is based on.
    checkpoint_lsn,
    begins_log_chain,
    bms.is_password_protected
FROM msdb.dbo.backupset bs
LEFT JOIN msdb.dbo.backupmediafamily bf
    ON bs.[media_set_id] = bf.[media_set_id]
INNER JOIN msdb.dbo.backupmediaset bms
    ON bs.[media_set_id] = bms.[media_set_id]
WHERE bs.backup_start_date > DATEADD(MONTH, - 2, sysdatetime()) --only look at last two months
ORDER BY bs.database_name ASC,
    bs.Backup_Start_Date DESC;
--OUTPUT
Step 5: Restore
Now, in order to get data before the execution of update statement, we are going to check the last_valid_restore_time and restore the database before the last_valid_restore_time which will return the data before update of the table as shown below.
USE [master]
RESTORE DATABASE [TESTDB]
FROM  DISK = N'D:\Backup\TESTDBfullbackup.BAK'
WITH  FILE = 1,  NORECOVERY,  NOUNLOAD,  REPLACE,  STATS = 5
RESTORE DATABASE [TESTDB]
FROM  DISK = N'D:\Backup\TESTDBdifferentialbackup.BAK'
WITH  FILE = 1,  NORECOVERY,  NOUNLOAD,  STATS = 5
RESTORE LOG [TESTDB]
FROM  DISK = N'D:\Backup\TESTDBlogbackup1.TRN'
WITH  FILE = 1,  NOUNLOAD,  STATS = 5,  STOPAT = N'2022-12-03T18:37:15'
GO

--OUTPUT
Conclusion:
Last_valid_restore_time is very handy information when we want to know the last transaction date in the specified backup & would like to restore based on specific time. Do let me know, how were you tracking this time in earlier version of SQL Server 2022.
Taking backup is the core responsibility of Database Administrator, either he takes the backup manually or he automates it but it does not matter. What actually matters is the database size because if it is very big then obviously it will take too much time in taking backup & occupy lots of disk space as well.
In this article, we are going to discuss one of the compression algorithms namely QAT_DEFLATE, which compresses backup size & reduce backup time drastically. We can use this compression algorithm for any types of database backup which are Full, Differential & Log backup. This algorithm will take less disk space and will reduce the backup time as well.
Let me demonstrate, how to implement this algorithm step by step.
Step 1:
Let’s check the database file size by using sys.database_files and as you can see the database size is ~10 GB.
USE SampleDB;
GO

SELECT DB_NAME()  AS DatabaseName
     , name       AS FileName
	 , size/128.0 AS CurrentSizeInMBs
FROM sys.database_files;
GO
Step 2:
Let’s take full backup of SampleDB to see how much disk space & time it takes:
BACKUP DATABASE [SampleDB]
TO  DISK = 'D:\Backup\FullBackupSampleDB.BAK';
GO
Step 3:
Let’s check the backup details especially the backup size and time. As we can see below, it took ~50 seconds to take Full backup and a disk space of ~10 GB
SELECT bs.database_name,
    backuptype = CASE
        WHEN bs.type = 'D' AND bs.is_copy_only = 0 THEN 'Full Database'
        WHEN bs.type = 'D' AND bs.is_copy_only = 1 THEN 'Full Copy-Only Database'
        WHEN bs.type = 'I' THEN 'Differential database backup'
        WHEN bs.type = 'L' THEN 'Transaction Log'
        WHEN bs.type = 'F' THEN 'File or filegroup'
        WHEN bs.type = 'G' THEN 'Differential file'
        WHEN bs.type = 'P' THEN 'Partial'
        WHEN bs.type = 'Q' THEN 'Differential partial'
        END + ' Backup',
	BS.compression_algorithm,
    backup_size_mb = CONVERT(DECIMAL(10, 2), bs.backup_size / 1024. / 1024.),
    compressed_backup_size_mb = CONVERT(DECIMAL(10, 2), bs.compressed_backup_size / 1024. / 1024.),
	bs.backup_start_date ,
	bs.backup_finish_date,
	DATEDIFF(second, backup_start_date, backup_finish_date) AS time_in_seconds
FROM msdb.dbo.backupset bs
LEFT JOIN msdb.dbo.backupmediafamily bf
    ON bs.[media_set_id] = bf.[media_set_id]
INNER JOIN msdb.dbo.backupmediaset bms
    ON bs.[media_set_id] = bms.[media_set_id]
WHERE bs.backup_start_date > DATEADD(MONTH, - 2, sysdatetime()) --only look at last two months
ORDER BY bs.database_name ASC,
    bs.Backup_Start_Date DESC;
Step 4:
We MUSTinstall the Intel® QuickAssist Technology Driver in order to use QAT_DEFLATE algorithm. Recently I have written an article on Intel® QuickAssist Technology Driver installation that can be accessed from here.
Step 5:
Let’s configure QAT_DEFLATE compression algorithm as a default in SQL Server as shown below.
EXEC sp_configure 'backup compression algorithm', 2;
RECONFIGURE;
GO
Step 6:
Let’s check the configuration of backup compression by using sys.configuration. As we can see below, the value is 2 which means QAT_DEFLATE is successfully setup.
SELECT configuration_id
     , name
     , description
     , value
FROM sys.configurations
WHERE name = 'backup compression algorithm' ;
GO
Step 7:
let’s configure the hardware_offloadoption which is also mandatory for QAT_DEFLATE algorithm as shown below.
EXEC sp_configure 'show advanced options', 1;
GO

RECONFIGURE
GO

EXEC sp_configure 'hardware offload enabled', 1;
GO

RECONFIGURE
GO

ALTER SERVER CONFIGURATION SET HARDWARE_OFFLOAD = ON(ACCELERATOR = QAT);
GO
Step 8:
Please make SURE to RESTART the SQL Server in this step.
Step 9:
Let’s take the full backup of our database with compression but since we setup the default compression algorithm as QAT_DEFLATE in earlier step then by default it takes full back with QAT_DEFLATE backup compression algorithm, so NO need to write the name of the backup compression algorithm in the script as shown below.
BACKUP DATABASE [SampleDB]
TO  DISK = 'D:\BackupFullBackupSampleDBWithCompression.BAK'
WITH COMPRESSION;
GO
Step 10:
Once the backup is taken, let’s check the backup details by using given below query. As we can see below, the backup compression algorithm is QAT_DEFLATE, the backup compression size is ~1.3 GB & it took 24 seconds to take back up. It is almost reducing the size by ~87% and time by ~52% as compared to original backup and which is a big achievement.
SELECT bs.database_name,
    backuptype = CASE
        WHEN bs.type = 'D' AND bs.is_copy_only = 0 THEN 'Full Database'
        WHEN bs.type = 'D' AND bs.is_copy_only = 1 THEN 'Full Copy-Only Database'
        WHEN bs.type = 'I' THEN 'Differential database backup'
        WHEN bs.type = 'L' THEN 'Transaction Log'
        WHEN bs.type = 'F' THEN 'File or filegroup'
        WHEN bs.type = 'G' THEN 'Differential file'
        WHEN bs.type = 'P' THEN 'Partial'
        WHEN bs.type = 'Q' THEN 'Differential partial'
        END + ' Backup',
    CASE bf.device_type
        WHEN 2 THEN 'Disk'
        WHEN 5 THEN 'Tape'
        WHEN 7 THEN 'Virtual device'
        WHEN 9 THEN 'Azure Storage'
        WHEN 105 THEN 'A permanent backup device'
        ELSE 'Other Device'
        END AS DeviceType,

	BS.compression_algorithm,
    backup_size_mb = CONVERT(DECIMAL(10, 2), bs.backup_size / 1024. / 1024.),
    compressed_backup_size_mb = CONVERT(DECIMAL(10, 2), bs.compressed_backup_size / 1024. / 1024.),
	bs.backup_start_date ,
	bs.backup_finish_date
FROM msdb.dbo.backupset bs
LEFT JOIN msdb.dbo.backupmediafamily bf
    ON bs.[media_set_id] = bf.[media_set_id]
INNER JOIN msdb.dbo.backupmediaset bms
    ON bs.[media_set_id] = bms.[media_set_id]
WHERE bs.backup_start_date > DATEADD(MONTH, - 2, sysdatetime()) --only look at last two months
ORDER BY bs.database_name ASC,
    bs.Backup_Start_Date DESC;
Conclusion:
I used QAT_DEFLATE backup compression algorithm & its results are quite good. Do let me know, which backup compression algorithm are you using and what is the outcome.
This blog/website is a personal blog/website and all articles, postings and opinions contained herein are my own. The contents of this blog/website are not intended to defame, purge or humiliate anyone should they decide to act upon or reuse any information provided by me. Comments left by any independent reader are the sole responsibility of that person. Should you identify any content that is harmful, malicious, sensitive or unnecessary, please contact me via email (imran@raresql.com) so I may rectify the problem.